How Do Solar Panels Work?
By Finn Peacock, Chartered Electrical Engineer, Fact Checked By Ronald Brakels
Last Updated: 12th Nov 2026
Solar panels change sunlight into electricity. While the process can be a bit complex, we’ll keep things simple. First, we’ll trace how power travels from your roof to your kettle. Next, we’ll look inside a panel to see how it makes electricity on your roof each day.
On this page:
- How Solar Power Gets From the Sun to Your Home
- Going Deeper: How a Solar Panel Is Built and Wired
- How a Solar Panel Turns Sunlight Into Electricity
- What’s Inside a Solar Panel
- How Shading Can Cost You Power
- Bypass Diodes: How Panels Work Around Shade
- How Today’s Panels Differ From Older Ones
- Constructing a Solar Panel
- Connecting Solar Panels Together in a Solar Array
- What to Do Next
How Solar Power Gets From the Sun to Your Home
Solar power moves through these steps from your roof to the grid. A battery is optional and not included in this diagram, but that’s an extra step too. Here’s what happens at each stage.
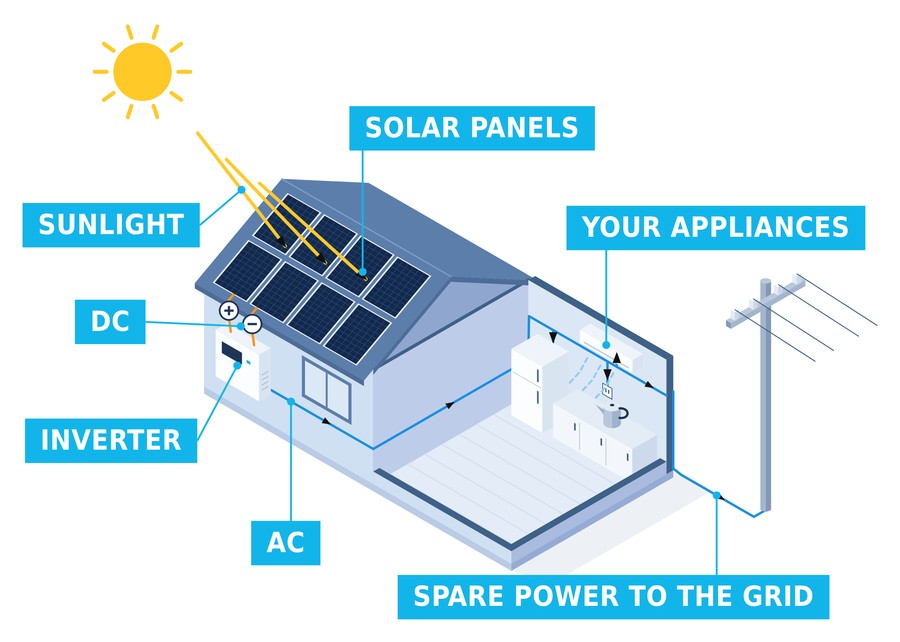
Solar panels turn sunlight into direct current (DC) electricity. The inverter changes it to alternating current (AC) for your appliances, and any solar your home doesn’t need can be exported to the grid. Simplified power-flow illustration; not a wiring diagram.
Solar Panels Make DC Electricity
Your panels produce electricity whenever light shines on them. For now, just keep in mind that there are two types of electricity involved: alternating current (AC) and direct current (DC).
Each panel has rows of solar cells, and each cell turns light into DC electricity through the photovoltaic effect. We explain how that works further down the page.
How much power your solar panels make depends on three things:
- how strong the sunlight is
- which way the panels face
- how much shade falls on them.
Panels also lose a little output on very hot days.
Clouds slow panels down, but they don’t stop them from producing power. Panels keep working in the diffused light that gets through. Normal clouds cut output by 50-80%, but dark storm clouds can reduce it over 90%. At night, of course, they produce nothing.
To see how much your system makes through the year where you live, try our solar calculator.
The Inverter Converts It to AC
Your appliances and the grid both run on AC electricity, so the DC from your panels needs to change. That’s the job of the inverter.
Cables carry the DC power from your roof to the inverter, which usually hangs on a wall near your switchboard. The inverter turns it into 240 V AC, the same electricity that comes out of your power points.
Your Switchboard Sends It Throughout Your Home
After leaving the inverter, solar power goes into your switchboard. This is the spot where your solar system, the grid, and your home’s circuits come together. Circuit breakers keep each circuit safe, and from there, power goes out to your lights, power points, and appliances.
Your home will use solar power before anything else. For example, if your fridge, air conditioner, and washing machine together use 3 kilowatts (kW), and your panels make 5 kW, your home uses 3 kW of solar. The extra 2 kW goes out to the grid or a home battery. Every bit of solar power you use is one less unit you need to buy from the grid.
That’s why it pays to use more of your own solar.
Not sure how kilowatts differ from kilowatt-hours (kWh) you see on your energy bill? Here’s the difference between power (kW) and energy (kWh).
Your Meter Counts What Goes In and Out to The Grid
Your electricity meter is the link between your home and the grid. If you have solar, you’ll need a smart meter that tracks both the power you use from the grid and the solar energy you send back. If you don’t already have a smart meter, you’ll get one when your solar is connected.
Your energy retailer uses these readings to calculate your bill. You pay for the electricity you use from the grid, and you might get a credit for the solar energy you send back. This is called a Feed-in Tariff (FiT).
FiTs usually pay only a few cents per kWh. The solar energy you use at home is almost always worth more than what you sell back to the grid.
The grid supplies power whenever your panels can’t. This happens at night, early mornings, or during very cloudy days when your panels produce less electricity.
Your local electricity provider might limit how much power you can send back, so it’s normal if your installer discusses an export limit with you. In fact, they should.
During a blackout, when the grid is down, most solar systems also shut off, even if it’s sunny. This is for safety. If your system kept sending power, it could make the lines live while repair crews are working on them.
To keep the lights on in a blackout, you need a battery and inverter set up to provide backup power. Here’s more on why solar switches off in a blackout.
A Battery Stores Spare Solar for Later (Optional)
A home battery lets you store daytime solar for the evening, when most households use the most electricity. Instead of selling spare solar for a small feed-in tariff, you use it yourself after sunset.
Not every battery gives you backup power in a blackout. If that matters to you, ask for it up front, because it might cost extra.
If you’re interested in adding a battery, the federal battery rebate reduces the upfront cost of adding one.
Going Deeper: How a Solar Panel Is Built and Wired
That’s the whole system. If you only wanted the big picture, you’ve got the essentials and can stop reading here.
If you’re still curious to do a deep dive into how the panels work, the rest of this guide opens up the panel itself.
We cover:
- How it turns light into electricity.
- What’s inside it.
- Why a little shade matters so much.
- How panels have improved.
- And how installers wire them together on your roof.
How a Solar Panel Turns Sunlight Into Electricity (The Photovoltaic Effect)
Solar panels create electricity using something called the photovoltaic effect. The name gives us a hint: “photo” means light, and “voltaic” comes from Alessandro Volta, the Italian physicist who invented the battery. Light goes in, and electricity comes out.
All of this takes place inside the solar cells. Electricity is just the movement of electrons around a closed loop, which is called a circuit. A solar cell uses sunlight to set those electrons in motion.
If the physics doesn’t make sense right away, that’s okay. We have pictures to help.
Step 1: Electrons surround the atoms in the silicon
A solar cell is a thin slice of silicon. Every silicon atom in it has electrons around it, held firmly in place.
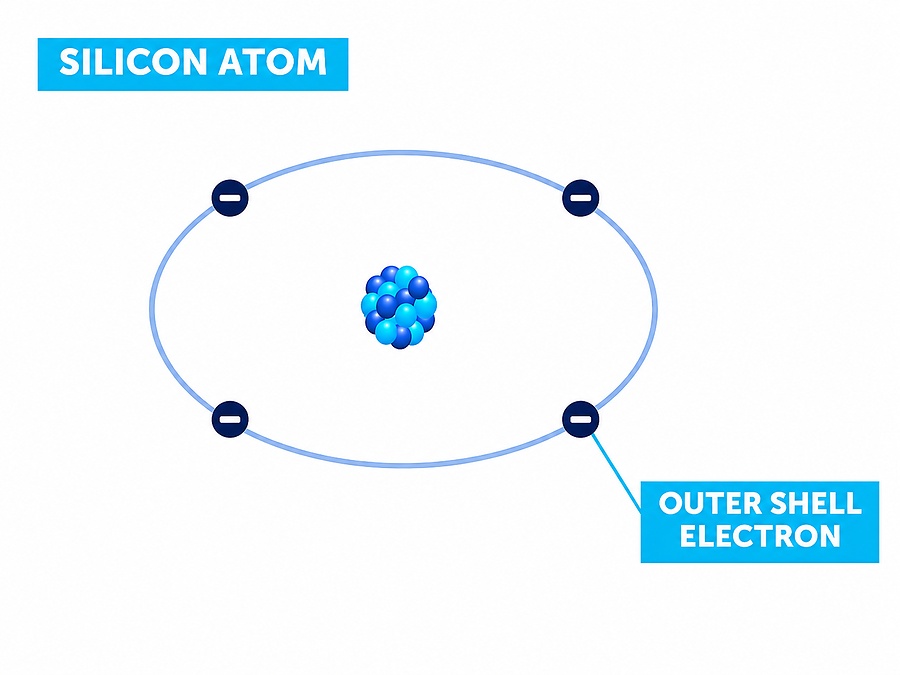
Every silicon atom holds its outer shell electrons in place.
Step 2: Sunlight knocks electrons loose
Sunlight arrives in tiny packets of energy called photons. When a photon hits the silicon with enough energy, it knocks an outer shell electron free.
The electron leaves a gap behind, called a hole. A hole is just a missing electron, but it behaves like a positive charge and can move around too.
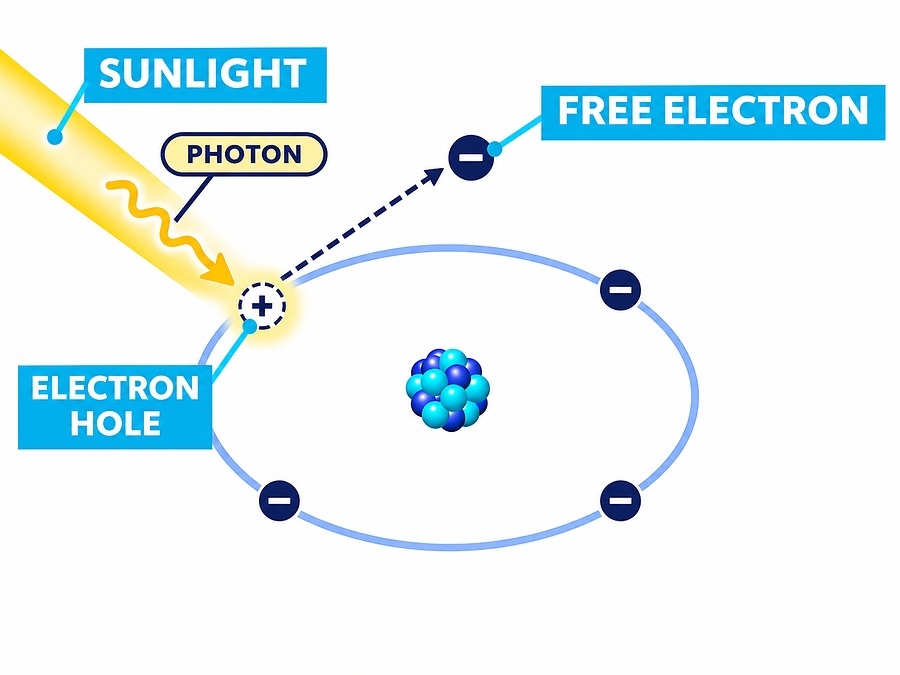
A photon with enough energy knocks an outer shell electron free and leaves a hole behind.
Step 3: The cell pushes electrons and holes to opposite sides
Manufacturers add traces of different elements to create two layers in the cell. Where those layers meet, called the junction, an electric field forms. It pushes free electrons towards one side of the cell and holes towards the other. With electrons gathered on one side and holes on the other, the cell now has a voltage across it, like the two ends of a battery.
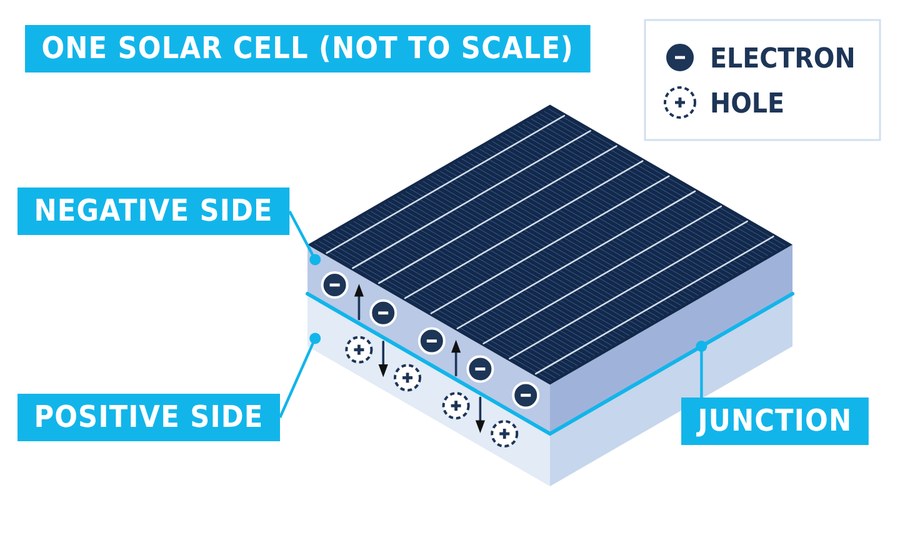
The electric field in the junction pushes electrons to one side and holes to the other, creating a voltage.
Step 4: Connect the two sides, and electricity flows
Like a battery, nothing happens until you connect the two ends. Join them with a wire, and the electrons flow through it to meet the holes on the other side. That flow is an electric current, and it can do useful work along the way, like making a light bulb glow.
As long as light keeps shining on the cell, it keeps knocking electrons loose, and the current keeps flowing. No moving parts required, and no fuel; just light in and electricity out.
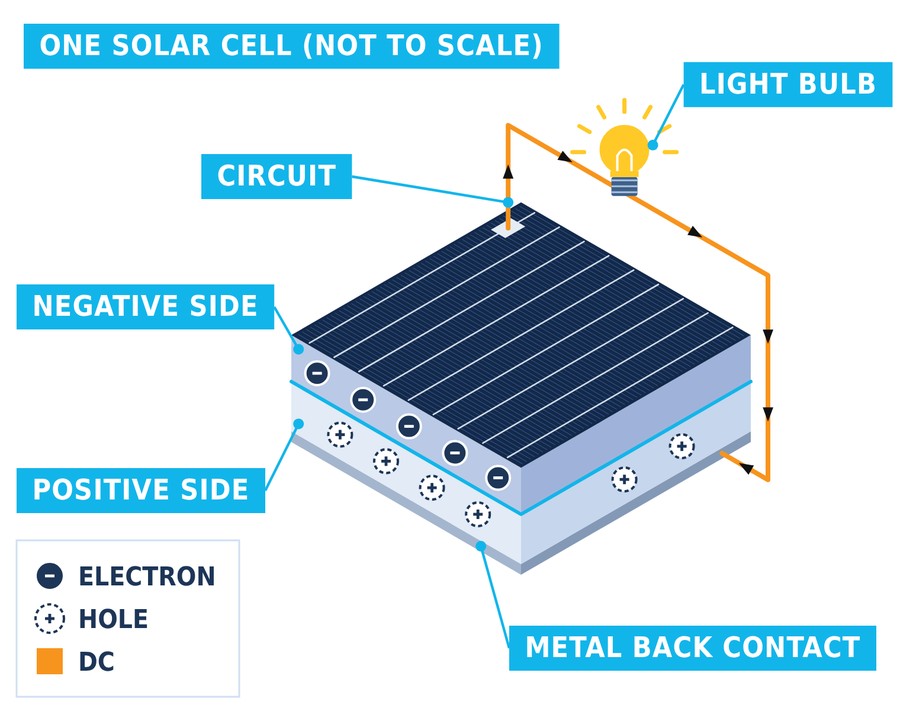
Join the two sides with a wire, and electrons flow through it to light the bulb.
What’s Inside a Solar Panel
The Solar Cell
The solar cell is where the photovoltaic effect happens, and it’s the basic building block of every panel. Each one is a fragile slice of silicon, with fine metal lines across it that collect the electricity.
On its own, one cell makes only a few watts. To power a home, you need a lot of them working together.
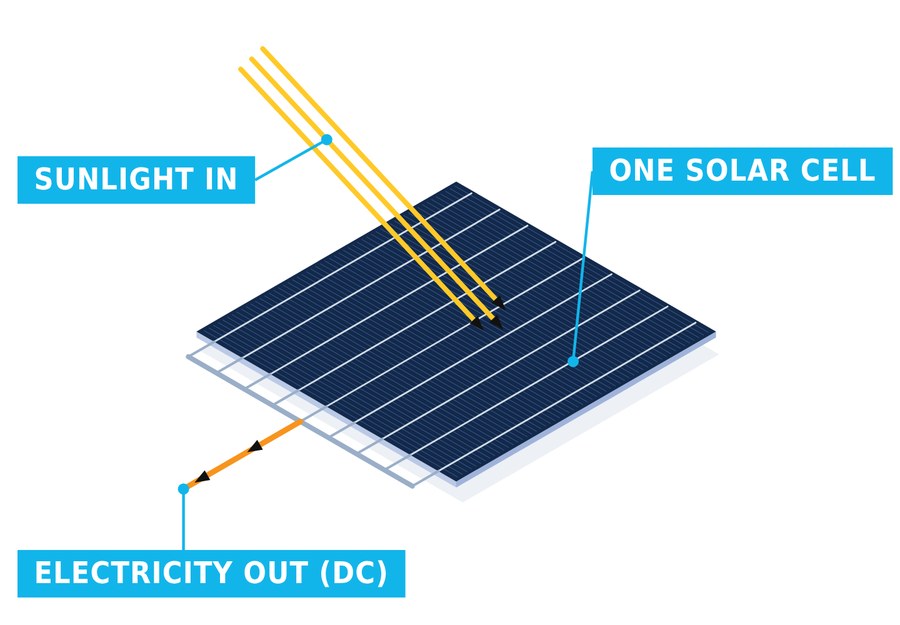
Fine metal lines across the cell collect the DC electricity it makes.
Making Solar Cells Into Solar Panels
Manufacturers wire dozens of cells together in a chain, one after another. Engineers call this a series connection. In series, each cell’s voltage adds to the next, the same way batteries stacked end to end in a torch add up to a higher voltage.
Basically all panels going on Australian roofs use half-cut cells. Manufacturers cut each cell in half, so the panel has twice as many cells, each half the size.
Then they divide the panel into a top half and a bottom half. The cells within each half are wired in series.
Why go to the trouble? Three reasons:
- More power. Each half-cell carries half the current, so less energy turns into heat in the wiring. Our guide to solar panel technology puts the gain at around 3%.
- Better in shade. Shade on one half of the panel doesn’t drag down the other half as much. More on that below.
- Tougher. Tiny cracks in a cell, called microcracks, do less damage to output when the cells are smaller.
How Shading Can Cost You Power
When you wire cells in series, shade becomes a major problem.
Electricity needs to move through each cell in the series, one after another. If one cell is shaded, it can only let a small amount of current through, and this slows down all the other cells in the chain.
It’s like having a kink in a garden hose. Even if there’s plenty of water behind it, the flow slows to a trickle.
This is why even a small shadow from something like a chimney, antenna, or tree branch can reduce a panel’s output much more than you might expect. A good installer will check your roof for shade at different times of day and throughout the year before choosing where to place your panels.
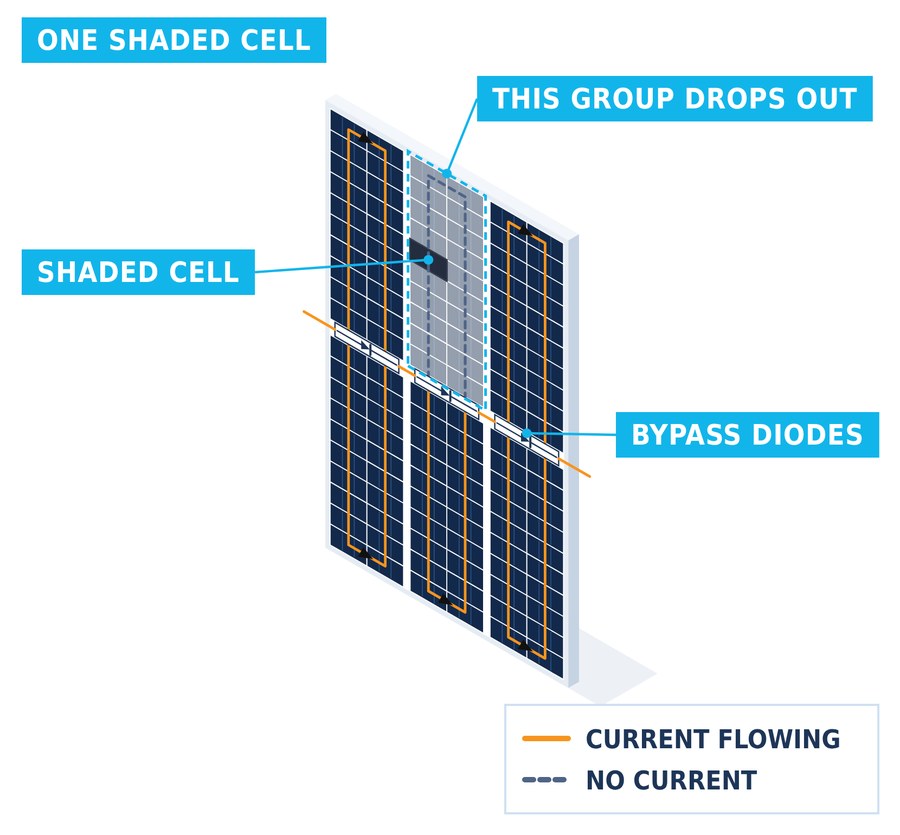
In a half-cut panel, one shaded cell knocks out just one of the six cell groups, not the whole panel.
If your roof gets a lot of shade, different systems may improve the output in shady conditions. Microinverters and optimisers let each panel work on its own, so one shaded panel doesn’t drag down the rest.
Bypass Diodes: How Panels Work Around Shade
Panels don’t simply give up in the shade. They use small, inexpensive electronic parts called bypass diodes.
A bypass diode is similar to a pressure relief valve. If shade blocks the current in one part of a panel, the current goes through the diode instead. This way, it takes a detour around the shaded section and keeps moving through the rest of the panel.
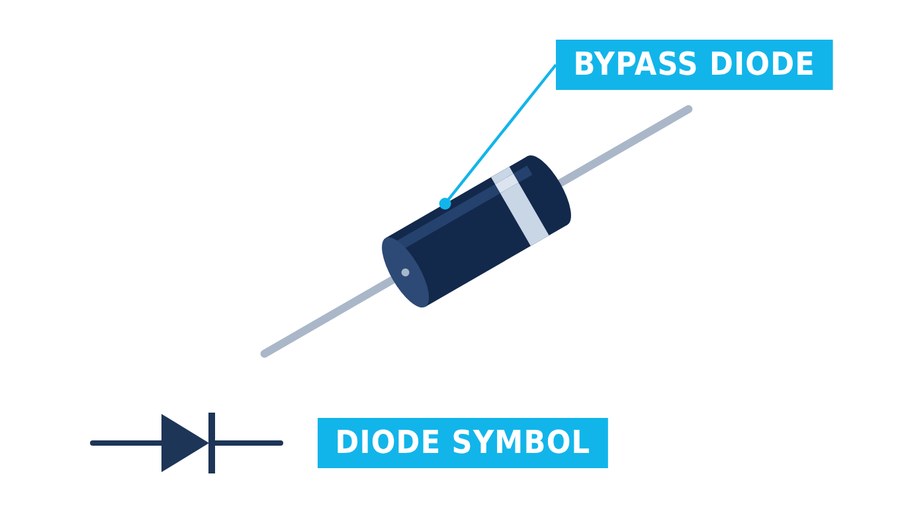
Bypass diodes are small, inexpensive parts that work like a pressure relief valve for current.
Most panels have three bypass diodes hidden inside a junction box, which is the small sealed box on the back where the cables come out. In a half-cut panel, the cells are split into six groups instead of three. This means that if there is a small patch of shade or a bird dropping, you only lose one of those six groups, not the entire panel.
Losing part of a panel still hurts. But it beats losing all of it.
How Today’s Panels Differ From Older Ones
From the street, solar panels look much the same as they always have. Inside, the cells keep improving. Three changes matter most if you’re buying panels.
TOPCon Cells
Most solar panels you can buy today use Tunnel Oxide Passivated Contact (TOPCon) cells. The name sounds complicated, but the concept is straightforward. A very thin extra layer inside the cell helps more freed electrons turn into electricity instead of being lost.
TOPCon has taken over from the older Passivated Emitter and Rear Cell (PERC) design as the main choice in the industry. These panels have thin metal lines on the front of each cell that collect electricity.
The step up from PERC is real but modest.
Back-Contact Cells
Back-contact cells move all the wiring on the front to the back of the cell. With no metal lines across the front, the cell catches slightly more light, and the panel gets a clean, all-black look.
That makes back-contact panels some of the most efficient you can put on a roof, usually at a higher price than TOPCon. Aiko and LONGi sell back-contact panels in Australia. To see how panels compare on output per square metre, read our guide to solar panel efficiency.
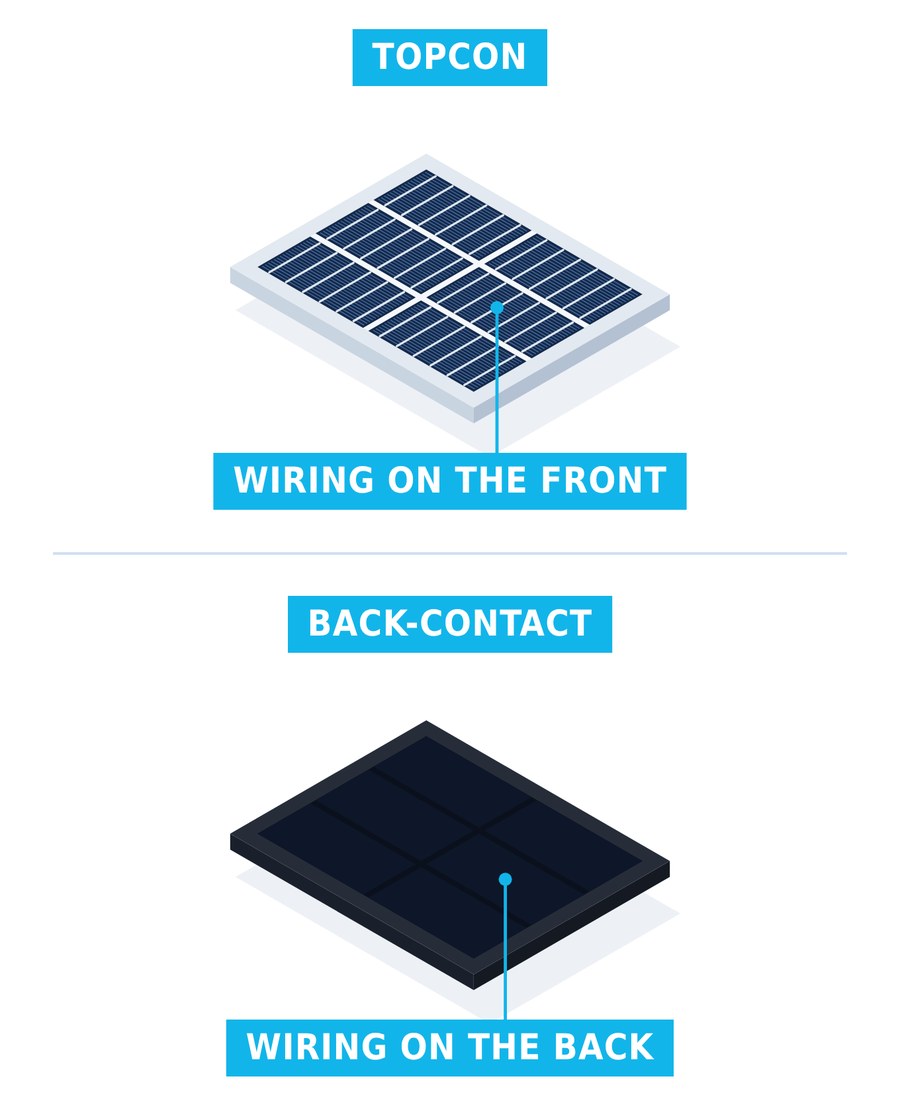
Back-contact cells move the wiring to the back, giving the panel a clean, all-black look.
Please note that panels can be both TOPCon and back-contact. They aren’t mutually exclusive.
Bigger, More Powerful Panels
Better cells mean more power from roughly the same size panel. Home panels used to be rated around 250 W. Most are now rated somewhere around 500 W.
That means fewer panels for the same size system. A 6.6 kW system once needed about 26 panels rated at 250 W. With 500 W panels, it needs 13. With roof real estate at a premium, more powerful panels in less space means you can load your roof up and prepare for that electric vehicle you’ve been eyeing. But please note that new panels are about a third larger than their predecessors.
Use our panel comparison table to compare current models side by side.
Constructing a Solar Panel
Solar cells are fragile, so most of a panel exists to protect them. Manufacturers build it in layers, like a sandwich:
- Front glass: a sheet of toughened glass lets light in and keeps rain and hail out.
- Encapsulant: clear polymer films on both sides of the cells hold them in place and seal out moisture.
- Solar cells: the layer that does the work.
- Back glass or backsheet: most panels now have a second sheet of glass on the back. Others use a tough plastic backsheet. On a good-quality panel, either works well.
- Aluminium frame: gives the panel strength, and gives installers something to clamp onto.
- Junction box: the small box on the back where the cables come out, and where the bypass diodes live.
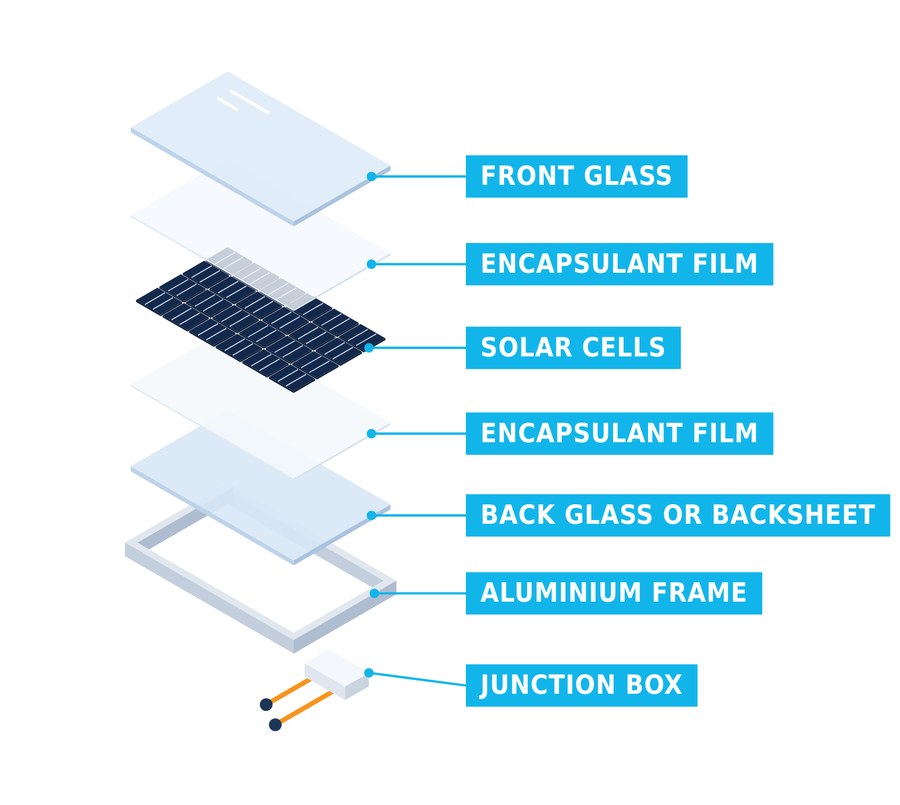
Most of the solar panel exists to protect its fragile cells.
Connecting Solar Panels Together in a Solar Array
Wired together on your roof, a group of panels makes a solar array.
Designers connect panels in two ways, series and parallel, and many systems use both.
Panels in Series
When you wire panels in series, you connect them in a chain from positive to negative. This adds up their voltages, but the current stays the same, just like it does with the cells inside each panel.
A chain of panels is called a string by installers. Your system designer needs to make sure each string’s voltage stays within what your inverter can handle. If there are too many panels, the voltage could go over the inverter’s maximum input rating, which could damage it. This is most likely to happen on clear cold winter days because heat slightly reduces solar panel efficiency. Australian standards require designers to check for this, so it rarely happens in a well-designed system.
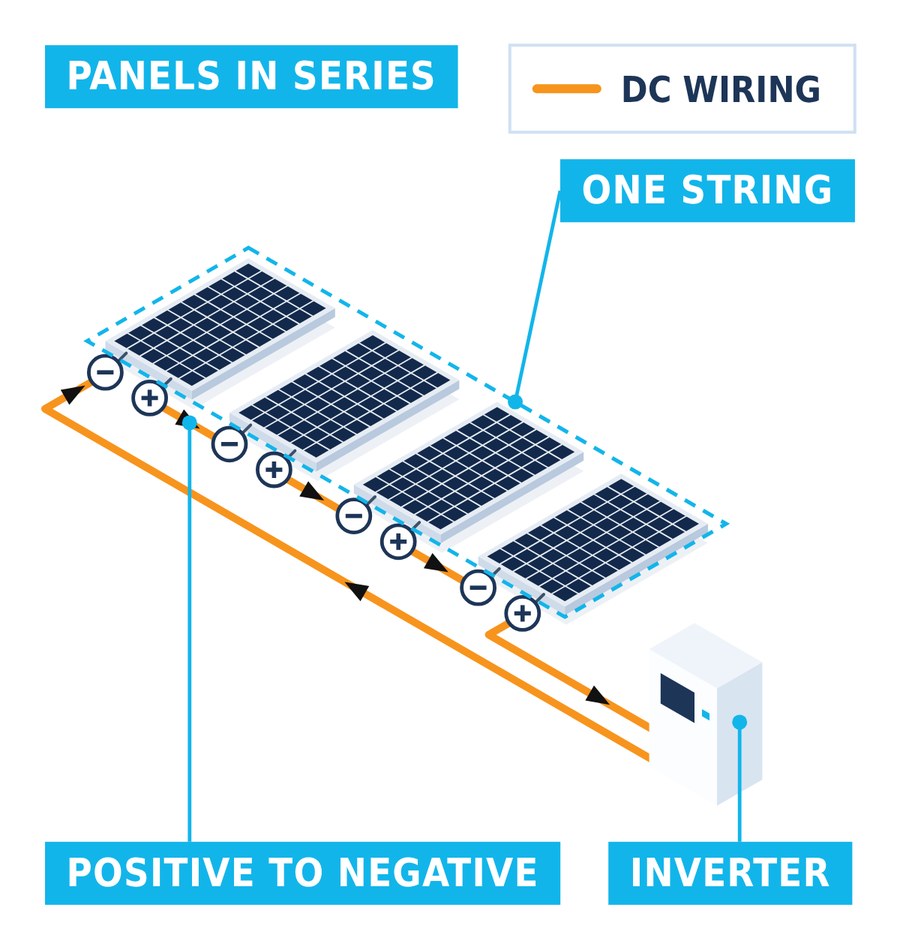
Wiring panels in a series adds up their voltages, while the current stays the same.
Panels in Parallel
When you wire strings side by side in parallel, it works differently. The voltage stays the same, but the currents add together. Using parallel strings lets a designer make a bigger system without raising the voltage too much.
But there is a trade-off: more current. The designer also needs to make sure that the total current does not go over what each inverter input can handle.
Many home inverters have two or more separate inputs, each with its own Maximum Power Point Tracking (MPPT) circuit. MPPT constantly adjusts to squeeze the most power from the panels on that input. Strings that share the same MPPT must be identical in number of panels, direction, and tilt.
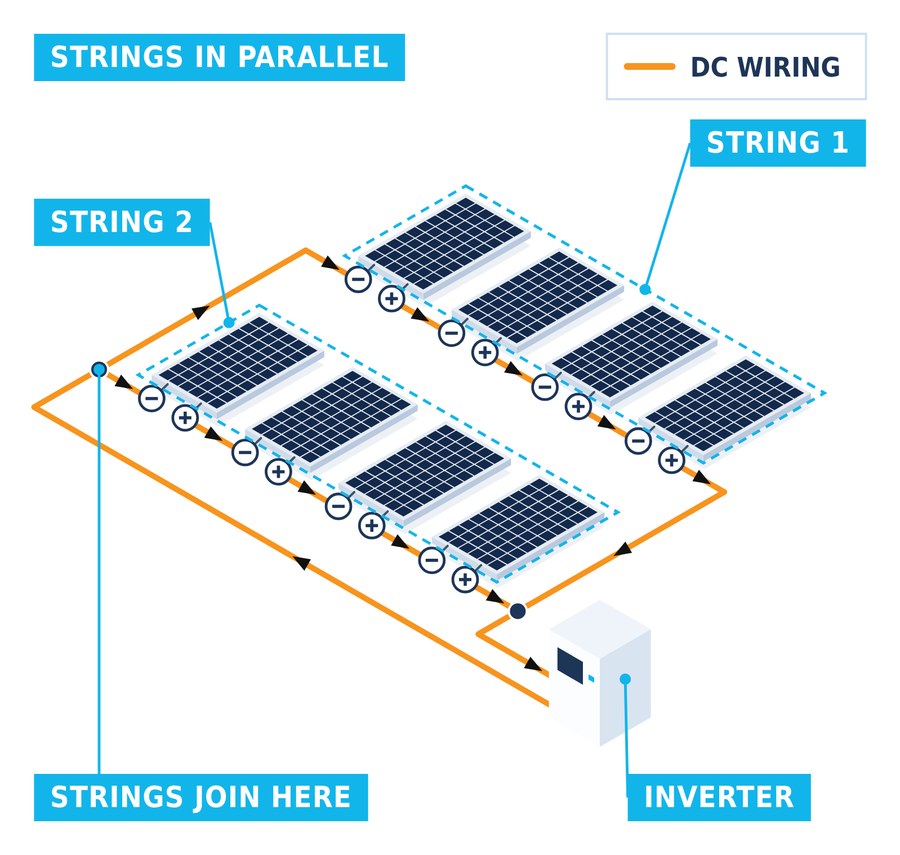
Wiring strings in parallel adds up their currents, while the voltage stays the same.
With two inputs, a designer can put panels on different roof faces, or use strings of different lengths, without one dragging down the other. Strings that share one input need the same number of identical panels.
Why Temperature Matters
Here’s a quirk that surprises people. Solar panels produce a higher power when they’re cool, and a lower power when they’re hot.
The warmth of sunlight on skin is from both visible light and from infrared radiation. Solar panels use both to generate electricity. But warmth is not good for solar panels. The hotter they are, the less efficient they become. The effect is only modest, so solar produces more energy in summer than winter because the days are longer and the sun is higher in the sky and so at a better angle for most rooftop solar panels.
Every panel’s spec sheet tells you how sensitive it is to heat. That figure, the temperature coefficient, shows how much a panel’s output changes for every degree its cells move away from 25°C.
For example, a coefficient of -0.35% per °C means the panel’s output falls by 0.35% for every degree its cells go above 25°C. On a sweltering day when the panels hit 60°C, that panel loses 12.25% of its power. Many modern panels sit between -0.30% and -0.36% per °C, and the very best reach the mid -0.20s.
The effect is reversed in cold conditions. When the cells are cooler, they generate a higher power, so temperatures below 25°C actually lead to a gain. This means that on cool, sunny days, solar panels can sometimes perform a bit better than their rated output.
Keep in mind that it’s the temperature of the cells themselves that matters, not the air temperature, and panels exposed to sunlight get hotter than the surrounding air.
Why Your System Needs an Accredited Designer
All of this is why installing solar takes more than banging some panels on the roof and plugging in an inverter. Every system needs a proper design.
To claim the solar rebate, you need a designer and installer accredited by Solar Accreditation Australia. That’s the body appointed by the Clean Energy Regulator to accredit solar professionals.
Ask to see your system design before you sign anything. Check that an accredited designer, not just a salesperson, put it together. Our guide to solar panel installation explains what a good install looks like.
Get the design right, and your array and inverter work together in every season, from frosty winter mornings to scorching summer afternoons.
What to Do Next
You know how solar panels work. The next question is what they’d do on your roof. Here’s where to start:
- Work out how many panels you need based on how much electricity your home uses.
- Check which way your panels face. Direction changes how much your panels make, and when.
- Compare the best solar panel brands and get a feel for how much solar costs.
For the full buying picture, read our guide to buying solar panels.
Then get up to 3 quotes from installers we’ve vetted. Comparing quotes side by side is one of the best ways to spot a well-designed system, and a badly designed one.