Portable Solar Panels: How They Work And How To Choose The Right One
Last Updated: 31st Jul 2026
When you go camping, caravanning, or four-wheel driving, you often need to run a fridge, lights, and a few devices for several days without a generator or powered site. Fortunately, there’s a solution.
A portable solar panel can be either a folding panel or a solar blanket. Both types pack flat and unfold easily at your campsite. They use sunlight to charge a battery or portable power station.
This guide focuses on portable panels; the kind you carry, unfold, and pack away. It does not cover the following related topics:
- Permanently mounted rooftop solar on a caravan or RV.
- Balcony or plug-in solar that feeds straight into your home’s grid connection, which is currently illegal in Australia.
If you were looking for information on those topics, follow the links. Otherwise, read on.
Table of Contents
- Folding Panels vs Solar Blankets: What’s The Difference?
- How Does A Portable Solar Panel Work?
- How Caravan Solar Panels Charge A Battery
- Solar Panel And Battery Kits: What’s In The Box?
- Portable Power Stations
- What Size Solar Panel Do You Need To Run A Camping Fridge?
- What Size Solar Panel Do You Need For Camping?
- What Size Solar Blanket Do I Need?
- How To Care For Your Solar Panels Or Solar Blanket
- What To Look For When Buying
- Making Your Decision
Folding Panels Vs Solar Blankets: What’s The Difference?
For a long time, “portable solar panel” meant one thing: a folding solar panel with a rigid aluminium frame, hinged like a book, with a kickstand to angle it toward the sun. It’s still the most common option, and for good reason. It’s durable and, watt-for-watt, usually the cheaper choice.
The other option is a solar blanket, also called a solar mat. These use flexible photovoltaic cells in a housing that unfolds like a picnic rug.
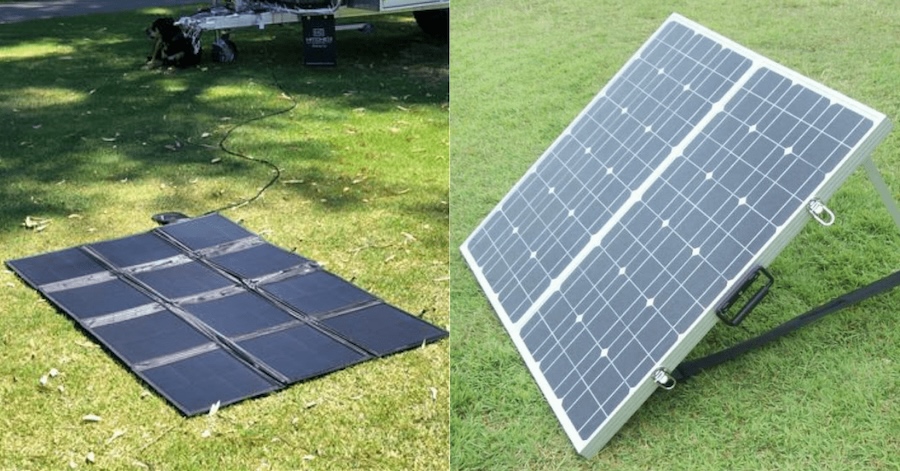
Source: abigpeacheyadventure.com.au
Solar blankets are lighter, pack smaller, and are easier to set up on uneven ground or limited vehicle space. However, this flexibility usually means they cost more per watt than other options.
Both folding panels and solar blankets are almost universally built around monocrystalline cells now, because they convert sunlight more efficiently than older polycrystalline cells and pack more output into a smaller panel.
Polycrystalline vs. monocrystalline panels is a debate that’s dying down. For portable panels, monocrystalline is now the standard, so you usually don’t need to worry about choosing between the two.
| Folding Solar Panel | Solar Blanket | |
| Weight | Heavier | Lighter |
| Durability | Rigid frame, generally tougher. | Flexible, needs gentler handling/packing. |
| Pack Size | Bulkier, briefcase-style. | Folds flat, smallest footprint. |
| Price per Watt | Usually cheaper. | Usually pricier. |
| Best for | Base camps, frequent trips, tighter budgets. | Weight-conscious travellers, occasional trips. |
How Does A Portable Solar Panel Work?
When sunlight hits the panel’s cells, it excites electrons and creates direct current (DC) electricity. This electricity passes through a charge controller, also known as a solar regulator, before reaching your battery.
In a portable setup, the controller usually comes in one of three forms:
- It could be a small, standalone box about the size of a paperback, with a digital display for volts and amps. One cable connects to the panel, and another goes to the battery.
- Sometimes, the controller is built right into the folding panel or solar blanket, tucked into the frame or a pouch on the cables. This means you don’t need to buy or mount anything extra.
- If you’re charging a portable power station, the controller is built into the unit. You simply plug the panel into the solar input port and don’t have to deal with the controller directly.
A more advanced type is the Maximum Power Point Tracking (MPPT) controller. Since a solar panel’s voltage and current change with sunlight and temperature, there’s always one combination that gives the most watts. This is called the panel’s maximum power point.
An MPPT controller continuously scans for that sweet spot, adjusts on the fly to capture it, and then converts the result to whatever voltage your battery needs. The upshot is a more usable charge from the same panel, especially on a dull or cool day when a simpler controller would leave power on the table.
A Pulse Width Modulation (PWM) controller is similar to MPPT but less efficient. It works like a simple switch: it connects the panel straight to the battery and pulls the panel’s voltage down to match, wasting whatever’s left over in the process.
The upshot of an MPPT controller is that it commonly delivers up to 30% more charging efficiency than PWM, and the gap is widest in cold, overcast or low-light conditions, exactly when you can least afford to lose power. That gap narrows when the panel’s voltage is already close to the battery’s, which is common in small, simple 12V setups.
If you pick up a cheap household solar panel which offers 35 to 45 Volts output, you need a more expensive MPPT to charge a 12V battery. Using a PWM regulator, which exposes the battery to short pulses of full panel voltage, will dramatically shorten lead acid battery life and may instantly damage the BMS in a lithium battery.
PWM is cheaper and perfectly adequate for a small panel matched closely to your battery voltage. MPPT costs more upfront, but it’s the better choice for anything larger, for solar blankets and panels with a higher voltage than your battery, or if you’re camping somewhere.
How Caravan Solar Panels Charge A Battery
The battery, not the panel, is what actually runs your gear. A bare solar panel isn’t safe to wire straight to a battery. Panel output swings all over the place with sunlight and temperature, and a battery that’s overcharged or charged with an unregulated voltage spike degrades fast or fails outright.
The charge controller sits in between the battery and the panel and does the job of turning “raw, unpredictable panel output” into “controlled, battery-safe charging current.” It keeps the charge steady and safe as it enters the battery. Once the battery’s charged, it runs your fridge, lights and chargers all day and through the night, sun or no sun.
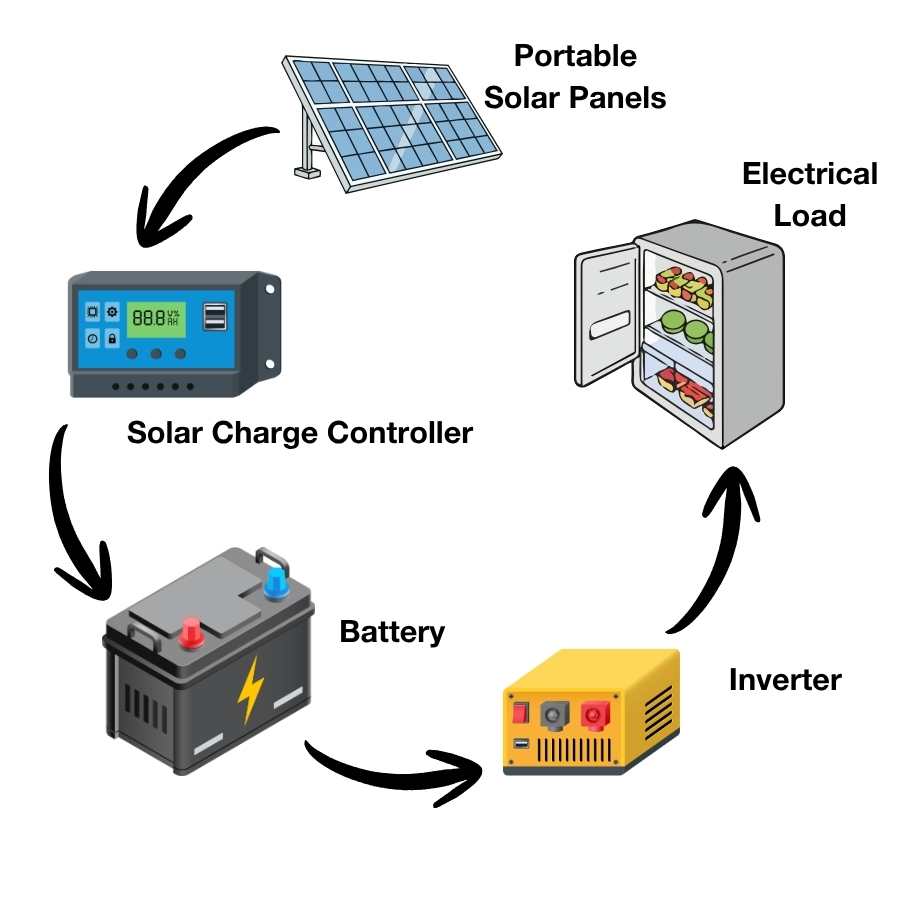
Most controllers, PWM and MPPT alike, charge in stages rather than just dumping full power in until the battery’s full:
- Bulk stage: the battery is low, so the controller pushes as much current into the battery as it safely can.
- Absorption stage: as the battery approaches full, the controller holds voltage steady and lets the current taper off, which avoids overheating or gassing the battery.
- Float stage: once full, the controller drops to a trickle to keep the battery at 100% without overcharging.
This staged approach is why a decent controller charges a battery faster and makes it last longer than just wiring a panel directly to a battery ever could.
Reverse current protection: At night, with no sunlight hitting the cells, a panel can actually act as a small drain, pulling a trickle of charge back out of the battery through itself. Every charge controller includes a cutoff that blocks this, disconnecting the panel from the circuit once the sun goes down so your battery doesn’t slowly bleed out overnight.
Battery chemistry settings: This is the one people miss most often. Lead-acid and AGM batteries require a different charging voltage profile than lithium (LiFePO4) batteries, which are now the standard in most portable power stations.
You don’t want to undercharge the battery (never reaching full capacity) or, worse, overcharge it, which can shorten its life or trigger its internal protection.
Most modern controllers let you select the battery type, sometimes automatically; always check this before wiring one up to a lithium battery because the settings aren’t universal.
What to check when buying a battery separately (as opposed to one built into a panel or power station):
- The controller needs to be rated to handle your panel’s maximum output current with some headroom, not just match it exactly.
- Input voltage limit is especially relevant if you’re wiring two panels or blankets together, since that can push the combined voltage above what a cheaper controller can safely accept.
- Battery type setting confirms if it supports lithium if that’s what you’re charging.
Solar Panel And Battery Kits: What’s In The Box?
A camping solar panel and battery kit is a good way to start, as long as you know what might be missing. Most kits include a panel or blanket, a charge controller, cables, and a carry bag. Some also include a small battery.
Basic kits often don’t come with a lithium battery big enough to run a fridge overnight. You usually need to buy that separately.
Kits also often leave out an inverter, which you’ll need for devices with a standard 240 V plug. They may also skip proper fuses or circuit protection, which are important for safety.
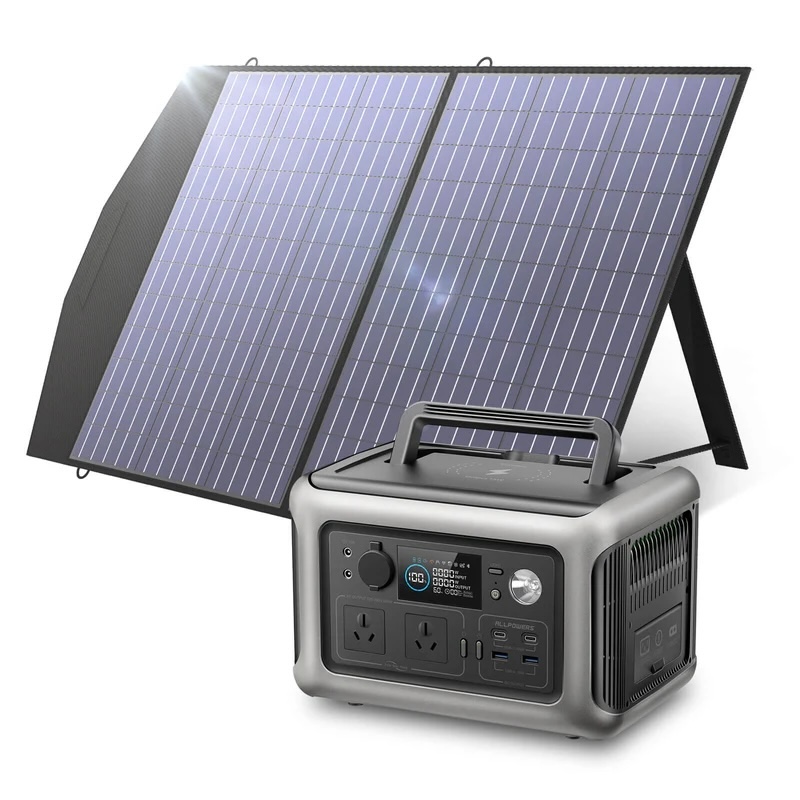
ALLPOWERS 600W Solar Generator Kit
A kit is helpful if you’re new and unsure what you need. If you already have a battery, want a specific MPPT controller, or plan to expand later, it’s better to buy the panel, controller, and battery separately.
Kits are built for one panel size, so if your needs grow, replacing parts can cost more.
It’s also important to know that portable setups don’t qualify for a rebate. The federal solar rebate only applies to accredited, permanently connected systems, so you won’t get the same discount as rooftop solar.
Portable Power Stations
Many portable panels are designed for specific brands of portable power stations, and there’s a good reason for this. A portable power station combines a battery, a charge controller, and an inverter in one box, with several types of outlets built in. This means you don’t have to deal with separate wiring.
This is different from a camping setup assembled from different parts, where you have a separate lithium battery with its own charge controller, and a separate inverter if you want to run 240 V appliances.
A portable power station handles all of this in one unit, which is why many campers prefer it if they don’t want to set up their own wiring.
The important thing is to make sure your panel matches the power station’s solar input. Before you buy, check two things:
- The connector type; common ones are Anderson plugs, MC4, and XT-60. If they don’t match, you’ll need an adapter or might have to return the panel.
- The maximum solar input voltage and wattage the power station can handle.
If you use a panel that exceeds these limits, you could waste capacity or even damage the input. If you’re choosing between brands, we’ve covered portable power station models and how they perform.
What Size Solar Panel Do You Need To Run A Camping Fridge?
To figure out what size solar panel you need for camping, add up your daily watt-hours, divide by the number of good sun hours you’ll get, and then add a buffer. The method’s the same whether you have a solar panel for camping or a solar blanket.
Watt hours/sun hours = Watts + Buffer
Since the fridge cycles on and off rather than running constantly, a realistic daily total is about 300-600 Wh, depending on the temperature and how often you open the lid.
Add a few hours of LED lighting and some device charging (phone, camera, the odd laptop), and a typical weekend camping setup sits at roughly 400-700 Wh a day.
Next, divide your total estimate by the number of sun hours you have. In Australia, you usually get 4 to 6 hours of good sunlight each day, but this changes with the seasons and your location. For example, Hobart or Melbourne get closer to 4 hours, while Darwin or Alice Springs get about 6.
Here’s the math: let’s say 450 Wh from the fridge plus 100 Wh from lights and charging, for about 550 Wh a day. Divide that by 5 sun hours, and you need roughly a 110 W panel at a minimum.
550 Wh/5 h = 110 W
Add a buffer of 20 to 30% for cloudy days and the simple fact that panels rarely produce their full rated output in the field, and you land at roughly 130 to 145 W.
This sits toward the lower end of the 120-200 W range. The extra headroom above the bare minimum covers a run of bad weather, a hotter day, or a slightly bigger fridge than this example.
What Size Solar Panel Do You Need For Camping?
Here’s the quick answer.
- Phone and light charging only: 60-100 W.
- Weekend camping with a fridge, lighting and charging: 120-200 W, commonly sold as a 200 W solar blanket or folding panel.
- Extended off-grid touring, bigger fridge, an inverter, maybe a CPAP machine: 300-400 W or more, which is where a 300 W or 400 W solar blanket earns its keep.
If you’re shopping for a caravan solar panel or trying to work out what size solar panel you need, the method is the same. Caravans usually have more appliances, such as larger fridges, water pumps, and entertainment systems, so you’ll likely need a panel at the higher end of the range.
What Size Solar Blanket Do I Need?
Use the same method as before: total your daily watt-hours, divide by your sun hours, and add a buffer. The result stays the same whether you choose a folding panel or a blanket. The difference is just in the packaging.
Most solar blankets are available in a few standard sizes. Choose 100 W or 120 W for light phone and device charging, 160-200 W for a weekend trip with a fridge, and 300-400 W for longer off-grid trips. If your calculation falls between two sizes, round up. Blankets often produce less than their rated output in real conditions, and it’s usually cheaper to go up a size than to risk running out of power.
If your power needs are higher than what one blanket can provide, you can use two smaller blankets wired in parallel to the same charge controller instead of buying a large, expensive one. Make sure both blankets are compatible with your controller’s combined input rating before you connect them.
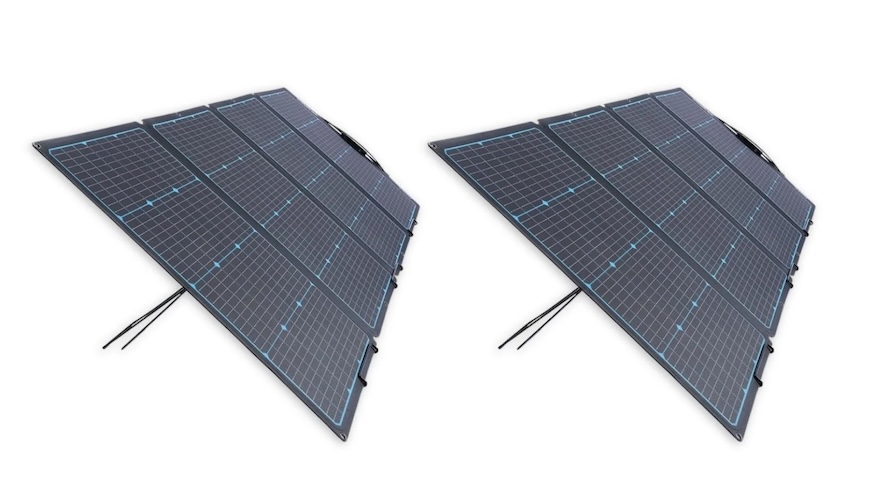
Twin 240W Premium Solar Panel Bundle
How To Care For Your Solar Panels Or Solar Blanket
A portable panel works best when it’s properly positioned and maintained. Face it toward the sun and move it during the day if you can. Even a folding panel with a kickstand won’t get the most out of a single fixed angle.
Keep the surface free from shade, leaves, and dust, since even a little shading can reduce output more than you might think. Also, protect the connectors. Dust and moisture cause more problems than the panels themselves. Wiping them down and storing them dry between trips helps a lot.
Don’t expect much from a portable panel on a very cloudy day. Output often drops to just 10-25% of the rated amount. It’s still better to have the panel out than not, but plan your battery capacity with the idea that you’ll have some cloudy days.
What To Look For When Buying
- Weatherproofing. Choose a panel with an Ingress Protection (IP) rating of at least IP65, which protects against dust and light to moderate water exposure. IP67 or IP68 offers extra protection if you’re near the coast or expect wet weather.
- Weight and folded size. This is especially important if you have limited vehicle space or need to carry your gear some distance from your car.
- Connector type. Check it matches your battery or power station before you buy, not after.
- Charge controller. Confirm whether one’s built in or needs buying separately, and if separately, whether it’s MPPT or PWM. The difference affects both cost and the usable charge you actually get.
- Cell type. Monocrystalline is now the near-universal standard for portable panels and blankets, for the efficiency reasons.
Making Your Decision
Start by figuring out your daily watt-hours, since that number determines most of your choices. Then, decide between a folding panel and a solar blanket based on your available space and how often you want to set up and pack away your gear.
There’s no wrong answer. It’s just a balance between weight and price.
If chasing power on the road has you thinking about solar for the roof over your head as well, our guide to buying solar panels covers what matters for a home rooftop system, and you can get 3 free quotes if you’re interested in comparing rooftop options.