Installing Solar Panels? Avoid These 13 Common Mistakes
Last Updated: 22nd Jul 2026 Fact-checked by Anthony Bennett, licensed electrician, roofer & solar installer.
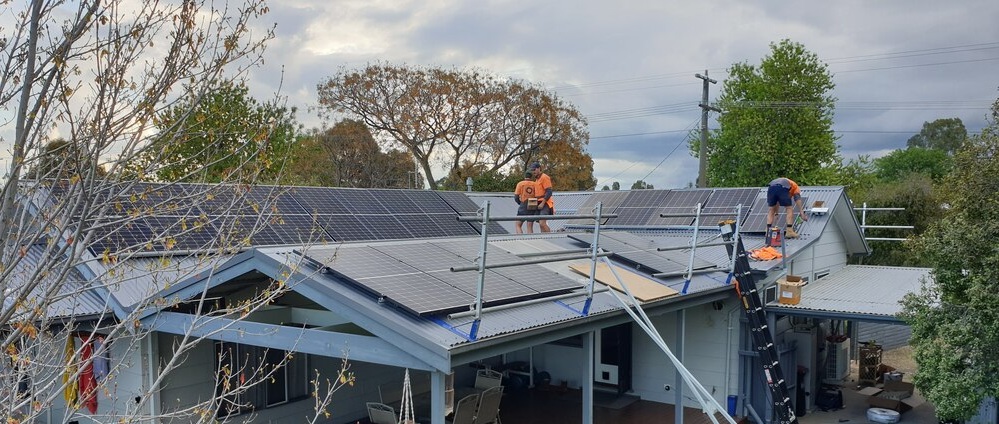
Most solar problems aren’t caused by the panels themselves. They often start weeks earlier, when someone signs a contract they don’t fully understand or chooses the wrong installer.
The good news is that all of these mistakes can be avoided. You don’t need to be an engineer to buy solar; you just need to know the common pitfalls of solar panel installation.
This guide explains the key decisions that can make or break your solar purchase. It also highlights a few technical checks to do before and after installation, so you get the system you expect.
Mistake #1: Comparing Quotes on the Bottom Line Instead of What’s Included
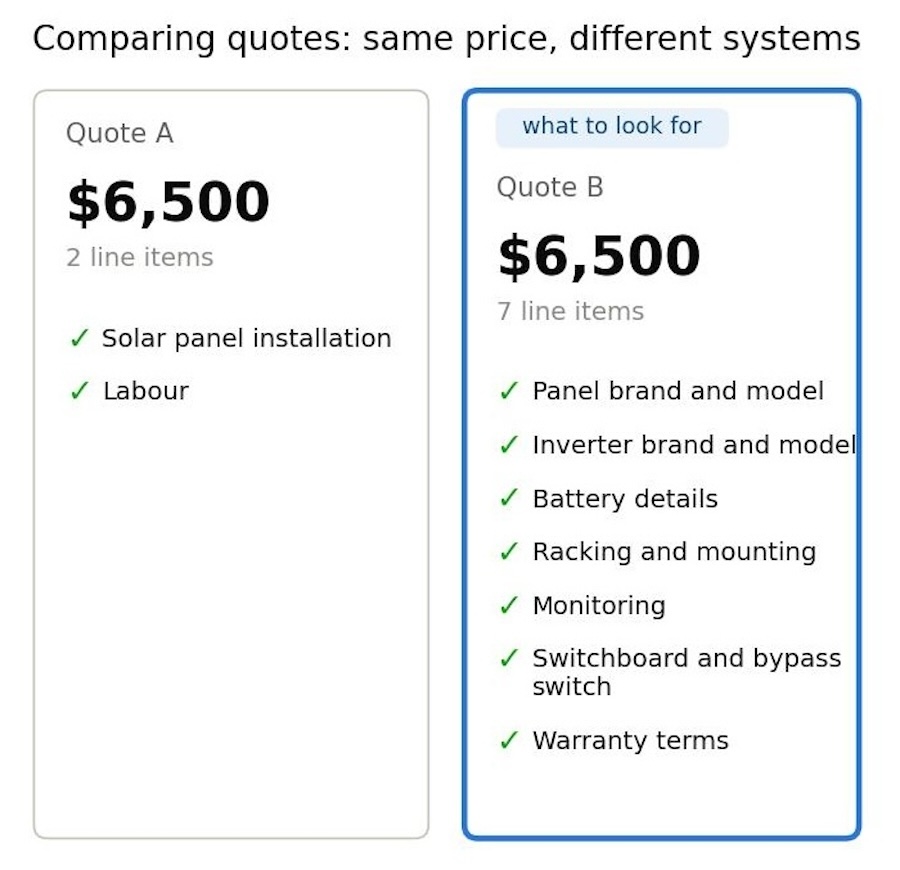
Two quotes with the same price can mean very different systems.
Ask for a detailed quote that lists the panel brand and model, the inverter brand and model, battery details (if included), racking, monitoring, any switchboard or meter work, and labour.
Then check the warranty terms line by line. A solar system carries three separate warranties, and they’re not the same thing:
- Product warranty, covering manufacturing defects, typically 25 years, depending on the panel brand.
- Performance warranty, guaranteeing a minimum output level over time (usually 25-30 years).
- Workmanship warranty covering the installer’s work, typically 5-10 years.
A cheaper quote that cuts corners on any of these warranties isn’t really a bargain. You might pay less upfront, but you could end up with lower output, faulty parts, or no one to help if something goes wrong.
A detailed quote should also cover what happens around the system, not just inside it.
- Ask whether your switchboard needs upgrading to handle the new system.
- Ask whether the system can control other big loads in your home, like your hot water system or pool pump, so they run on free daytime solar instead of overnight power.
- If you’re adding a battery, confirm a bypass switch is included. Cheap systems might leave it out.
Mistake #2: Choosing an Installer without Accreditation
A polished website and a friendly salesperson don’t tell you who will be working on your roof.
Since 2024, Solar Accreditation Australia (SAA) has taken over from the Clean Energy Council as the body responsible for accrediting solar installers in Australia.
If your installer isn’t SAA-accredited, you can’t claim the federal solar rebate, and you have no guarantee the system will be installed to Australian standards. A good installation is crucial.
Before you sign anything, check two things:
- Years in business. A company that’s been installing for a decade has survived a few rebate changes and price wars. A company that appeared six months ago hasn’t been tested yet.
- Who’s on your roof? Some solar retailers subcontract the installation to whoever’s available that week. Ask directly whether the installer is an employee or a subcontractor, and how long they’ve worked with the company.
All of this can be done with a few phone calls. It’s the best piece of mind you’ll get for the price.
What’s more revealing is what happens once something goes wrong.
- Read the one-star reviews for any installer you’re considering, not just the five-star ones on the homepage.
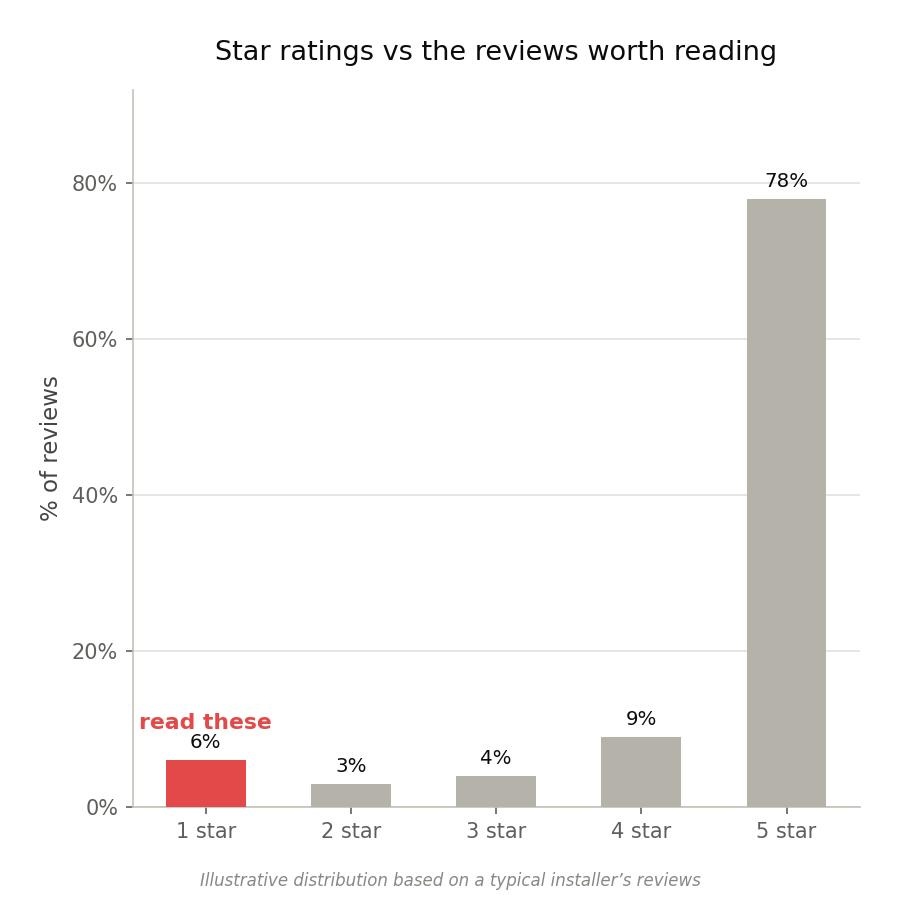
That’s where you’ll find out how a company handles a leaking roof, a dead inverter, or a slow warranty claim, long after the sale is done.
The good news is that every installer you’ll come across on the SolarQuotes website already has accreditation.
Mistake #3: Paying Too Much
Solar prices might seem straightforward; just compare the numbers. But sometimes, those numbers are quietly increased before you even see the quote. It’s crucial to understand what solar panels cost.
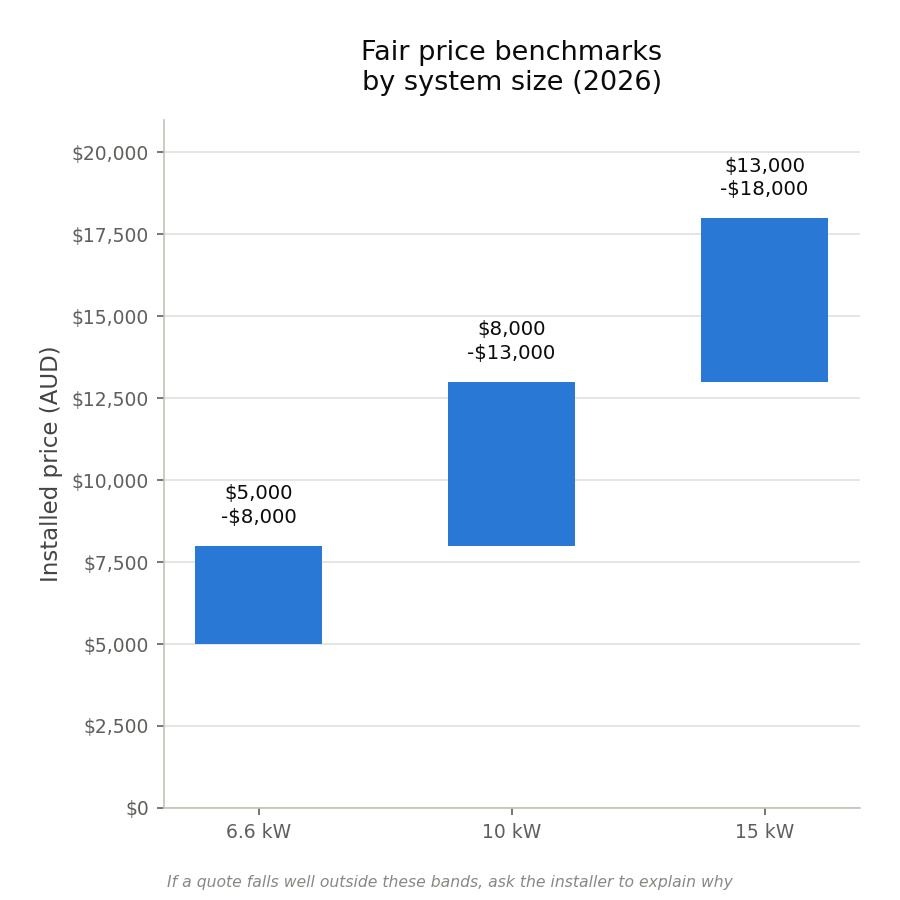
Know the benchmark. Nowadays, the cost of installing solar in Australia ranges from $0.88 to $0.95 per watt, or roughly $1,000 per kW as a quick rule of thumb.
- A typical 6.6 kW system costs between $5,000 and $8,000.
- A 10 kW system costs between $8,000 and $13,000.
- A 15 kW system is around $13,000-$18,000.
If a quote is much higher or lower than these ranges, ask the installer to explain why.
A note on financing your solar system:
- “0% interest” solar deals aren’t really free. The cost is hidden. When a solar company offers a “0% interest payment plan,” they still pay the finance company a fee, usually 15-25% of your system’s price.
- The fee doesn’t disappear. It’s added to your price. Retailers include it in your quote, so a system that should cost $10,000 in cash might be quoted at $12,000 with “free” finance.
A trustworthy installer will tell you the system’s price without any finance markup. If they can’t or won’t, that’s a sign the “free” finance could be costing you more.
There are other ways to finance your solar system. A better alternative to “0% interest” buy-now-pay-later is a green loan.
These are backed by the government’s Clean Energy Finance Corporation. The discount comes from public funding, not from a markup hidden in your system price.
That means the rates are genuinely low. Some CEFC-backed lenders offer solar and battery loans at under 5% per annum. A few go as low as 2.74%.
Ask your installer or your bank if you qualify for one before signing up for a BNPL “0% interest” deal. The interest rate on a green loan is real and disclosed upfront. Nothing is folded invisibly into the price of your system.
It’s worth remembering this cuts both ways.
- A well-known brand doesn’t guarantee a good outcome if the installation itself is botched, and paying too much is no safer than paying too little.
- Chasing the cheapest number on the page carries its own risk: rock-bottom prices are often propped up by rock-bottom after-sales support, so when something eventually goes wrong, there’s no one left to call.
Mistake #4: Sizing the System for Today, Instead of Tomorrow
Asking “how many panels do I need?” isn’t enough if you only look at your current electricity use.
Upgrading to a larger system now usually doesn’t cost much more. But adding more panels later can be expensive, especially if your roof runs out of space or your inverter is already at its limit.
Think about where your household is heading over the next five to ten years, not just this year’s bill. An EV in the driveway, ducted air conditioning, or a home battery all pull more power.
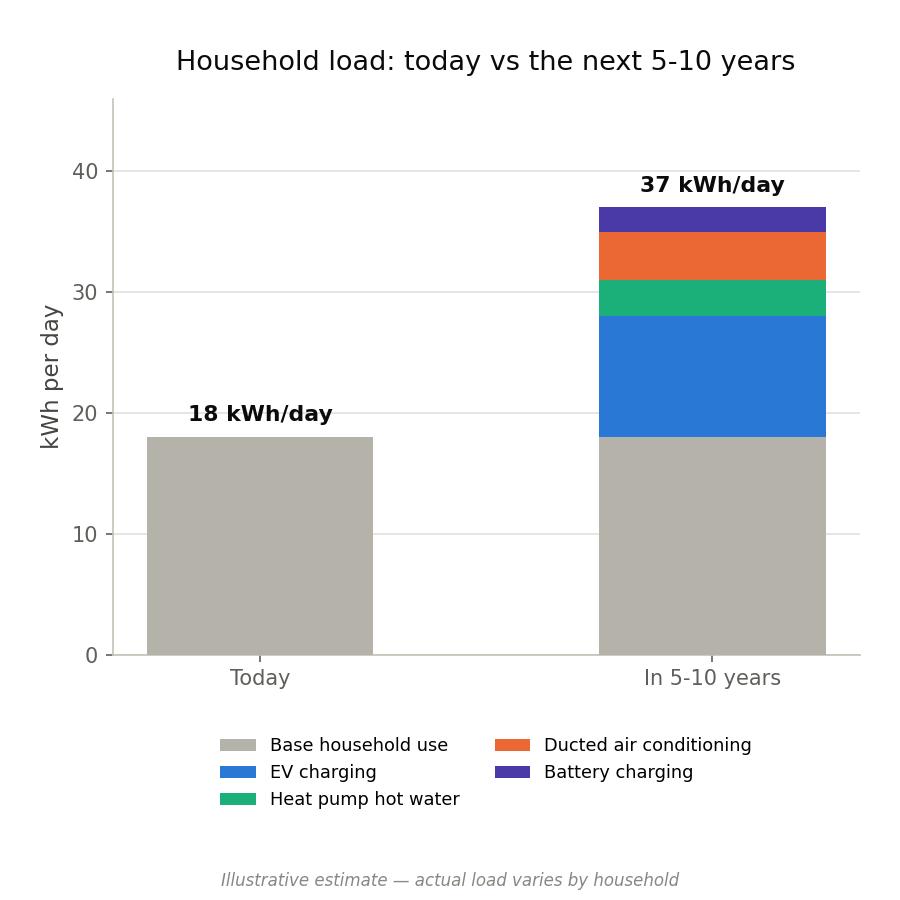
Most homeowners who regret their system size say they wish they had chosen a bigger system while the roof space and installer were available.
Adding a battery or EV charger later usually means a second site visit, another day of labour, and sometimes a switchboard upgrade that could have been bundled into the first job.
You don’t have to buy everything now. Just mention to your installer if you might add a battery or plan to get an EV in the next few years, before they finish the design.
Watch out for the default trap, too.
- Plenty of homeowners end up with a 6.6 kW or 13.2 kW system simply because that’s the size everyone else gets quoted, not because anyone worked out what their roof or their future usage actually needs.
- An EV alone can roughly double a household’s electricity consumption.
If your roof and budget allow it, install as much solar as you can reasonably fit, not just whatever size happens to be the default.
Mistake #5: Ignoring the Cheaper Home Batteries Program
A few years ago, skipping the battery and selling excess solar back to the grid made financial sense. That math has changed for buying a battery.
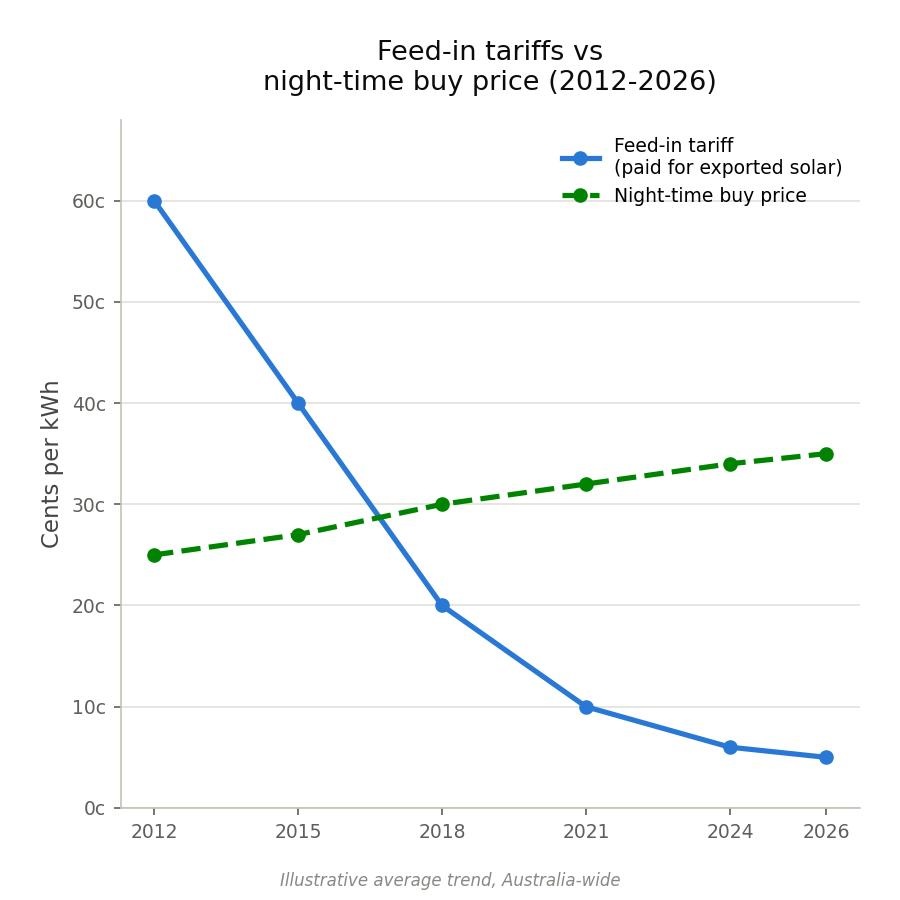
- Feed-in tariffs have fallen sharply.
- Most Australian retailers now pay somewhere between $0.03 and $0.08 per kWh for exported solar, while Victoria’s minimum rate is closer to $0.01.
- When you compare that to the $0.30 to $0.60 per kWh you pay to buy electricity at night, selling your extra solar back to the grid doesn’t seem like a good deal.
A battery stores midday solar for use after sunset instead of selling it for next to nothing.
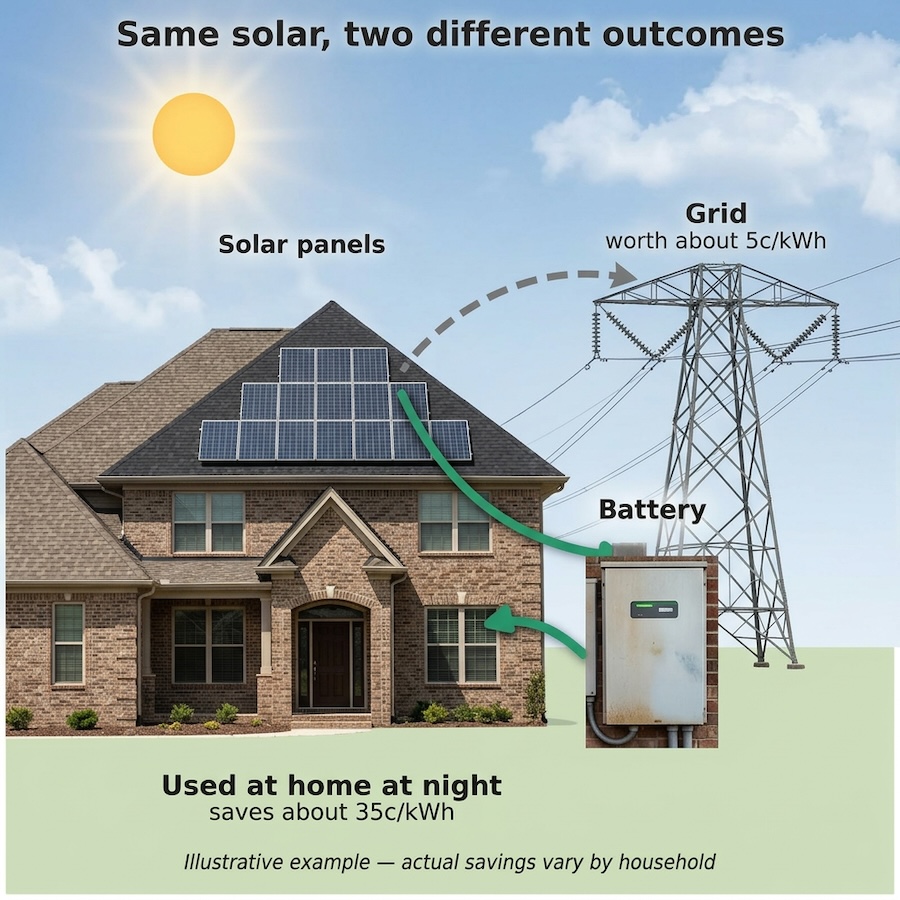
The federal Cheaper Home Batteries Program currently funds a discount on installed battery systems, which meaningfully changes the payback period math.
It’s also worth knowing the rebate is a one-time claim per property, so it pays to size the battery properly the first time rather than starting small and topping up later.
Skipping a battery still makes sense in specific cases:
- If you’re home using power all day.
- If you’re planning to sell the property soon.
- Or if your budget genuinely doesn’t stretch that far this year.
In other cases, it’s a good idea to do the math before deciding that solar without a battery is the cheaper choice.
You’re unlikely to need reminding about the battery rebate. Most solar companies push it hard enough already.
- The bigger risk is that, in all the focus on batteries, it’s easy to overlook other big electricity users in your home, especially cooling, cooking, and hot water.
- Your hot water system is worth a second look on its own: a standard tank can store roughly 13 kWh of energy as heat, which makes it a battery you may already own.
Running it on a timer during the day, so it heats using free solar instead of overnight power, can capture some of the same savings as a battery, for a fraction of the cost.
Mistake #6: Assuming Your Roof Rules You Out Because It Isn’t North-Facing
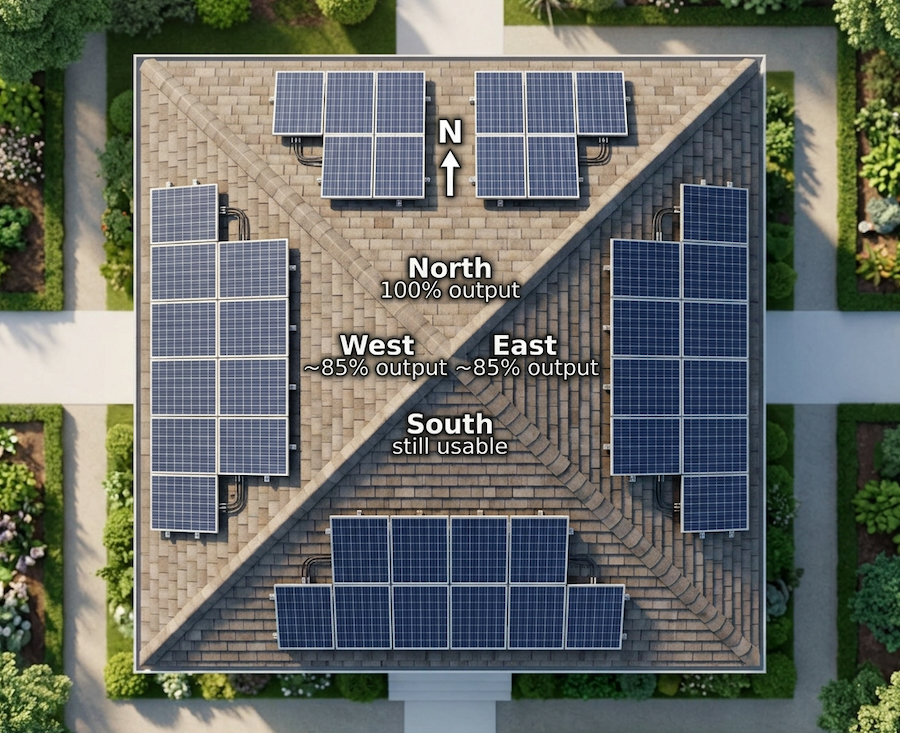
This one costs people entire solar systems they never installed because they don’t have a north-facing roof. In reality, solar systems still suck up a lot of sunshine regardless of which direction the panels face.
- East and west-facing roofs only lose about 15% of output compared to north-facing panels, and in some cases, they suit your household and energy use patterns better.
- If you’re usually out during the day and home by early evening, west-facing panels that produce more power in the late afternoon can be more useful than a north-facing system that peaks when your house is empty.
Shade is a bigger factor to get right. Ask your installer how the system will be designed to handle shade on your specific roof, whether from trees, chimneys, or next door’s roofline.
Microinverter and power optimiser systems isolate each panel, so one shaded panel doesn’t drag down the output of the whole array. Systems with more MPPT strings across various roof faces make a huge difference, too.
If your roof gets any shade, ask your installer exactly how the system will handle it.
The same logic applies further than just east and west.
- Don’t write off a south-facing section of roof either, particularly if you’re expanding an existing system or replacing one and need to spread panels across more than one plane.
- Beyond shade, there’s genuinely no bad direction for solar.
Panels just need to face up.
Mistake #7: Mounting the Inverter in Direct Sun
Heat is the main reason inverters fail early, and where your installer places the unit affects how much heat it will face.
- Most inverters are rated to last 10 to 15 years, but repeated overheating can shorten that considerably, sometimes to a fraction of the warranty period.
- Direct sun exposure adds external heat in addition to the heat the inverter already generates as it converts DC to AC, accelerating the breakdown of the capacitors and semiconductors inside it.
- AS/NZS 5033 requires isolators to be protected from direct sunlight and weather. The isolator needs to sit fully within the shaded area.
Ask your installer about the inverter’s location before installation day. Placing it on a shaded wall or in a well-ventilated garage can help it last longer. An inverter left in full sun will wear out faster. Choose your inverter and installer carefully.
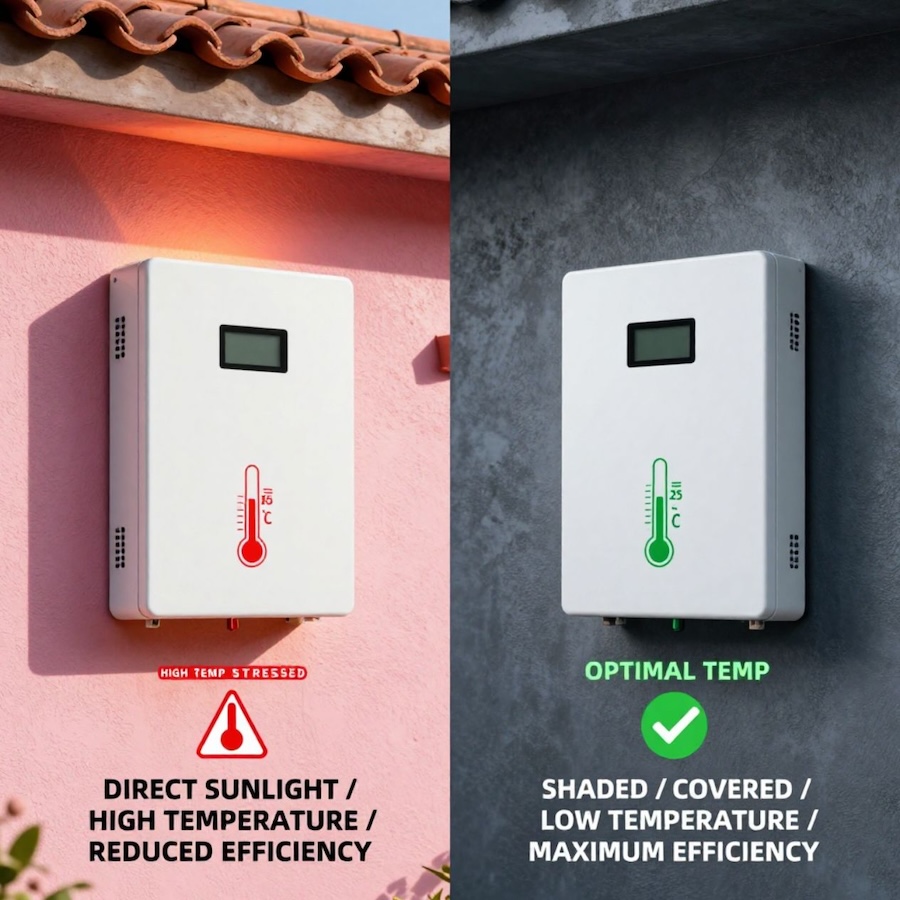
The same logic applies to a battery if you’re installing one.
- Batteries are just as sensitive to heat as inverters.
- A battery left baking on an unshaded wall all afternoon will degrade faster than one placed somewhere cooler.
Ask your installer where the battery is going, not just the inverter.
Mistake #8: Installing Solar on a Roof That Needs Replacing
Solar panels usually last longer than most roofs, which can be a problem if no one checks your roof’s condition before installation.
Solar panels carry performance warranties of 25 to 30 years. If the roof underneath doesn’t have anywhere near that much life left in it, you’re setting up a second, expensive, avoidable, reinstallation job. Whether it’s ageing tiles, rusting metal sheeting, or a roof that was already due for replacement, it needs evaluation before installing solar.
- Larger arrays, multi-storey homes, or systems with microinverters all cost more to remove and reinstall for the same reason: more labour and greater complexity.
- Installation is usually scheduled 3 to 5 days after the roofing work finishes, to give any coatings time to cure.
Before installing solar, ask your installer or a roofer to check how much life your roof has left. If it needs replacing in the next ten years, consider doing it first or at least be aware of the extra cost later.
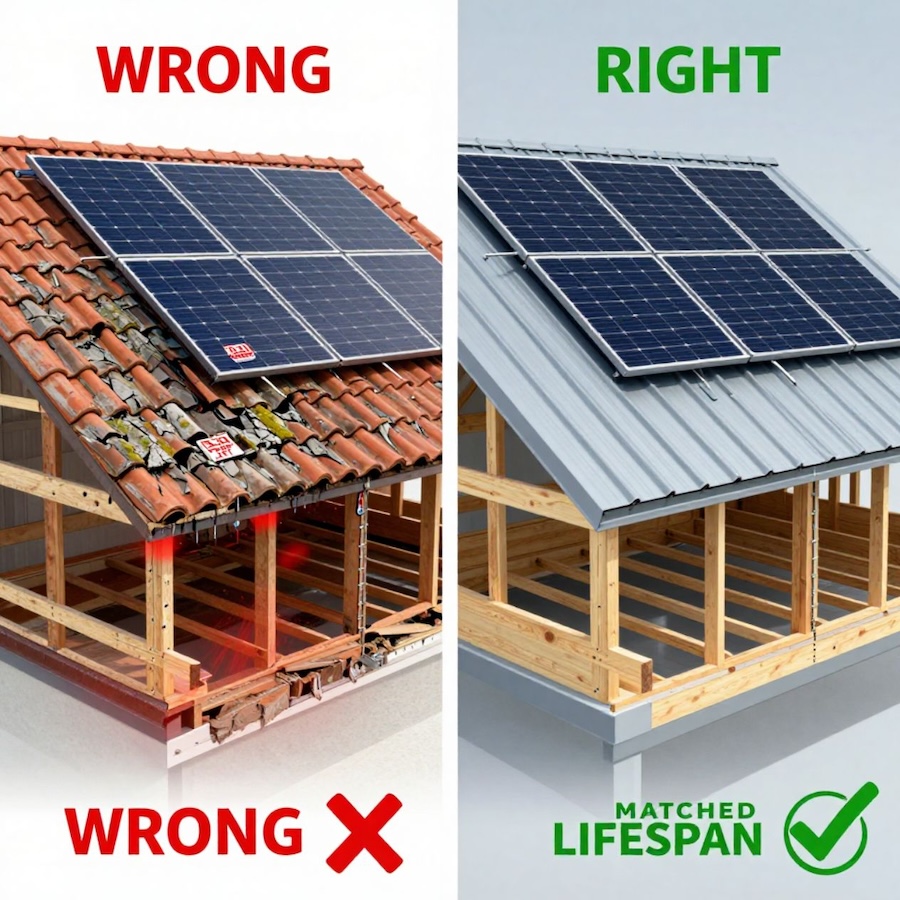
If your roof needs attention anyway, it’s worth asking whether solar is even the first job that should happen.
- Insulating the roof cavity properly, for instance, is often cheaper to do before the panels go up than after.
- And if you’re replacing a tiled roof, it’s worth asking whether tiles are the right choice to put back: tiled roofs cause more complications for solar installers, and more of the problems that show up later, than a metal roof does.
Mistake #9: No Site Assessment Before Quoting
A quote based on your address and a rough idea of your roof isn’t a quote; it’s a guess. A proper site assessment is necessary because so many unique factors about your house affect what should be installed and how.
- Shading. Even partial shading from a tree, a neighbouring roofline, or a chimney can cut a system’s output by up to 25%. That’s normally checked with shade-modelling software, not eyeballed from the street.
- Roof condition and age. As we mentioned, roofs older than about 15 years, or those with any asbestos-containing sheeting, need inspection before anyone goes near them with mounting brackets. This isn’t optional: it determines what work can proceed safely.
- Switchboard capacity and cable runs. Whether your switchboard can handle the extra load and how far the cable has to run from the panels to the inverter and into the switchboard both affect the design and the price. Neither can be judged accurately without someone looking. A switchboard upgrade is a cost that needs to be factored into your payback period.
- Network export approval. Your local distributor (DNSP) sets the rules and limits on how much solar you can export, and those caps can force you to use a smaller inverter or a different design than the one originally quoted.
Pro-tip: our SolarQuotes installer map lets you filter for installers that do site visits.
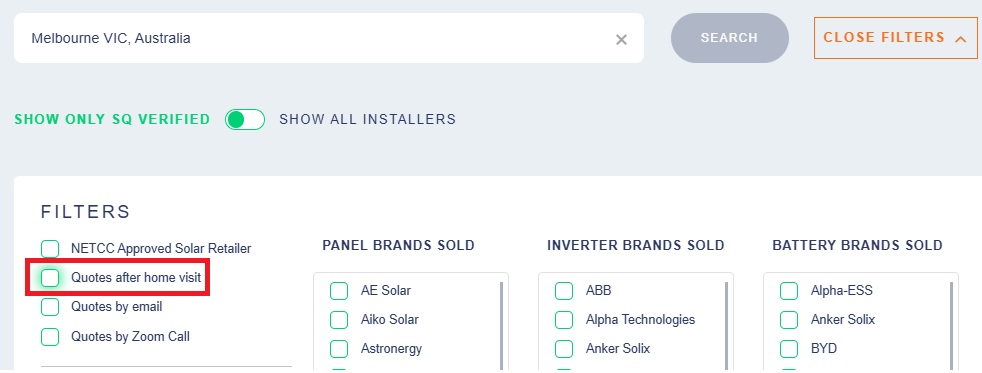
Enter your address, then click “Filter Results“. There, you can select “Quotes after home visit“.
Check if someone has done a real site assessment for your home, not just an estimate based on a similar house nearby. Your home is unique, and your system should be as well.
- If you’re likely to electrify other parts of your home over time, hot water, cooking, heating and cooling, and an EV charger, ask whether your switchboard is being sized for that future, not just for today’s solar and battery.
A bigger switchboard now is far cheaper than a second upgrade in a few years.
Mistake #10: Signing on the Spot Instead of Using Your Cooling-Off Rights
If a salesperson comes to your door, calls unexpectedly, or pushes you to sign for a “today only” deal, you still have protections.
Under Australian Consumer Law:
- Unsolicited sales (door-to-door, cold calls, and similar approaches) are subject to a mandatory 10-business-day cooling-off period.
- You can cancel for any reason in that window, and the supplier isn’t allowed to take payment or install anything until it’s over.
The point isn’t to avoid buying solar from a door-to-door or special offer. It’s to make sure no one rushes you past your legal right to take your time. A good installer will respect that.
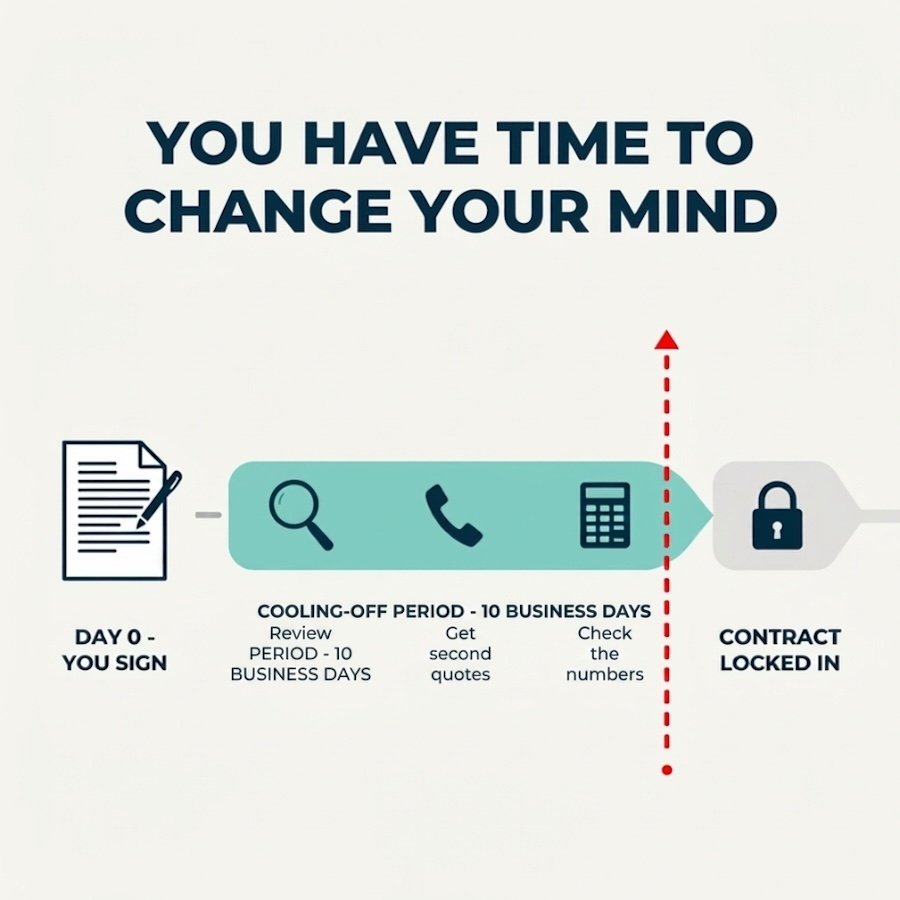
While you’re reviewing what you’ve signed, check that switchboard work and safety switches are actually included in the price, not added on as a surprise once the installer is on your roof and finds an old board that doesn’t comply.
Adding on extra work on the day of installation is a common way for the final bill to come in higher than the contract you agreed to.
Mistake #11: Making Sure the Monitoring Works Before the Installer Leaves
Solar monitoring acts as your system’s dashboard. Since you paid for it, including setup, it should not be considered optional.
- Sometimes installers finish the job after dark, so the system never gets tested while it is generating power. This includes checking the monitoring.
- Homeowners are often left to deal with Wi-Fi connection problems themselves, sometimes after being promised a follow-up call that never happens.
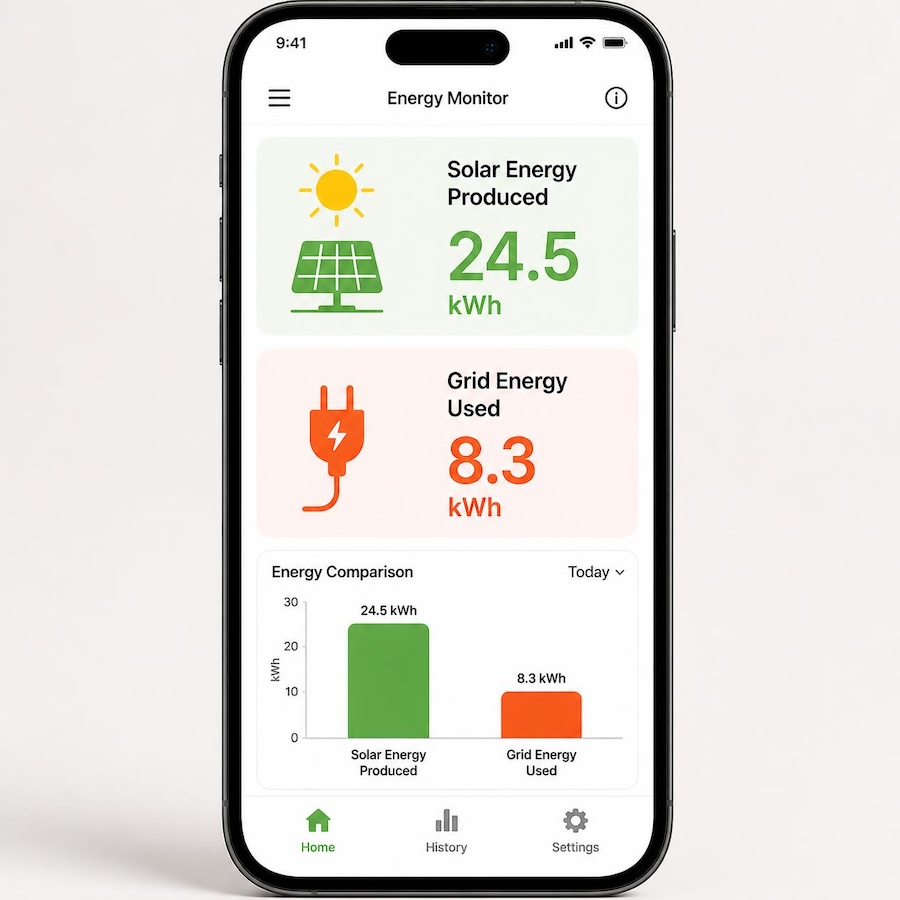
Monitoring, for most systems now, is included in what you paid for, not just an extra. If it is not working when the installer leaves, speak up right away. If they set up the system in the dark and you do not have a working dashboard, call the installer or retailer immediately instead of waiting for it to fix itself.
If your system doesn’t come with some form of energy use monitoring software (basically, systems without a battery), consider adding Solar Analytics. It’s an easy-to-use energy use monitoring platform. You wouldn’t want to drive a car without a speedometer; your solar system needs one, too.
Mistake #12: Leaving Without the Required Documentation
Speaking of car metaphors, you wouldn’t drive a new car off the lot without the owner’s manual and service book. Solar isn’t any different.
Australian standards require installers to give you a full set of documents: user manuals, warranty papers, and compliance and commissioning certificates. This paperwork is important. You will need it for warranty claims and possibly for insurance later.
- Ask for your documents at the start, either printed or by email. Make sure they do not leave without giving you the paperwork.
- Some installers now put a QR code on the switchboard that links to all your documents online. If your installer offers this, use it.
Solar is not a ‘set-and-forget’ appliance, no matter what some installers might say.
- Some installers tell homeowners that their system does not need any maintenance. That is not true.
- Others suggest using harsh chemicals or high-pressure washers to clean the panels, but both can actually damage the panels instead of helping.
Maintenance instructions should come with your documents, not be something you have to ask for later. If your installer has not explained basic care before leaving, ask them to show you before they go.
Mistake #13: Forgetting to Shop Around for a Better Energy Retailer After Installation
Buying solar is only part of the process. Choosing the right energy retailer afterwards is just as important.
Feed-in tariffs vary widely between retailers, sometimes by 2 or 3 times, for the same solar exported to the same grid.
Most people just stick with their current retailer’s rate and never look for a better deal.
Once your system’s connected, compare feed-in tariff and usage rates across retailers in your area, and revisit the comparison every year or two. Energy retailers count on customers keeping an overpriced plan when another suits them better. Don’t give them the discount. Use the SolarQuotes electricity plan comparison tool instead.
Wrapping Up: What Buying Solar the Right Way Looks Like
The best solar systems are bought by taking your time where others rush. Before you sign, make sure you have:
- compared itemised quotes, not just bottom-line prices
- checked your installer’s track record
- size the system for where your usage is headed, not just where it is today
- run the numbers on a battery, given how far feed-in tariffs have fallen.
- flag any future battery or EV plans before the design is finalised
- inverter and/or battery placement
- confirmed how the design handles shade and roof orientation
- whether or not you need to replace your roof
- used your cooling-off rights instead of signing under pressure
- shopped around for a better feed-in tariff after the system’s switched on
If you get these steps right, the panels themselves will be the easiest part of the process.
To compare quotes from installers who have passed SolarQuotes’ thorough vetting process, request (up to) three quotes and start comparing.