

With record-breaking heat and bushfires sweeping the country, times like these serve as a sobering reminder of why we need more solar – and also as a reminder that those of us living in at-risk areas ought to prepare and maintain our rooftop PV arrays appropriately.
I recently heard a conspiracy theory, purportedly from the USA, about how Australia has made fires in California a million times worse. It’s not your usual argument about our massive fossil fuel exports and world-leading carbon pollution though.
Americans have found we’ve planted incendiaries all over their countryside.
We already know, but after a hundred years or more sowing them, Californians have figured out that eucalypts are flammable. Without the native pests, gum trees do really well in a SoCal climate, I’ve seen first hand that they actually grow taller than trees you’d be familiar with here.
I’ve also seen first hand the batchit crazy timber shingle roofing they use but, the point is, we all need to be careful about how we build and look after our homes.
BAL Is The New Black
Bushfire Attack Level (BAL) is the planning jargon used to describe how you should build a new house if there’s any chance it might be subject to fire. Broadly speaking the rules are justifiably more stringent the further into the bush you decide to build.
Having worked on houses that are designed to the highest standard, the golden rule is to get everything millimetre perfect. When you’re done, there should be no more than a 1mm gap in any finished surface, and behind that mineral fibre (rockwool) insulation fills the voids.
For the solar on your roof there’s not much change from an average suburban house, but there’s three details really worth getting right.
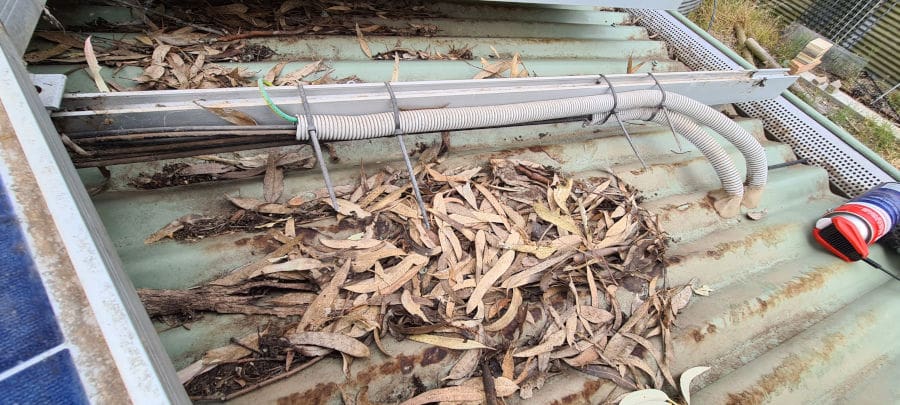
This array had a number of issues, but leaves were one of the worst problems.
Penetrating The Roof
Getting the DC wiring from the roof down to your inverter requires mechanical protection under the Australian Solar Standard (AS 5033). For a BAL rated installation, this means using what the electrical trade calls an “anaconda” which is a flexible metal conduit inside a protective plastic sheath.
The hole in the roof must be a tight tolerance to meet the 1mm gap requirement. The practice we found best was to install the conduit, wiring and weatherproof rubber flashing (often referred to be the trade name Dektite) with urethane sealant.

Black plastic sheath prevents this flexible metal conduit from corrosion.
On the following day we stretched the flashing enough to put a calking gun nozzle down the outside of the conduit and then proceeded to pump intumescent sealant into the the void between the fashing and the roof.
This “fireproof” caulk isn’t a good adhesive or sealant – it’s difficult to use because it doesn’t stick anything together, but it does fill gaps so even if the rubber flashing is burnt off, the caulk will still offer some protection.
If you really want a bombproof system and you’re as keen as I am on an industrial aesthetic, putting the DC wiring into metal conduit and running it outside the building is the best idea.
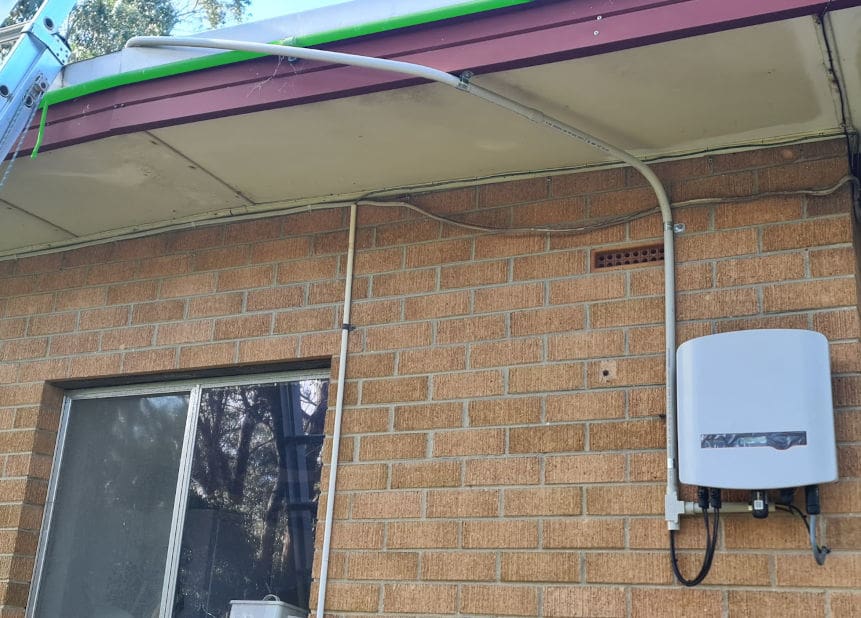
This house in the bush has copper pipe used for a fire sprinkler system. (highlighted in green) To avoid drilling the asbestos eaves & roof the DC conduit is run externally.
Mounting On Vertical Rails
Keeping the roof clean is key, and it is easier when the mounting rails run parallel with the roof rather than across it.
Average houses have a roof pitch of 22.5° and anything more than that will help rubbish and wildlife slide right off.
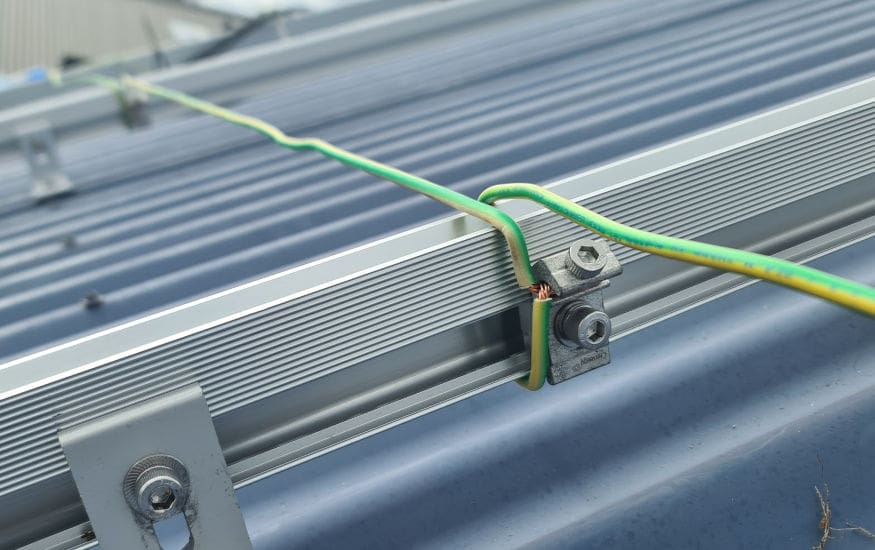
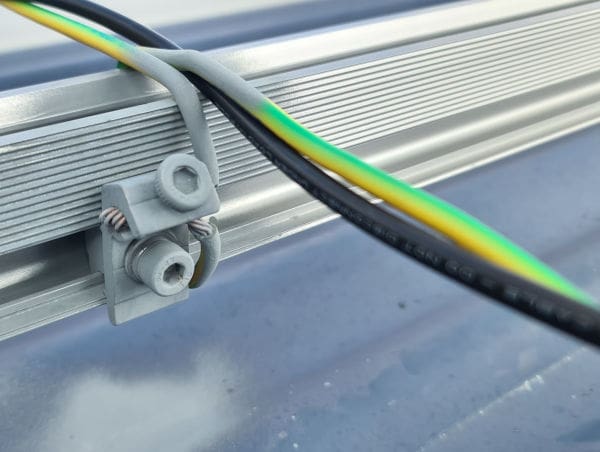
Solar rules call for 4mm² earth cable for mechanical strength, this offers a good support for DC cables but even better practice is to use a plastic coated steel catenary cable.
In my experience the worst problem in cleaning under solar arrays on a relatively low pitch is actually spider webs.
Not even a petrol powered garden blower will break the threads of silk which entangle leaves & bark, so you need a broom of some sort to move everything along. It’s slow, laborious, fiddly and awkward even before you consider the roof angle.
If your array is on horizontal rails and more than a few metres long, then it becomes impossible to clean without disassembling parts of it.
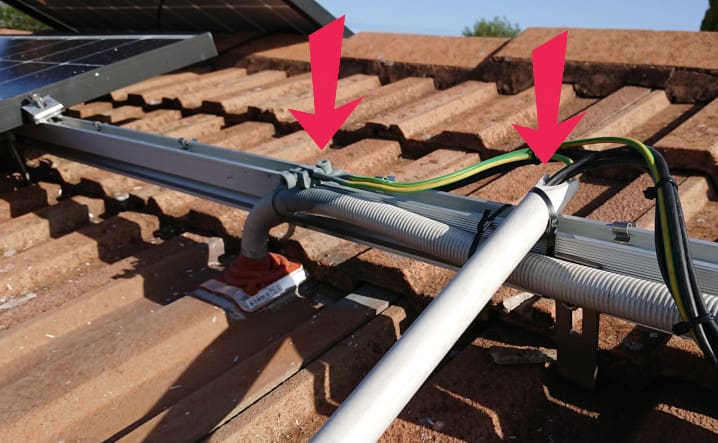
Modern panel frames are often only 30mm deep, which makes it difficult to run conduit or earth lugs (arrowed) on top of the frame. If you can find 35mm frames they can offer more options for tidy wiring
Cable Management Is Crucial
If it’s one thing that the AI hyperbole of the last few years has taught me, it’s that the word crucial has been overused.
However I really mean it here. If there’s any sort of obstruction under your solar, leaves and twigs will get stuck and it only takes one to cause a buildup of others. This is why Australian standards insist that none of your array wiring is allowed to droop down and touch the roof.
Earth connections must be sprayed with “cold galv” paint to prevent corrosion.
It really takes some planning and some pride to get a proper result, but you really must drill it into your installer that dangling cables aren’t acceptable. They’re often quite anal about making it aesthetically nice and straight from the top side, but the functional cable management you can’t see is more important.
While this conduit is good practice, it runs under the rails, close to the roof, meaning it could easily catch rubbish.
One of the best ways I know is to run catenary cables across the array framing before the panels go down. This gives your electricians a nice tight path for wiring to be tied up out of harms way.
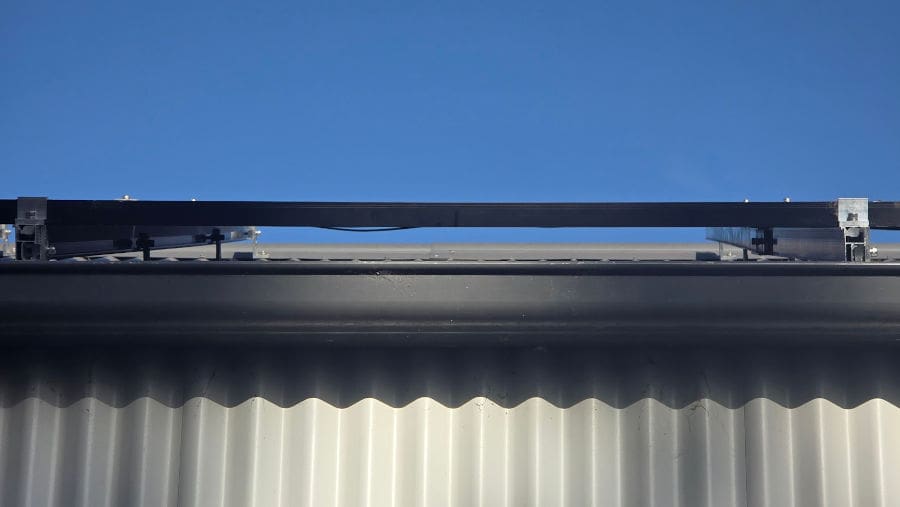
If you can look up from the bottom and see straight through, you can check and clean easily
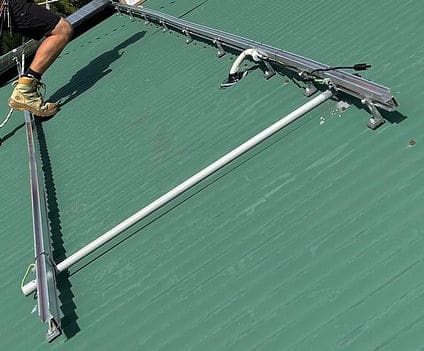
While it’s not always possible, one of the cleverest ideas I’ve seen for solar maintenance was just a very long broom that simply allowed the roof to be swept from ground level. The biggest trick was to make sure the wiring wasn’t going to get hooked up in the process.
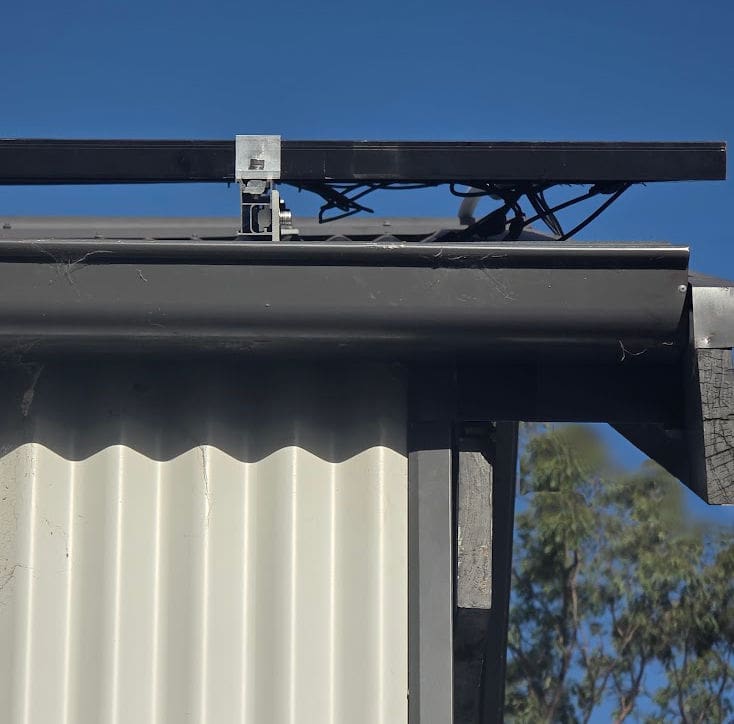
It’s worth noting that not every part of the array will be the same, the wiring disconnection point may be a bit messy
For guidance on what to do with your solar and battery if you need to evacuate due to a bushfire, read my detailed guide.
 RSS - Posts


Hi Anthony. Is there a specific gap requirement for penetrations related to cabling under any bal level other than the general gap requirements? An AS or somewhere in the NCC?
Maybe it has changed; however, that general gap requirement was less than 3mm when we built recently. Not that the builder could manage to achieve that
Hi Matthew,
I haven’t looked at it recently but my experience comes from working with a fussy builder who was putting his own “forever home” together.
Perhaps he was the driver behind our millimetre perfect specification.
The take home message was that gaps need to be filled with intumescent sealant and/or mineral fibre insulation to exclude embers.
You can’t stop dust & leaves getting into everything, but preventing them from buikding up and making it hard for glowing hot embers to get into the same places is the priority.
When I built in Victoria, about 5 years ago, it was 3mm in BAL19, but for my brother in NSW it was 2mm in BAL40. He added fire rated stainless steel window shutters for about $80k. Not required for BAL19, but I’m looking at *much* cheaper aluminium, DIY installed, even though it’s 55m to the forest where I’ve removed 6 heaped trailer loads of fallen treetops.
Just home from buying 2 more fire hoses. Have put wheels & handle on the fire pump, as it’s heavier now, at age 72. I also crank the Grundfos VFD water pump up to high pressure, switch output to the fire main, for ember defence – petrol pump only for flame attack. Off-grid here, so VicGov-warned grid failure in fires is NBD – 46 kWh batt, 27 kW PV, tank water.
The 1 cm bird-mesh around the panels seems to exclude leaves, but racking following the steel decking ridges -> big gap, & 40deg slope on N & W roofs aids washout in rain.
The kangaroos keep the grass very short, so I expect to be able to defend the new house.
I have a problem with leaves, I live in the middle of the bush. I cant get them all with the effort i am able to put in without worrying about hooking cables.
I have been told the answer is to install the bird proofing they use to keep pigeons out, then you just have to keep the leaves off the top side of it.
But as i have been waiting for a bigger inverter, additional panels and batteries to be installed I have held off on that, but they went in this week, so I am about to start looking around for a reputable “pigeon proofing” company..
I dont suppose solar quotes has a 3 quotes system for that? 🙂 .
My solar installer did the bird mesh, as I included the requirement in the five page system specification he quoted on. It was stainless steel mesh strip, black plastic coated. (I’ve lost the bit of paper with its brand name. 🙁
Installers are geared for call-backs for problems – yours should be able to quote for one of his blokes up on your roof for a morning’s clipping & strapping. (Mine went on with included straps reminiscent of cable ties with fat square tabs too big to go through the mesh.)
I did have to fish a whole lot of small mesh sections out of the grass around the house, as the bits snipped out for the racking ends to protrude though, were just flung whilly-nilly as the work proceeded. And a few ended up in the spouting.
cheers, my installers are back sometime next week to put a cover on my freshly installed second battery stack, I’ll ask them.
Hi,
I am considering a new build, & my thoughts on Roof + Solar is to use Kliploc roofing with S-5 clips or similar. This rail-less install gives good clearance to roof, & cables can be clipped to the panels. A conduit can be used on the lower side if required, & all connections possible made on the ridge side. By having the inverter cables at the ridge (on a straight Gable roof which gives maximum area for panels) one can reduce the impact of penetrations, even getting down to a single penetration (S-5 mounts clip to the Kliploc, no penetrations).
I had not thought of spiders, but it should be possible to pull a round spider broom or foam pig from top to bottom.
Solar Design when designing the house, is, I feel critical. PassivHaus is all about design anyway, so worth considering all systems during building design.
Could a solution be to just mount the panels higher off the roof? A bigger gap would be easier to clean.
The use of Kliploc & S-5 does give more clear area under the panel. The trays add to the clearance. Note: The use of the S-5 mounts means there is no horizontal rail. The panels are normally installed landscape orientation.
S-5 can be installed on corro too, but better on Kliploc.
Did that here 5 years ago, primarily for zero penetrations for fixing, so no leaks. (Same 40 years ago, using Rolldeck. never a leak.)
Landscape panels have the racking running upslope, on top of the decking ridges – add clip height and the panels are 16 to 18 cm off the roof.
The Clenergy clips I used are only rated to 40° roof slope, so that’s the roof I designed in here at 38°S latitude. That angle boosts winter yield at little summer cost:
Solstices:
40°: Summer: 90% Winter: 93% Equinox: 99.9%
Flat: Summer: 97% Winter: 48% Equinox: 79%
I.e. almost double winter yield compared to flat panels. (Design for the trough!)
That 25m long N-facing roof took 26 panels – nearly half, but the best half.
No leaves to clean in 2 years, despite half a dozen buckets of them in the spouting each year. The bird mesh sits on the ridge tops, so leaves can wash under, if any get in. The 40° slope helps there.
In your discussion re; Feed – in Tariffs you use as an example someone who is getting a feed in tariff of 10c/Kwh !!.
Where in Aust. can I get that sort of offer?
I signed up for an offer over the phone that gave me 7c/Kwh solar feed in tariff which was changed back to 4c/Kwh within a few weeks.
Now my latest bill says that my feed-in tariff is 3c/Kwh !! It seems that power retailers can change your billing at their whim.
When replacing a HWS make sure you get the size you think you need and then multiply it by 2 or more.
I added a green neon light to the isolator switch which shows me when the
element is in use. I leave the HW power OFF and only turn it on when the solar production is 5Kw or more. It helps that I am retired!
You could install a timer on your switchboard but i found that my timer was a fiddly, unreliable POS and I didn’t want it on on a cloudy day.
This sort of setup acts as a battery on a sunny day.as a big HWS only needs to be on once every 3 days or so. Unless you have a household of teenagers who like to warm themselves under a hot shower on a cold day !!