
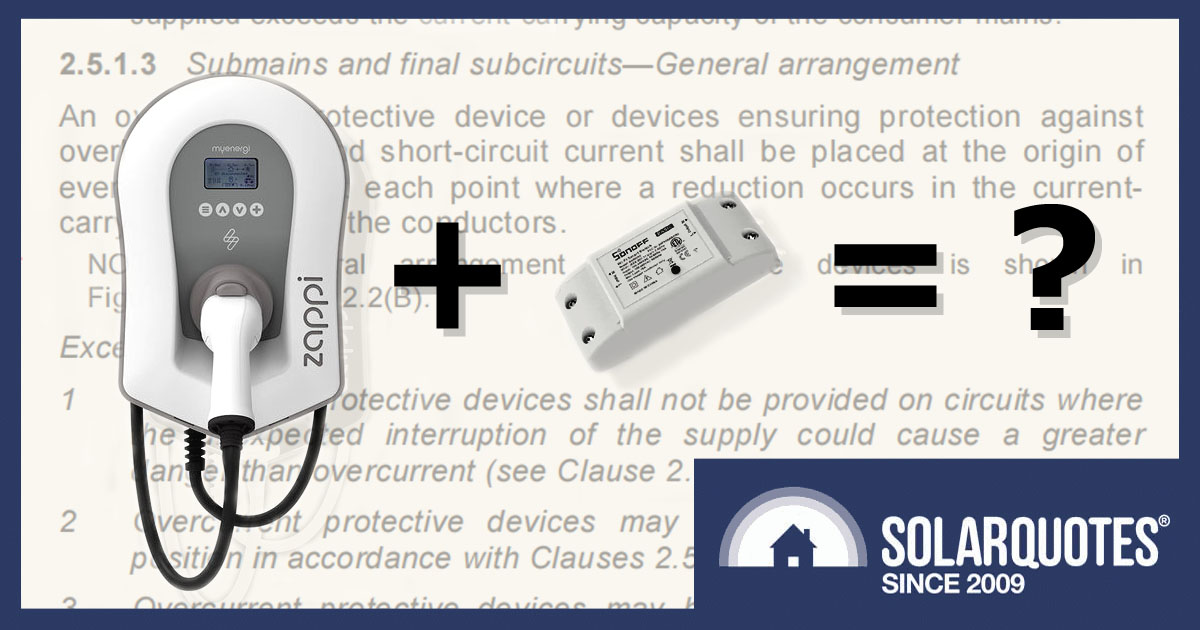
DIY Load Control Is Tempting. Please Don’t Do It.
An enthusiastic reader recently contacted SolarQuotes with some information on how a small modification could control a myenergi zappi EV charger via wifi to take advantage of low-tariff electricity. While I commend him on his ingenuity, I question whether the benefits are worth the risks. After reading this story, you can make up your own mind.
Spoiler alert: Our SQ reader, who we’ll call Bob for privacy reasons, made a modification which, given the right set of circumstances, could have been a serious fire hazard, voiding his warranty, and his house insurance policy, and putting his home and family at risk. On a positive note, when this was pointed out, Bob, to his credit, rectified the problem. Now we can all sleep better at night.
The Hack
Well, it’s not really a hack. They show you how to do it in the manual.
Prior to the latest version1 of zappi 2.0 being released, the only way to connect to the internet and use the myenergi app for additional functionality was to use another piece of hardware called the myenergi hub.
Bob realized he didn’t need to buy the myenergi hub to get the home EV charging functionality he wanted. He discovered the zappi could be configured to override the ECO or ECO+ modes to take advantage of economy tariffs and get cheap electricity to charge his EV.
Bob used a $6 Sonoff wifi switch in conjunction with an eWeLink app on his phone to activate the eSense input in his zappi charger and go into boost mode. He set this to operate between 10 am and 3 pm to charge his EV when electricity prices are cheap and sometimes negative. Pretty clever, huh? Not really.
Let’s take a look at page 23 of the manual.
“The eSense input can be configured to automatically activate a Boost during ECO or ECO+ charging, whenever economy tariff electricity is available. The eSense input must be wired to a circuit which is live during the economy tariff times for this to function. See eSense Input (economy tariff) page 34 for wiring details.”
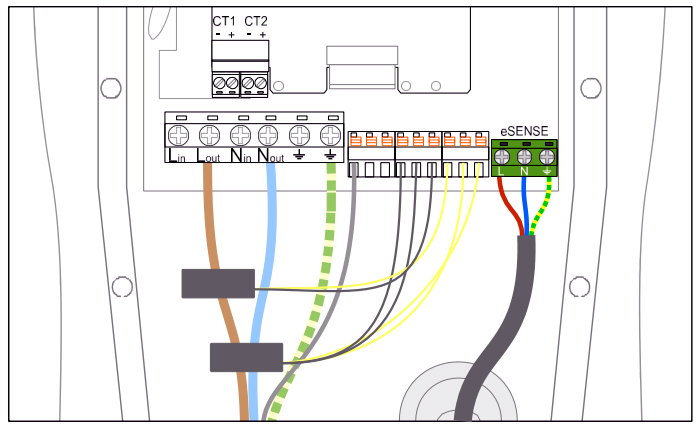
Zappi eSense wiring diagram on page 34 of the operation and installation manual. Image: myenergi
Here are the details they refer to on page 34:
“zappi has an input which can be used to sense the availability of economy tariff electricity, this can be used to automatically boost the charge when in ECO or ECO+ charging modes. The eSENSE input is electrically isolated and effectively draws no current so the cable size is not important. An AC voltage between 100V and 260V across the L and N terminals of the eSENSE input cause the economy tariff symbol to be shown on the main screen. The eSENSE Earth terminal is not required to be connected. See eSense Input on page 23 for details of how to configure the eSENSE input.”
Alarm Bells
Bob gets points from me for thinking outside the box and bonus points for actually reading the zappi operation manual, but he loses points for sticking his fingers somewhere they shouldn’t be and not having a f*ing clue what he’s doing.
Alarm bells started ringing in my head when he said:
“You can open the zappi unit and wire in a wifi switch. I used the power coming into the zappi unit to power the wifi switch and then the output from the wifi switch, when switched on, toggles the eSense input… “
Is Bob an electrician? No. I asked him to send me a pic to see how he had wired in the wifi switch. That’s when it hit me that this was not looking kosher.
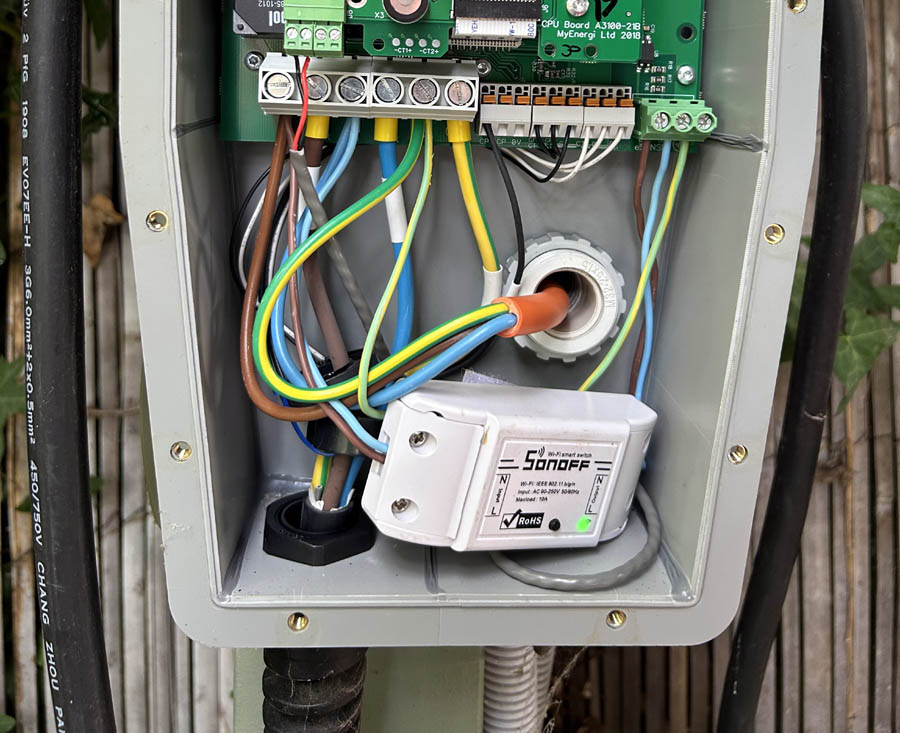
Bob’s Sonoff wifi switch wired into his zappi EV charger – first attempt (wrong). Image: Bob
It looks like a simple enough job, but the problem is that his wifi switch and wiring don’t have adequate overcurrent and short-circuit current protection. Bob has simply piggy-backed and taken a feed from the incoming terminals that supply power to the charger (“L in” and “N in” on the circuit diagram above).
In the very real chance that the wifi switch has an internal fault or Bob’s wiring comes loose and creates a short circuit, the only fault protection is a 32A or 40A circuit breaker that supplies the charger. This is not good news considering Bob has used 1.5mm wiring (rated at up to 16A) and the switch is rated at 10A. Translation – Not only illegal2 but a potential fire risk.
I called Bob to let him know my concerns. I told him that the wifi switch should really be located externally to the zappi, and powered by a separate supply with a suitable HRC fuse or circuit breaker to protect the switch and wiring in case of a fault. At the very least, a second option could be the wifi switch remaining inside the zappi as long as it had a suitable fuse plus an upgrade to 6mm wire from the supply terminals to the fuse.
Bob was so caught up in his clever little scheme that it took quite a bit of convincing before he realized that his home and family are actually more important than saving a couple of dollars by doing his own electrical work. Even after I’d put down the phone, I don’t think he believed me.
Fortunately, two months later, Bob emailed me saying he’d taken the Sonoff device out of the zappi and installed it with its own power supply and fuse as I’d suggested. I was hoping he would say he’d got an electrician to do it, but at least that’s better than nothing. Thank you, Bob. Your wife will also thank you if she reads this.
No doubt some readers will point out that the eSense terminals draw no current, so what’s to protect? The answer, as previously stated, is that there could be current drawn if the wifi switch has an internal fault or Bob’s wiring comes loose and creates a short circuit. Circuit protection devices are used to protect electrical installations under fault conditions, not normal operating conditions.
The other thing that worries me is that Bob, like a kid with a new toy, has more of these wifi gadgets in his house, turning on and off lights, and fridges, and operating his front gate. This is not music to my ears considering Bob’s demonstrated lack of safety awareness. For his family’s sake, I hope he has the common sense to have an electrician check them out.
There’s A Better (And Cheaper) Way To Do It
The irony here is that there’s a safer and cheaper way to control the zappi via a phone app. Simply buy the myenergi hub! It was designed to do exactly what Bob wanted plus more. You can plug it in yourself with no dangerous electrical work required. There are other benefits such as energy monitoring and optimization, plus it’s the only way to upgrade the firmware in zappi 1.0.
Cost
myenergi hub $175
Electrical connections are not required. Just plug it in and configure it.
DIY Sonoff switch + installation >$175
No electrician will install this for less than the price of a myenergi hub. If you do it yourself, it will void your zappi warranty and home insurance, plus it’s illegal.

myenergi zappi, hub plus app. It’s (almost) all you need. Image: myenergi
An Even Better Alternative: Get An OCPP Compatible Charger
If you’ve already bought a Zappi, it’s a bit late. But if you are in the market for a home EV charger, I’d strongly recommend buying one that is OCPP compatible (Zappis are not). That means third-party devices can talk to the charger, and ‘hacks’ like this are as easy as configuring some numbers in an app such as Charge HQ. As tariffs get more complicated, the third-party apps will be updated to keep up, ensuring you can always coordinate your charging with the changing tariffs.
My Mother Could Do That
Electrical circuitry can sometimes appear to be simplistic. Even my elderly mother could correctly connect red, black, and green wires to make a power point work. It doesn’t look that difficult. Or is that brown, blue, and green/yellow? The truth is that licensed electricians are trained to understand those components and wires at a deeper level than your average DIYer.
Despite having a love/hate relationship with the Wiring Rules, electricians know that 95% of that book is there to stop your house from burning down. Please respect that or suffer the consequences. If you’re an addicted amateur DIYer and can’t help yourself, run it past your sparky mate first and not the DIY Solar FaceBook group. Better still, just don’t do it. If you play with fire, you might get burned – and so might your family.
Footnotes
- The zappi 2.0 now has wifi and ethernet connection built-in. ↩
- ASNZS3000:2018 Clause 2.5.1.3 Submains and final subcircuits—General arrangement – An overcurrent protective device or devices ensuring protection against overload current and short-circuit current shall be placed at the origin of every circuit and at each point where a reduction occurs in the current carrying capacity of the conductors. ↩
 RSS - Posts


Well, that separate wired supply is overkill. I have many of these used as temp/humid sensors. All powered from light circuit and every single one has added glass fuse inline. I don’t trust Chinese quality and don’t want fire in roof cavity so that regardless of 16A limit on lights circuit these are fused to 500mA each. Can see it similar way inside Zappi with 500mA fuse. I would use shelly, however.
When my Zappi was installed, electrician did a few things I’ve asked him to do for small fee. I agree as separate task it would be too expensive but done while Zappi is installed, I bet I would have Shelly wired for $20. Or maybe even for free as part of install itself if I’ve asked before ordering it.
Hi Darek. As a licensed electrician myself I’d suggest you let a qualified person (the sparky) make the call of what is or isn’t overkill for each unique situation. Yes, in this case an in-line fuse may be suitable, but that goes along with appropriate wire sizes and correct voltage and amperage ratings of the fuse. This might be obvious to your good self but maybe not the next DIYer who thinks he can save a couple of dollars and have fun with his little science experiment. The whole point of this article is to make people aware there is more to simple domestic wiring circuits than just connecting up a couple of wires, and the implications of getting it wrong are serious.
Wiring is always an issue with Hard wired devices. This is one reason my charger is plugged in to a 32A industrial power point.
Personally, I don’t think everything needs to be done by a sparky, but one certainly needs to use common sense. A connect/disconnect licence is also helpful. (My background is Medical Electronics, so I have much experience in High Voltage devices, eg defibs & Theatre equipment.)
My personal opinion is Australia is far too regulated. In Europe, one can do repairs etc to plumbing & electrics, as long as it is certified. After seeing some of the jobs performed by Licenced Electricians that did not comply to AS3000, I think I could have done a better job! (It is difficult to get them to rectify the work too.)
This hack is one reason why I think all hardwired EV chargers should be OCPP compliant. The charger can then be controlled by the OCPP server.
Yep, Doug, this is where you see union’s hands to limit workforce. I am not against licensing but when I looked at getting my SEP 1kV recognized here, I abandoned it as it would be required for me to actually work continuously or I will loose it anyway. Rules are opposite to Europe where load has to protect itself and wiring is protected against load while here wiring is protecting load. Thus having 16A plug with wire and two 10A sockets seems illegal here while alright in Eu. Colors are swapped (see black use), and so on. I saw label on windmills in WA saying that local electricians are not allowed because inside wiring is made up to Eu standards. And these plugs here. In Eu there is simple compatibility from 6A plug up to 25A plug/socket.
Kim your post makes a lot of sense and I am pleased you persevered with Bob to improve his circuit protection.
Doug makes a good point also; like most things in life “its horses for courses”.
Lawrence Coomber
What would be a zappi alternative that works with ocpp and allows for smart charging based on solar input?
Take your pick: https://www.solarquotes.com.au/electric-vehicles/compare-ev-chargers/
I use a Delta AC Max ‘Smart’ and Charge HQ for smart solar charging, but you need a compatible inverter or monitor.
There is Zjbenny which combines sort of both. It can use CT clamp to match PV but can also talk OCPP. I wanted one but it turned hard to buy. No trusted source around and lots of offers but with no such modules inside which then you can’t buy to retrofit. It might be good if you find one.
It’s a pity that the Zjbenny is difficult to obtain, since an analogue input able to ramp charging rate is ideal for off-grid. A CT-similar signal could be synthesised from the voltage across the domestic battery shunt, so that EV charging only discharges the battery fleetingly, e.g. while a cloud passes.
It sounds like the Zappi input is only binary. That is perhaps better than nothing – so long as the EV tolerates repeated total charging interruption, without dropping out of charging mode.
Briefly skimming an OCPP protocol description showed control messages for timing of charging, but nothing for dynamic real-time ramping on a second by second basis. A hardware control input is simpler to deal with, especially if it is Hi-Z ELV.
The Zappi is analogue – it ramps the charge rate up and down to match the solar in almost real-time.
Finn, I know you know it but I believe it is worth to mention – these are EVSE not chargers. The EVSE provide PWM signal and it is up to the car to adjust. I observed my Zappi and it does correct often but between external change and adjustment it takes a while (not as bad as chargehq, however). I also observed the vehicle takes a lot over PV surplus for around 10s from start. This may ruin off-grid system if there isn’t enough power reserve and I believe this will be vehicle-dependent.
While speaking PWM – I have gut feeling if I had off-grid system I would replace EVSE PWM with something generated by, say, ESP8266 and converted to +/-12V as per spec. This could be integrated with any dumb EVSE leaving relay/230V part original and providing alternative PWM feed. It might sound difficult but when you look at Tasmota compatibility page, you may find it otherwise by number of people transplanting chips in so many devices.
Many thanks for the heads-up, Finn.
Reading p12 of the Zappi manual, the ECO+ mode seems well suited, and on p22, the “Gen & battery” mode of CT operation might be best for off-grid. This is unequivocally the best solution I’ve seen. It’ll be a few months before the funds are lined up for the batteries needed – enough time to type up a system spec. with a good chance of being able to do the job.
A CT wouldn’t work with DC, but I can “transform” the battery shunt signal to just about anything in an Arduino, if that proves necessary.
short list (not comprehensive) of solar aware EV chargers:
EO – Mini Pro 2 or 3 / CT clamp (Optional)
EVNex E/X / CT clamp (Included)
EVBox – Elvi / Energy Meter (Optional)
Fronius Wattpilot (Home & Go) / Fronius Solar Inverter Integration
Hypervolt – Home 2.0 / CT clamp (Included)
Smappee EV Wall Charger/ CT clamp (Included)
Wallbox – Pulsar Max / Energy Meter (Optional)
Wallbox – Pulsar Plus / Energy Meter (Optional)
ZJ Beny AC EV Charger / CT clamp
Zappi v1/v2 / CT clamp or Hub/Eddi
Pricing/Availability is sketchy, models are designed for EU/UK, some models aren’t available in AU yet.
Some chargers (Smappee/Fronius) also require extra hardware to be installed.
Solar Energy Meter installation can be a pricey option +$200-$500 if they aren’t also adding a 40A breaker/RCD at the same time, whereas a +$30 CT clamp just has to be clipped on.
You might also have a Energy/Consumption meter installed with your solar Inverter, so this may take up room in the switchboard, YMMV.
OCPP is a problem child, it’s supposed to allow for remote / web management and RFID / billing, but the standard needs improvement. V2 supports Fleets, but it adds complexity/cost. If you need to lock or share/bill others, check how it works.
ChargeHQ is probably the ideal for taking advantage of solar, and you have a non-solar EV charger. It was designed to use with Tesla, as the Car handles charge rates and scheduling, not the Tesla charger.
however, it requires charge states and change amperage values, via OCPP, or a remote API. Only about 10 “OCPP” chargers are ChargeHQ compatible, and available in Australia.
The Ocular IQ / Wallbox Pulsar Plus, from AGL,
ABB – Terra AC Wall Box
Circontrol eNext Elite
Delta – AC Max Plus
EO – Genius 2 & EO – Mini Pro 3
Keba – KeContact P30
MG Chargehub
Schneider – EV Link Smart Wallbox
ZJ Beny AC EV Charger
If you have solar, and a solar aware EV charger, you don’t have to worry about OCPP/ChargeHQ.
The hub cannot be used with a V1 zappi in Australia. The hub and zappi communicate with one another via radio frequency. The v1 is set to 868MHz which is standard for UK/EU but not approved in Australia because it overlaps with frequencies used by mobile phone carriers (Vodafone I think). The V2 zappi was designed to accomodate the Australian market and is switchable between 868MHz and 915MHz by changing the time zone.
If Bob has a set off-peak window, he can set a boost in the zappi which will activate during that time. Much simpler than messing with wiring.
I’m confused. Since when do you have to separately fuse a device you connect to 240V? All that matters is the CB trips if the rated current of the wiring is exceeded. If something draws excessive current and catches fire, it is what it is. Applies to TVs, internet routers, PCs etc. Most loads do however have some sort of overload protection and Bob’s switch should be in this category.