
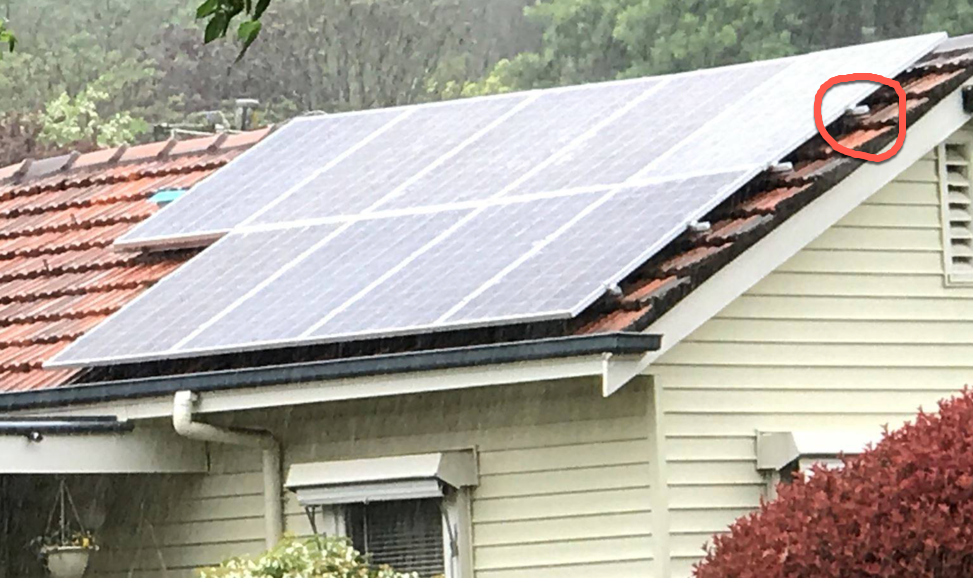
That clamp is not in the zone! After reading this post you will know what that means. (Photo credit: Matt Hines – definitely not one of his installs)
There is one main way solar panels are attached to roofs in Australia and I’m hoping you won’t be surprised to learn it’s not glue. If you’ve got panels, they are almost certainly fastened to your roof with clamps and held tight in the loving embrace of metal brackets.
When solar is installed on a typical roof, whether it is tin or tile, rails, also known as racks, are securely fastened to roof rafters. Panels are laid on top of these rails and held firmly in place with clamps. While there are other ways of attaching solar panels, including directly bolting them on, clamps are by far the most common method. Convenience is the main reason, but it is effective and I expect the large majority of correctly clamped panels will still be in place 40 years from now.
Properly clamping panels so they meet the manufacturer’s instructions (and therefore the Australian Standards for installation) involves using the right number of clamps in the right places. The areas on a panel where clamps can be clenched are known as zones and panels can have more than one type. If you are interested in learning about clamping zones, what you should check to see if your panels are properly clamped, and what you can do if they’re not, then please read on.
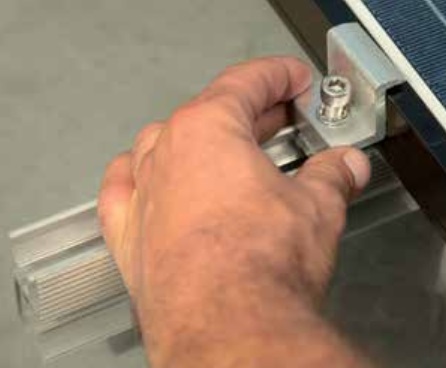
I stole this image from Sunlock, a maker of roof mounting systems. The great thing about clamps is, if you use an Allen key to tighten that bolt, you don’t have to stand there and hold them in place like in this picture. Also, you probably wouldn’t need that extra bit of railing sticking out to rest your hand on.
Bolts On Roofs Is Nuts
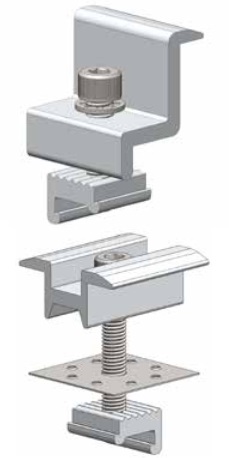
Sunlock clamps: The top one is an end clamp used when there is no adjacent panel and the other is a mid or inter clamp that goes between panels.
Solar panels can be directly bolted into place and panels will generally come with either four or eight mounting holes for bolts to be placed through. This method is often used in solar farms to attach panels to ground mounted racks or to solar trackers that follow the sun through the day. It is possible to use bolts because on a ground mount or a tracker there is plenty of room to get behind the panels and attach them. But on a roof where panels are laid flat this is not at all easy.
Australian standards require a gap of at least 5 cm between roofs and solar panels. However, in urban areas, panels are generally not allowed to extend more than 10 cm from the surface. As a typical solar panel is around 4 cm thick, this only leaves a 5 to 6 cm space in which to work. So directly bolting panels on would require either fancy tools or magic hands to get the job done.
Clamps Rule and Clamp Rules
Because bolts are so bothersome, by far the most common method for permanently perching solar panels upon people’s household canopies of tin or tile is for them to be firmly clenched in the clasp of clamps.
Clenched clamps are clearly the most common category of connector chosen when it comes to cohering panels to racks and roofs and are capable of doing their duty for decades.
But in order for clamps to be effective in holding panels in place in all kinds of weather, there are certain rules that must be followed about where they can go. These rules involve clamping zones.
Clamping Zones
Clamping zones can vary from panel to panel. Many panels only have one type of clamping zone, which will be located around its mounting holes. Other panels can have multiple zones which will give an installer options on where to install clamps, depending on what wind conditions are like at a location.
You can find information on your panels’ clamping zones by searching for the brand’s installation manual or installation guide.
Clamping Zone Examples
This kind of dull-looking diagram is from LG Solar’s installation instructions:
As you can see, LG’s panels only have one type of clamping zone, which is located around its four sets of two mounting holes. The mounting holes are, quite sensibly, located in the best positions to anchor a panel.
The more colourful diagram below shows a solar panel with three different clamping zones and is from the Yingli Solar PV Modules Mounting Guide. Yingli Solar was the world’s largest manufacturer of solar panels and now it’s not. (If you are going to follow the ups and downs of solar panel manufacturing, make popcorn. It’s a real soap opera.)
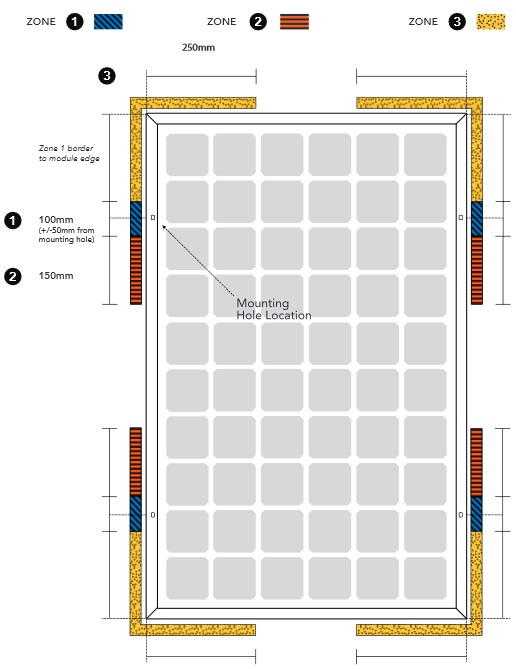
As you can see there are three clamping zones numbered in order of effectiveness.
Zone 1 = The best
Zone 2 = The not so best
Zone 3 = The least best
In addition, in the middle of each side, there is an area that is not part of any clamping zone.
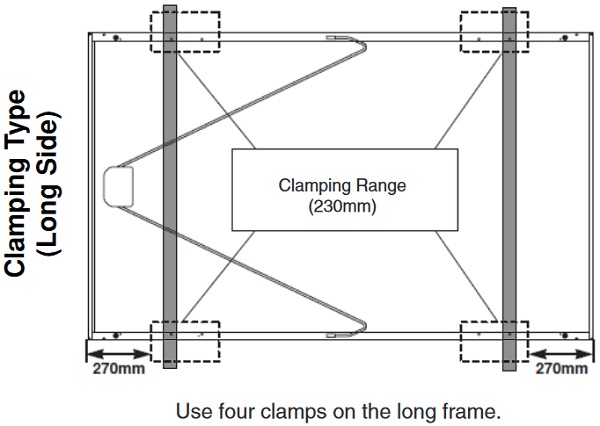
Zone 1 is centered on each of the four mounting holes and is 10 cm long.
Zone 2 is the second-best place to clamp a panel. They are located next to zone 1 on the side closest to the center of the panel and are 15 cm long.
Zone 3 is located around the corners of the panel and is the least secure of all three clamping zones, but it is better than the “no zone” areas in the center of the panel’s edges.
This table from the Yingli Mounting Manual lays out the effects of applying clamps in different zones on their standard-sized 60 cell panels:
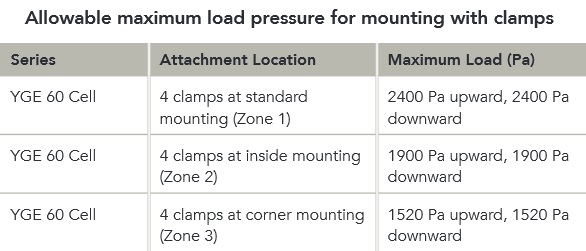
The upward loads under “Maximum Load (Pa)” are caused by the wind trying to blow the panels off the roof, while downward loads are caused by snow piling up on panels — a problem we rarely have in Australia. According to the table, a panel with clamps in each of its 4 zone 1s can withstand 26% more powerful winds than a panel with its four-zone 2s clamped, and 58% more powerful winds than a panel with its zone 3s clamped.
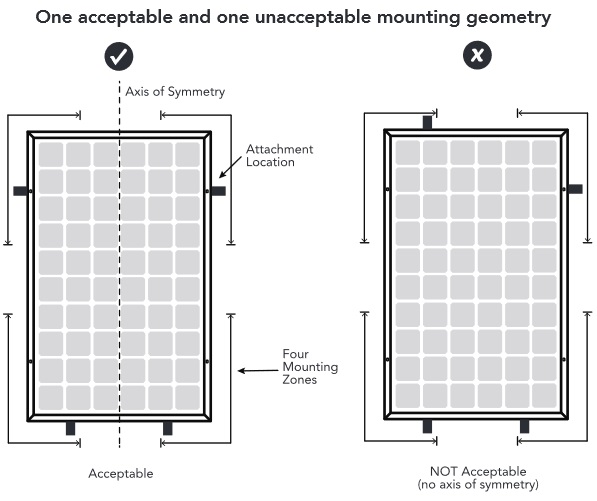
Clamps Needs To Be Symmetrically Arranged
Clamps used to secure solar panels should be positioned symmetrically. To use a technical term, the position of clamps should not make a panel appear “wonky”. Once again, I turn to the Yingli Mounting Manual for assistance:
Help! There Are Clamps In My “No Zone” Areas!

An Ice Warrior from Doctor Who proudly displaying his hand clamps. Or possibly a Lego man after it has been exposed to gamma rays.
If you look at your panels and see there are clamps located outside of clamping zones, there is no need to panic.
Not yet, anyway.
Look at your panel and see if there are four clamps symmetrically arranged in valid clamping zones. If so, then you have nothing to worry about. The clamps in the “no zone” areas are doing no harm and are providing extra anchoring for your panel.
If there aren’t four clamps properly located in clamping zones, then if you want to panic, feel free to do so for a little while, just to get it out of your system.
If there are less than four clamps properly placed in clamping zones then any placed in the “no zone” areas will result in stress being placed on weaker parts of the panel. This can cause the panel to flex in the wind, which is bad as it can cause microfractures to form in the solar cells and degrade their performance. Given enough time, or just one really bad storm, it could result in clamps failing and the panel being blown off the roof.
If your installer hasn’t properly clamped your panels you need to get them to fix the problem as soon as reasonably possible. It doesn’t matter if their workmanship guarantee is over or how much time has passed. In Australia you are protected by consumer guarantees that require products be:
- Safe and lasting, with no faults.
- Suitable for the purpose it was sold for.
Solar panels that are inadequately clamped are neither. While I am no lawyer, I am certain a consumer tribunal would require the installer to rectify the situation.
Bad clamping zones. AKA ‘Diving board’. Photo Credit: Crap Solar FB Group
Happy Clampers
Ideally, you will want each panel in your system to have a clamp in each of its four zones, or four most secure zones if it has more than one type, and additional clamps as well. These extra clamps can be located outside of clamping zones without a problem. The next best situation would be one clamp in each of a panel’s four most secure zones.
If your panels have multiple clamping zones and your clamps are located outside the best zone, then that is sub-optimal. Whether or not this should concern you depends upon where you live. This map, which I stole from the Shark Bay Shire site, shows Australia’s wind zones:
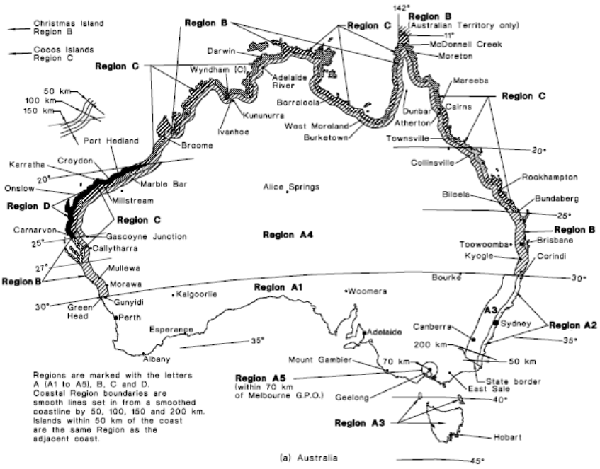
As you can see — provided you have good eyes — there are 4 regions from A to D. Personally, I think of them as:
A for All Right
B for Beware
C for Cyclones
And D for you are going to Die
If I was living in Region A, I wouldn’t be too worried. Especially if my home was surrounded by trees or houses which will reduce wind speeds. Wind loads are also worse near the crest and edges of roofs, so a set of panels with a meter of spare roof space around them will suffer less wind force than those that just have the 20 cm minimum.
If I was in region B I would want a clamp in the most secure zone of each panel. This is because I’ve been on the receiving end of some very wild and woolly weather in the eastern zone B. (In one storm, my horse, Tonto 4, was killed by a grapefruit the size of a hailstone.)
In actual cyclone zones, very high standards have to be met for securing the rails that panels are clamped to. But provided the clamps are rated for cyclonic conditions, only four are required in a panel’s most secure clamping zones in wind Regions C and D. But extra clamps can be used for increased peace of mind.
If the climate becomes more unstable and crazier than it already is, we may all have to prepare for more powerful storms. Except for people in Region D. I don’t think things can get any worse there. If it did, they might have to start installing their solar panels underground.
There’s plenty more I could write about clamps. I could go into the different types and brands, but I’m not going to do that now. I have other things on my mind. When it comes to mounting, I used to think of myself as an expert. There are many books that touch upon the subject on my shelf. But I am so excited by what I’ve learned so far from Yingli Solar’s Mounting Guide I am inspired to see if there is anything in it I can try out with my good friend, Tonto 23.
 RSS - Posts


If you had used Iron Ridge racking in the first place you could avoid all of that trouble.
Somehow I feel that installing panels underground, the safest option, won’t generate enough power back into the grid.
My estimation is that it would take about 250 years plus … and no doubt I won’t be around by then anyway!!!!!
Be that it may, thanks for these updates/ information. If you didn’t, then I suppose nobody else would be bothered to make the effort.
What was that 20cm minimum rule?
Does that mean the panels have to be 20cm from Gutter/Crest?
Many a times I have noticed the bottom screwline is closer to Gutter than that, will it then be unusable?
Leaving a minimum of 20 cm from the roof edges or crest is a typical manufacturers’ recommendation when installing solar panels. (Manufacturers recommendations have to be followed to meet Australian standards.) So panels you see with less than 20 cm space have probably not been installed correctly. This doesn’t make the panels unusable, it just means they will be more likely to be damaged or get blown off in a storm.
You say that we don’t glue panels to rooves. But I remember talking to the TCK at the home show (http://www.melbournehomeshow.com.au/exhibitor/tck-solar-2/) who said that his Solon panels do just that. Although I don’t see that mentioned on their site (http://tcksolar.com.au/products/solbond/). Any thoughts?
Glue on thin film panels were a thing years ago. The backing could be peeled off and they could be immediately stuck to a surface. But I don’t know if that type is still available. The declining cost of silicon panels meant they never caught on for rooftop solar. Currently, there are people who glue flexible solar panels to trucks, boats, caravans, etc. for mobile applications.
Hi Ronald,
Interesting information as usual. I looked at the clamping of the panels to the rails. Some parts had 8 mm dia and some had 6 mm dia bolts. That didn’t seem right to me. Then the installer uses 65 mm long roofing screws into timber. Did the installer do a stress test lifting the panels from the roof? I could not use any hardware available to fit my panels so I made my own. I didn’t want my panels across the road into the bush during the next cyclone. Curious to see how the others around here will manage. Look at the weakest link in the chain. How about specify the cross section area of the bolts, the tensile stress of the bolts, the same for the rail fixing to the timber. I think you will be very surprised.
Cheers
john nielsen
Ronald, my mounting fetish relates to non-penetrative clamping. To avoid having any holes in the tin roof, I built this house with clip-lock style steel decking. Not a drop of moisture ingress in 27 years – handy when you have strawboard ceiling. So I plan to use similar stuff on the new build.
Now, engineers are linear thinkers, it is said, so don’t be surprised when I admit to dreaming of PV array clamping which doesn’t put holes in the roof either. So here’s the nub: Are there clamps out there, which just grip like death on the narrow 40+ mm high ribs of steel decking? If so, I plan to stick ’em under the installer’s nose, in the hope he’ll accede to using them. (I figure that SS bolts through thick Al alloy pads could do it.)
With a 3.5m northern slope, I have coincidentally allowed for 1m free at the ridge, and 0.5m below. The installer will have to advise on the ends.
The 60+ yo house currently out on the farm had roofing nails in corrugated iron. They worked out up to 1 cm over time, and have been replaced with gasketed screws. I think the new spots on the masonite ceiling are probably condensation from the unsarked roof, but I still prefer a roof without holes.
Sunlock makes non-penetrative roof clamps. This PDF has details on them:
http://sunlock.com.au/pdf/TechBulletin_Roof-Clamps_2.0.pdf
And then there is Clenergy’s Klip-lok system:
http://www.clenergy.com.au/getmedia/6e45b831-af50-425f-b444-860bbd8d81d0/Installation-Guide_PV-ezRack_SolarRoof_Klip-Lok_AU_V2-1.pdf.aspx
And no doubt there are others.
Many thanks, Ronald. That was good reading, not least because both are compatible with Klip Lok 700 sheet, which I’ve pencilled in. It is great to have one more thing sorted, even if there’s an awful lot to do before that bit’s needed.
We dread to check our installation which was done early days in Qld. when the rebate to the provider was $6,000 and we paid $7,500. The installers walked on the roof of the 3-bay shed, denting it, buckling it so badly in places it leaks when it rains. The solar company based on the Gold Coast didn’t want to know us when we told them we were not satisfied.
Flat concrete roof. Has anyone tried glue? Perhaps 3M 5200.
I wish to avoid running bolts into the concrete – inevitably there will be water ingress and corrosion,
You can use ballasted systems on flat roofs that don’t require roof penetration. But they are only generally usable in wind Region A.
Glue is an option, but hopefully you’ll be able to find a better solution.
Thanks, Ronald. Sadly, I’m in Zone B. So glue it has to be.
Try TCK: http://tcksolar.com.au/products/solbond/. They’re more expensive, but sound impressive. (German!)
What about chemical bolts like the old dyna bolts but chemically fixed?
Still involves drilling into the concrete but you’re probably correct. The lesser of 2 evils.!
I just coated a metal roof with apoc silicone coating after taping all the seams with 2″ gaco silicone tape. I would not hesitate to penetrate the roof these days. My first Hawaii install was in corrugated metal with straddle blocks. Gooped each hole with geocel. the chemicals these days are awesome. I’d rather be bolted down and silicone coated than just glued.
One thing that has not been mentioned regarding the clamps is that they typically use SS bolts screwed into aluminum extrusions which are prone to seize due to the reaction of the dissimilar metals.
We have a 5 year old installation less than 1 km from the sea and when we had to move a row of panels we found all the bolts required heavy leverage and several seized to the extent they had to be cut to remove them.
Both steel and aluminium can suffer in the presence of saltspray, even drifting mist. But Aluminium is higher on the electrochemical series than iron, so acts sacrificially to protect it – that’s why it is a component of the protective layer in zincalume. There are various SS alloys – I think 316 is one of the good ones for corrosion resistance, but I’m no metallurgist. The composition of your SS bolts may well have been something else. I’ve heard of SS from China being prone to rusting in only half harsh environments, so “SS ain’t SS, Sol.”
If there wasn’t visible evidence of corrosion on the bolts, or pitting of the aluminium, then the reluctance to separate could have been due to galling, perhaps exacerbated by (over)enthusiastic tightening and/or a suboptimal SS alloy. There are anti-galling compounds which can be smeared on threads before insertion, but they are usually copper based – and copper is lower on the electrochemical series than iron, so that’s introducing a corrosion risk, previously absent.
My doubts about clamping head more in the direction of creep in the aluminium, so the clamp loses grip. But so long as the clamps are not pure Al, soft as toffee, but a harder alloy, e.g. 6061, then it’s probably all good. (I know that when I alloyed about 3% Cu and 2% Zn with Al, the casting was surprisingly hard, and flummoxed the chap who machined it.)
My Flat concrete roof installations: mark out where your supports are going to be located. Use a Bosch or similar masonry piston drill with a 12 mm sds bit. Drill 3 holes, 50 mm apart in a triangle. Drill straight down to 25 mm, then turn the drill at an 45 degree angle and continue drilling for about 75 mm depending on the slab thickness, outwards from the center. Don’t worry if you penetrate the roof, although best not. For each support get 3 off 12 mm diameter deformed reinforcing bars about 300 mm long. Mark each bar say 90 mm with chalk so that you know how far the bar is into the slab. With a sledge hammer belt each bar into the slab. Get a piece of pipe and straighten up the bars so that they sit vertically. Hose and clean the area around the bars.
Make a plywood box, 4 sides about 300 x 300 and place over the bars. Use bags of premix concrete, not too wet, and pour it into the box, then insert your chosen bolts with washers into the wet concrete. The bolts must lap with the deformed bars for at least 150 mm, so you might have to use 200 mm long bolts. Stainless steel rods cut to required lengths is what I use. I have mistakenly drilled too deep a couple of times, but definitely no water ingress since the concrete box area seals the roof completely. As for the bolt sizes you use, I guess 10 or 12 mm dia. If they are long enough and positioned correctly, then you will be ripping the panels to pieces before you will rip off the anchored deformed bars from the slab. The panels being 300 mm above the slab equals more ventilation. If you vary the box heights from say 200 mm to 1200 mm you can have your panels sitting on an angle, nice and clean when raining or snowing.
Cheers,
John Nielsen, Silkwood
Hi Ronald
Any ideas about mounting an A frame for solar panels on an older concrete water tank for the house ? The gal roof needs replacing. Its about 7 meters in diameter
Cheers
Linden
Greendale
Hi Linden
Provided the tank can hold the weight, the easiest solution might be to use no penetration mounts that hold the panels at an angle of 10 degrees and just rely on the weight of the mounts to hold them in place in storms. While these can’t be used in cyclone prone areas they should be fine for Greendale.
If you need a lighter solution then you could use frames that penetrate into the concrete to hold them in place, but there is a good chance this won’t be suitable for the tank.
Hi Ronald,
I know that pv panels side by side have a clearance of the clamp between them. I have two rows of panels, should there be clearance between the rows?
Thanks
Gary
Hi Gary
Yes, there should be a gap between rows. Requiring a gap allows for thermal expansion of the panels, but mainly it helps air to circulate and reduces the temperature of the panels. From memory, I believe it should be at least 1cm.
Hi Ronald,
Thanks for the information, this site is very informative. I also have another silly question, Can the Enphase micro inverters be mounted on either rail in a row? The manual does not say and all of the videos and photos have them on the top rail.
Thanks
Gary
Hi Ronald,
I’m currently sourcing PV panels and I’d like to purchase durable ones; ones that will hold up well in a cyclone. However, after reviewing many data sheets I’ve noticed most panels have Stress Test/Wind Load rating of only 2400 Pa, for the rear of the panel, while the Snow/Front Loads tend to be 5400 Pa.
As you mentioned, not every location has to worry about snow. So, I was wondering if I purchased one of these ‘baseline’ PV panels, installed them in ‘landscape’ configuration adding an extra rail along the center of the longer side with clamp downs, could I achieve a Wind Load rating of say 3600 Pa or higher?
Thanks in advance.
Firstly I’d suggest looking at Winaico panels as they say they can withstand 3,600 Pa from the rear in tests. They may also be other panels that do well.
An extra rail with extra clamps would help hold the panel down, but it is going to complicate the installation and add to the cost. You may want to consider if you would be better off keeping the extra expense and putting it towards replacing panels if you need to. Keep in mind that in a really bad cyclone you may lose your roof and then it won’t matter how securely the solar panels are attached.
My NEO 360w from Taiwan are 5400Pa. Form factor is the key. Mine are 40mm. I need in USA because of snow 120psf (5700Pa). Wind is only 110mph (177kps). I am considering a 3rd center rail. for the bottom row because of snow piling. I’m planning on L/8 and L/2 for spacing. I can’t get a good answer for optimal rail spacing for the rest of them but shooting for L/5 for the 2 rail rows. (L/5 means having the rails at 20 and 80% of the long length with 60% exposed in the center. Mine are huge 72 cell 77″ (196cm) long.
Thanks for your advice. I’ll check out those Winaico panels.
Solar panels were recently installed on the family home .
The railings fixed to the roof that the panels are fixed to , protrude at least i foot at teh bottom of the panels, and to some extent on the top of the panels at the top of the roof. This looks very untidy. The house is also in a heritage area.
I have told the suppliers that i am not happy and was not consulted when teh panesl were mounted.
Has anyone had this issue and what can be done to resolve it. The supplier says there is nothing they can do, and I dont want them moved as holes will be left in the iron roof
Hi Teresa
If there is no roof attachment on the rail that is sticking out, that is, there is nothing connecting that part of the railing to the roof, then there should be no reason why most of the excess railing can’t be cut off. The installer saying nothing can be done sounds like they don’t want to bother sending someone up onto the roof. If you wish, you may want to contact consumer affairs and get advice on how best to proceed.
Anyone had experience mounting panels to a corrugated iron roof with cyclone tie downs that sit around 100mm above the roof surface? (C sections that look 5 or 8 mm thick)
Trying to work out a way to mount panels that doesn’t require the removal of the tie down angle irons. The existing solar hot water panel was simply bolted on the top of the rail. But for solar pabels that would have the top of the panel sitting more than 100mm above the roof.
Any ideas?
I’m no installer, but 10 cm clearance between panels and roof seems good to me. Not only does it allow cooling air to flow under, it ought to be enough to avoid accumulation of flammable leaves and twigs underneath. But what is the debris accumulation effect of the rails?
Your installer ought to know the extra panel clamping and set-backs required for your area.
I don’t know whether one of the newer panels with high wind load rating is advisable when a bit more wind can get under the panel.
The clamping zones on the panels relate to different hold-down force limits, with zone-1 at around 3500N and adjacent to that about 2400N (for Canadian Solar). I have been looking for hold-down force requirements but could not find any relevant, official documents.