

This is the story of Mathias Boer-Mah, a self-confessed tinkerer, energy nerd and SolarEdge Home Battery owner. Mathias wanted more control of his battery than SolarEdge could provide, so he hooked up his SolarEdge inverter to a free open-source software application for home automation. Through this, he can now:
- control the battery charge/ discharge
- automatically curtail his solar
- import and export electricity according to spot prices and forecasts from his electricity retailer Amber
- turn on and off high-energy devices in his house automatically to use surplus solar energy.
Pretty impressive stuff for a DIY solution.
Before we go any further, a round of applause for Mathias, please.

Mathias first came to SolarQuotes’ attention when he posted a comment on a review of the SolarEdge Home Battery by SQ blogger Ronald in September this year.
Both the SolarEdge Home Battery and the Energy Hub inverter can be controlled by the mySolarEdge mobile app. However, more than a handful of owners and potential buyers have commented about one aspect of the app that leaves much to be desired – the lack of customer access to some basic functionality.
For example, as in most home battery systems, the level of reserved energy can be set in case of a blackout. With the SolarEdge Home Battery, you must contact the installer to change the setting. This is SolarEdge putting the installer before the end consumer. Not good.
Mathias says contrary to popular belief, the mySolarEdge app can actually do this without having to contact the installer1. It’s just a bit harder for the average battery owner to interrogate the inverter. He, however, has gone a different route.
Mathias’ Home Assistant Journey
Mathias had been using ‘Home Assistant‘ for about six years, doing things such as automating his lights to switch on when he gets home, and switch off when he leaves. He already knew it would be possible to integrate a SolarEdge inverter with Home Assistant, so when he bought his home battery, he gave it a try.
It took some time to get SolarEdge and Home Assistant to talk because it’s not plug-and-play, but worth the effort he says:
“because the functionality is amazing, and so much better than the mySolarEdge app. It’s chalk and cheese really.”
As you can guess, Mathias works in IT, so he is familiar with this stuff. He has previously been leading an applications support team doing, among other things, low code programming that he describes as “drag and drop stuff; similar to the way Home Assistant works.”
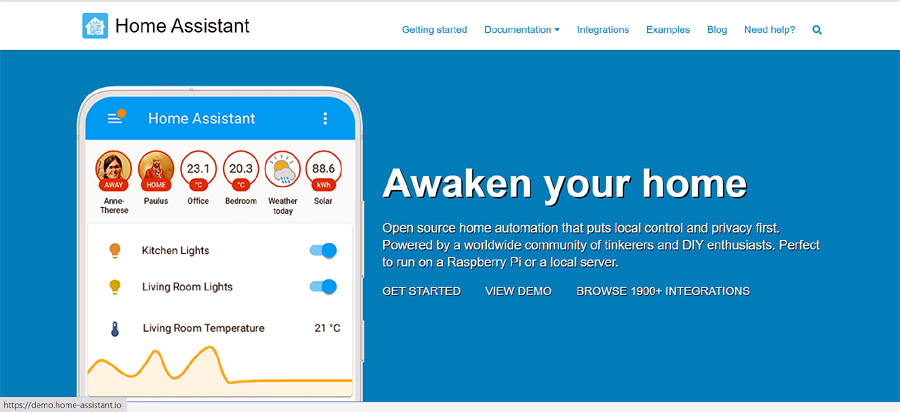
Home Assistant webpage. Image: Home Assistant
What About The Average Joe?
So, is this something the average Joe can set up, or do you need programming or coding experience? I suspect it would help, although Mathias is a bit more optimistic.
“You don’t necessarily need programming or coding experience to do what I’ve done. All the tools in Home Assistant are pre-made tools to interrogate SolarEdge. Someone else has already made them because it’s free open-source software, which is being developed constantly by a community of software developers.”
“Home Assistant is the second most active Python project on GitHub. There are thousands of people using it, and they’re not all programmers. The fact that it has a lot of inbuilt automation that can pick up your smart appliances without any coding necessary, allows anyone to get into it, and build as they go.”
This Is How You Do It
Mathias says, “it’s not that complicated”. I don’t believe him. To me, Mathais is a God. I’ll attempt to explain.
Plug It In
The first rule of troubleshooting is “Is it plugged in?” followed closely by “Is it turned on?” So that seems like an appropriate place to start.
Mathias has his Home Assistant installed on a dedicated small form factor HP desktop computer. It runs 24/7 and is pretty efficient. He used to run it on a Raspberry Pi, which is far more efficient but prone to crashing.
“When the computer goes down, so too does the approval rating with my girlfriend.”
In this case, it seems that a stable computer equals a stable relationship. Moving on.
The Home Assistant PC is connected via an Ethernet cable to a router and then either by WiFi or Ethernet to the inverter and smart devices. Other smart appliances connect wirelessly via the Zigbee USB dongle in the computer.
SolarEdge initially had Modbus over Wifi. Modbus is the communication protocol that talks to the inverter. Then they blocked it, so you had to go through Ethernet. Now they’ve unblocked it, so you can use WiFi again. Mathias has kept his Ethernet connection because it’s more stable, and as we know, stability is important for Mathias.
Side note – To use WiFi, you need to set it up on the inverter.
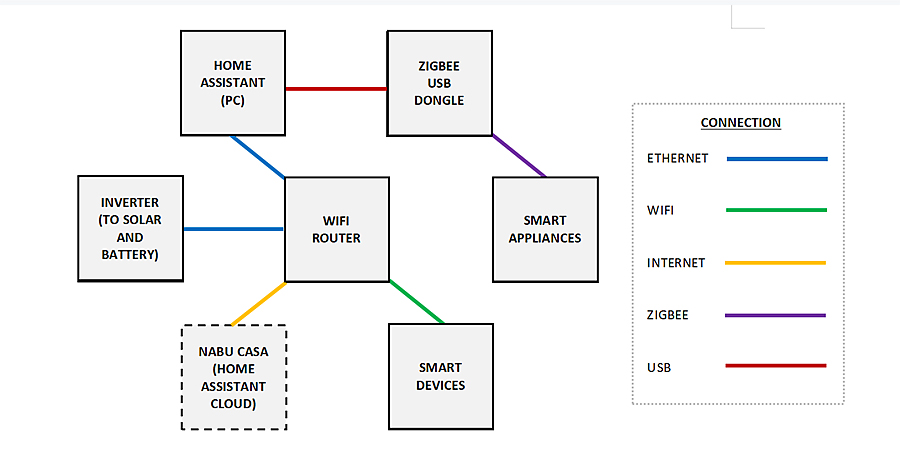
Mathias’ LAN connection diagram. Image: SolarQuotes
Turn It On
Home Assistant is the base system. It’s very smart, and once installed will pick up most of the smart devices in your house automatically – things such as smart lights, electric toothbrushes, etc. It even tells you how long you cleaned your teeth and how much pressure you used. Very useful stuff.
From there, you can access a bunch of plugins and start building. For example, you could install the SolarEdge communication tool, which will access information from the inverter. Mathias says he only uses a small fraction of it – if the battery is charging, what percentage it is, etc.
He says:
“It has tons of other stuff like the electrical waves and stuff I don’t understand.” (Oh no, maybe he’s not a God after all.) “After that, you just create automations using low code plugins which create triggers such as time of day, battery charge, export blocking when prices are negative, etc.”
Home Assistant Automation Overview
Although the automations may look complicated, they are built piece by piece with three simple stages called Triggers, Conditions, and Actions. Start by creating an automation either from scratch by using an empty automation, or using a blueprint from a drop-down menu, which is something that another user has pre-built. From there, you start creating relevant Triggers, Conditions, and Actions.
You might, for example, select Trigger Device, and create a trigger for when the pool solar pump is turned on or off. The resulting action in this mock example below is to play some music from the media player.
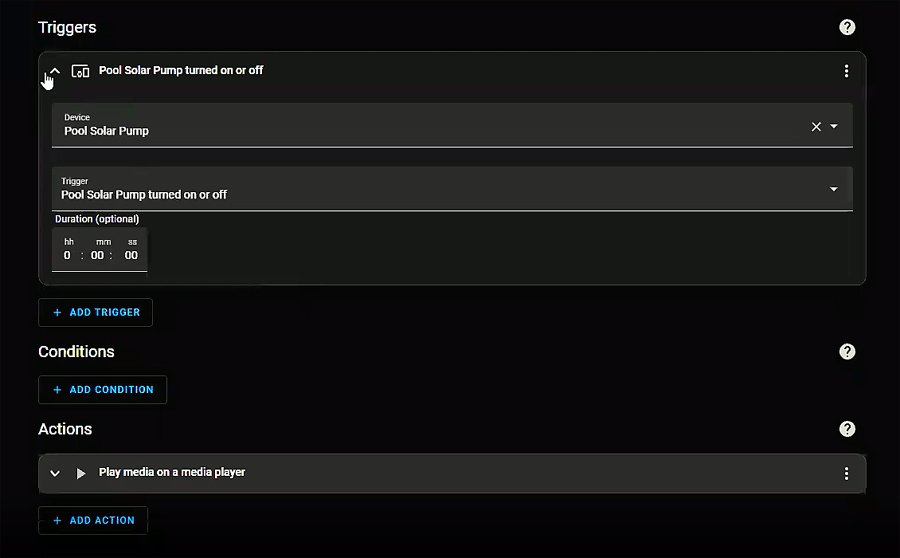
Mock example of pool solar pump triggers and actions. Image: Mathias Boer-Mah
The diagram below shows some Triggers, Conditions, and Actions Mathias has set up for his battery to respond to based on import/ export electricity price and excess solar.
Example 1
If the electricity import price is above 60c/kWh (Trigger), and the battery level is above 20% (Condition), turn off all air conditioners and pool pump (Action).
Example 2
If the electricity import price is less than 0c/kWh (Trigger), and the battery level is less than 100% (Condition), charge the battery from the grid (Action).
Example 3
If the electricity export price is greater than $10/kWh (Trigger), and the battery level is greater than 20% (Condition), export the battery to the grid (Action).
Example 4
If the excess solar power is more than 1200W (Trigger), and house temperature is less than 17 degrees (Condition), turn on AC1 to heat (Action).
Example 5
If the excess solar power is more than 1200W (Trigger), and house temperature is above 26 degrees (Condition), turn on AC1 to cool (Action).
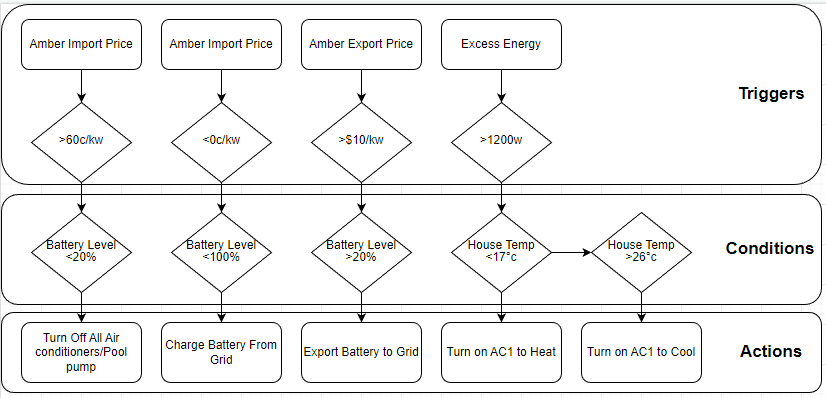
Home Assistant Triggers, Conditions, Actions custom flowchart. Image: Mathias Boer-Mah
Export Limiting With SolarEdge And Home Assistant
Mathias showed me a dashboard he set up on Home Assistant to monitor everything. At the time, his solar power system was producing 1.6 kW, which was the same as his home was simultaneously consuming. The reason was that he’d triggered export limitation.
To find out how much power was being curtailed due to the export limit, he had set up another action disabling the export limit for five seconds, recording the exported power, and then re-enabling the export limit. This showed how much power was being curtailed at that time. His custom-made live dashboard showed 2.714kW of curtailed power at that time.
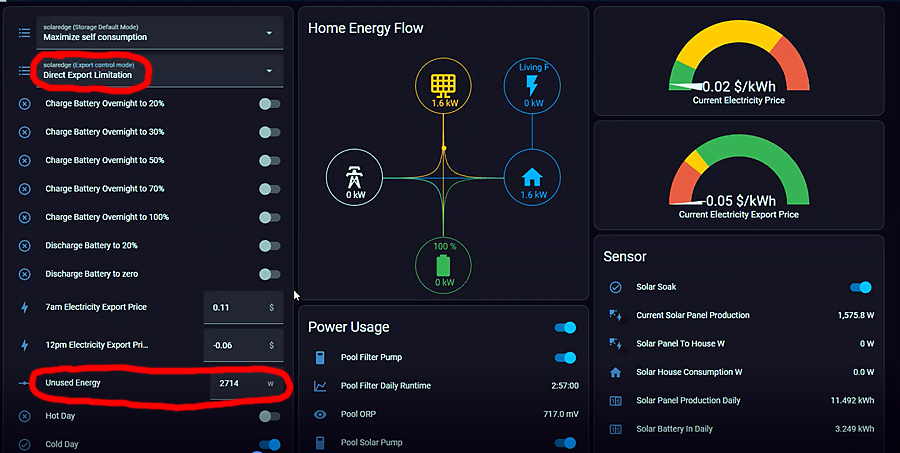
Home Assistant custom dashboard showing unused solar power during export limiting. Image: Mathias Boer-Mah
Mathias plans to use more of his excess solar energy by installing a heat pump hot water system and replacing the gas stove with an induction cooktop. He has already started the process of streamlining his power use, by automating the air conditioner.
For example, in winter, if the house is cold when the sun is out, and the solar panels are producing excess power, all the air conditioners are turned on to absorb the energy and heat the house.
It started as an experiment to see if the house could absorb the heat during the day, and then later release that heat and so eliminate the need to run the air conditioner during peak periods.
And yes, Mathias says it works quite well.
Energy Savings
I asked Mathias, “So this whole set-up, apart from being an obsession and a lot of nerdy fun, has it actually saved or made you money?”
“Yes. I’ll show you the progression of bills I’ve got from Amber. The Amber web app shows your everyday usage but doesn’t show the true bill amount. It doesn’t take into account the $15/ month charge plus poles and wires, which is about $1/ day.”
So naturally, Mathias has put the extra charges into Home Assistant so he can monitor his true expenses and know exactly what his next power bill will likely be.
See the bills below; starting low on April 22 and then getting quite high in May due to heating costs. The solar/ battery system was installed at the end of June and the bills started going down from there. The 10 kWh battery is charged from 11.5 kW of solar panels.
“I had a great month of -$45 in August. Since then have had fairly minor bills but still using the credit from August so no bill yet!”
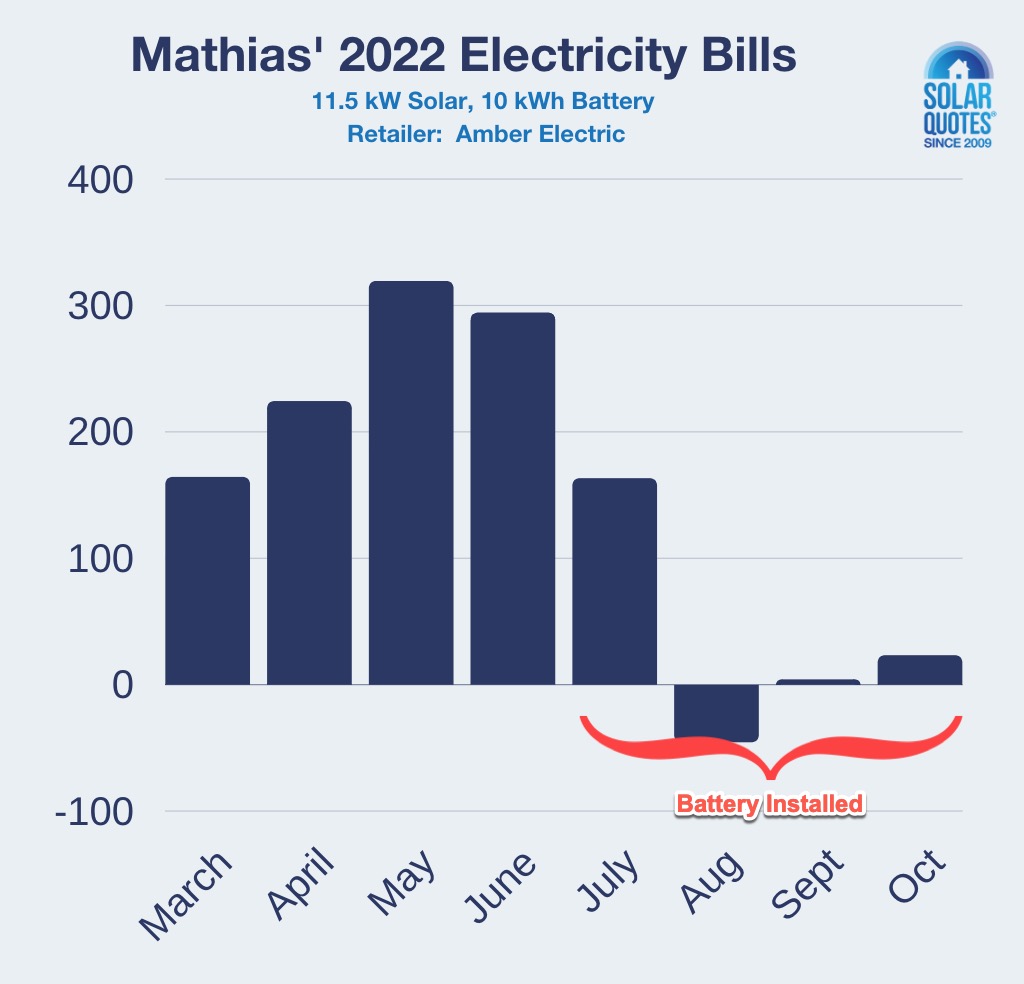
Mathias’ electricity bills. March – Oct 2022: $164, $224, $319, $294 | Battery Installed | $163, $-45, $4, $23
I asked Mathias, “Does your Home Assistant set-up do more than Amber Smartshift VPP offers in their plan, or is it the same thing, just replicated?”
“It is and it isn’t. The reason I haven’t gone with Amber Smartshift is that it isn’t holistic enough for me. They will charge your battery when the price is negative, and they will export from your battery when the export price is high, but not the rest.”
He says Amber Smartshift is revolutionary. It’s OK for a normal person who isn’t obsessed like him.
It’s Not All About The Money
“My methodology behind the power management is not only financially based but also environmentally based. I want to decrease my energy footprint and reduce carbon emissions. Also, there is an excess of solar energy produced by my array, so would like to convert the existing gas appliances to electricity and soak up the excess energy.”
Mathias’ Future Aspirations
Mathias plans to:
- replace the gas stovetop and water heater with an induction stovetop
- heat pump water heater,
- completely disconnect the gas.
- add a pool heat pump to absorb excess energy.
- replace all windows with energy-efficient double glazing.
- buy an EV when the prices come down and V2G (Vehicle to Grid) technology is more widespread.
Tech Specs: Mathias’ Solar, Battery And Automation System
Solar/ Battery:
- 11.5 kW Canadian Solar panels with SolarEdge Power Optimizers
- 5 kW SolarEdge SE5000H inverter
- SolarEdge Home Battery
- SolarEdge Home Backup Interface
Automated Devices:
- SolarEdge Inverter
- Solar Edge Battery
- Pool Pump
- Pool Solar Pump
- 3 x Samsung Windfree Air Conditioners
- Assortment of LIFX bulbs, IKEA Tradfri bulbs, switches, and SONOFF Plugs
Hardware:
- HP desktop computer
- WiFi router
- Zigbee USB dongle
Software:
- Home Assistant (open source automation)
- SolarEdge Modbus control
- Amber API plugin for Home Assistant
Home Assistant Energy Management Dashboards:
- Energy Distribution
- Solar Production
- Energy Usage
- Custom Home Energy Flow
The statistics are collected every 5 seconds from the inverter through Modbus.
Available Controls For SolarEdge:
- Export Limiting
- Charge Battery from Grid
- Charge Battery from Solar
- Export Battery to Grid
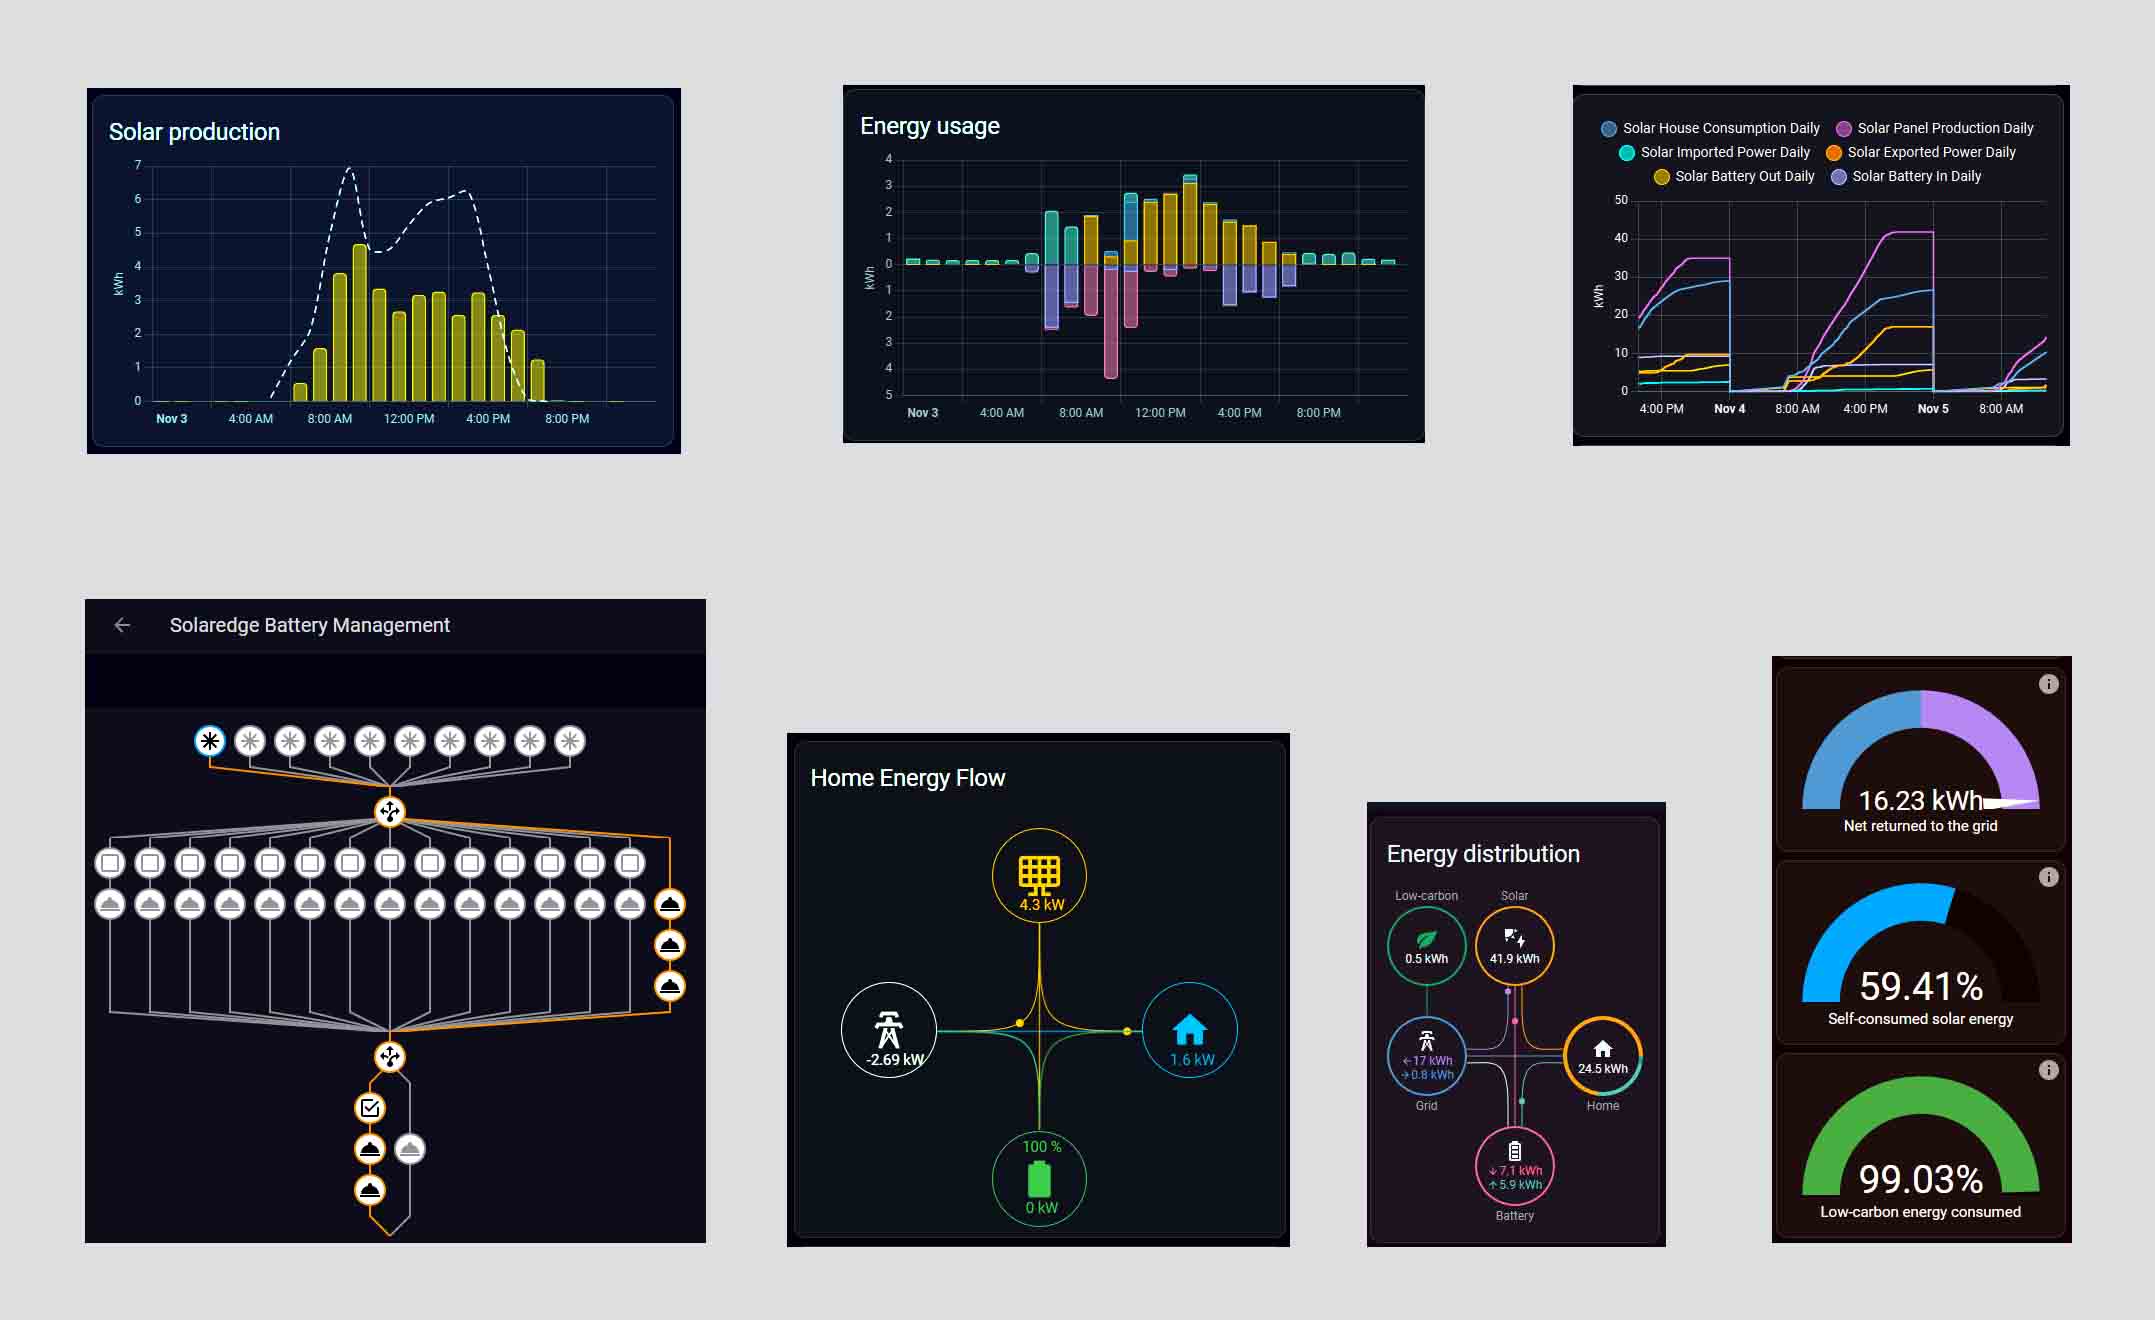
More of Mathias’ custom Home Assistant dashboards, just because they’re so awesome. Image: Mathias Boer-Mah
Footnotes
- In the app, if you click on inverter communication or inverter status, it will get you to scan the code on the side of the inverter, and that will let you into SetApp, which is what the installers use. So it’s not locked. You just have to know what you’re doing. ↩
 RSS - Posts


What a great article, thanks. Your blog warned us years ago that battery owners needed to be careful of what’s in their contracts. I’ll be installing between 20 and 30 kWh of battery with a Selectronic charger/inverter and islanding capability to supplement our 8 KW solar installation. The cost? Heaps, but I’m anticipating the blackouts over the next few years her in suburban Melbourne. I guess I say I’m doing it because I can. And I’m not sharing kWh 1.0 from it.
Out of interest what are your typical summer & winter daily kWhs consumed in total (self-generated & from grid)? Equally what are your typical daily exports to the grid in summer/winter?
Sorry to take so long to answer, I’m a bit overloaded with love jobs ( electrical and administration) at the moment. I’m supposed to be retired. Maybe next year?
I too an considering the Selectronic path because we have way too many blackouts, and it is close to the only thing that can tick my requirements which is all around good blackout support. To do that, I need to be able to run my enphase solar in a blackout, support 3 phase and have some sort of backup generator support. This combination seems to limit other battery solutions.
The downside is expense, as these are expensive, especially by the time you get 3 to support 3 phase. But my other concern with Selectronic is I want to path forward to VPP or Amber type abitrage. And I am not sure how accessible that is. I suspect it won’t be 1st in line to get support from VPPs. So my fallback was something like Amber and integration with Home Assistant. But at this stage it is far from clear how easy that will be, as there does not appear to be well developed integrations for Home Assistant yet.
I would be interested if anyone has insights.
I can’t help you with any words of wisdom but I went to the Selectronics day courses, one on design, the other on installation and testing. Not so I can do it but I don’t want to keep asking dumb questions of my solar guy who will be putting it in for me. I didn’t do their maintenance module, maybe later. I recommend that to anyone with a serious interest in getting it right when trying to establish islanding capability for extended blackouts. RAM asked about my consumption, generation and export (above). I did the vital numbers (kW, kWh, backup capacity from an ultra-quieted diesel set) a while back but will be revising them as I want to install 10 amp GPOs on each side of my block for the neighbours. Each will be monitored and have its own ELCBO.
Got Solaredge inverter + Sonen Battery (with inverter) + EV. Any advise of how I can automate to control when/how I charge my EV most efficiently?
e.g. when battery is full etc?
Try a Zappi EV charger. If you use the ECO++ mode it only charges off excess solar
Can you give any updates especially with regards to your experience with Selectronic? I too am interested in blackout protection and can’t see value in sitting in the dark with thousands of dollars worth of Solar…especially since Energex in QLD can not only disconnect me from the grid, not unreasonable I don’t want to fry their guys down the road, but also shut down my system, at best forcing me to install a battery which I then can’t recharge…
fantastic effort Mathias, and thank you very much for sharing your solutions and perspectives, much appreciated (and Kim for aiding the cause) cheers all, regards Mark
Great article. Thanks.
I’m already using much of this including home assistant with the modbus TCP interface sans battery.
One of my SolarEdge inverters has the ev charger and I’ve not found a way to enable and disable that load except via the phone app. Any ideas about that?
Good stuff, really well done.
I am able to control the backup reserve on my SE battery installed a couple of weeks ago, though it’s the only thing I can do. I can choose the percentage and a time period it is valid for.
I know there are a lot of settings that most customers are locked out of for some reason. You can see them with this guy how installed the battery himself, which I posted in another SE thread.
https://youtu.be/FAvIb4Oti5k?t=2
Not sure why we get locked out of them.
This is super cool! I bought a solar edge because i was worried about the security risk of the Hauwei inverters, but now there’s another reason to buy one!!! Mathias is a solar rockstar.
So does this only work on the newer screenless versions, or can it now be enabled on wifi on the older SolarEdge inverters with a screen?
I believe this functionality is available on both the newer and older SolarEdge inverters, you may need a firmware update for the wifi access. 4.16.23 or better.
Hmm. I’ll have to check version number this weekend. It’s not exposed on the website.
It’s not available on wifi – only on Ethernet – on the older Solaredge inverters.
Great article and shows how having an opensource controller looking after all the bespoke systems and data from APIs can be brought together to something for the household.
Have a look at the Energy Management for Home Assistant (EMHASS) add-on to create an optimised schedule for all your household devices.
For those of you with the technical inclination, and a sensible use case, Home Assistant is absolutely briliant. Lots of vendors have their own smart home platforms (which potentially make it easier). But Home Assistant to me looks to be the most widely supported platform that will bring all this smart home stuff together and enable you to integrate stuff no matter what vendor it comes from.
I have used it to do a range of things. In terms of energy savings, my biggest hits have come from :-
1. Configuring it to fully automate the Tesla Model 3 charging. Just come home, plug it in, and it will automatically charge from the most effective power source. The biggest improvement comes from the fact that during the day, Home Assistant is constantly monitoring my grid connection, and it will configure the Tesla charging to only use excess solar. So it ramps up and down to soak up the excess solar and nothing more. For those of you interested, see the post on Nov 14 2022 at the following URL which outlines that in more detail :-
https://community.home-assistant.io/t/optimizing-use-of-unused-solar-power-to-charge-a-tesla/340818/146
The automations also do other things like enable a min charge threshold to be set, which turns the charger on a night during cheaper off peak times to make sure we are charged each night to a minium and adjustable threshold. Home Assistant also has integrations for things like solar forcasting tools, so what is possible in your automations is very powerful.
2. I also automate the Pool pump. So it only comes on when there is excess solar, and turns off when it goes away. So again, that big load is all done with solar (or mostly).
When I get a battery, using it to duplicate what Mathias has done is a no brainer.
I would not recommend Home Assistant unless you are somewhat IT literate. But it is not rocket science either, and if you have perserverance and a willingness to learn as you go, you don’t need to be a programmer either.
I’ve been running Home Assistant (HA) on an RPi4 for over a year now and I am far from a tech head. I have both grid-tied 11 kW Fronius PV system and 2.2 kW off-grid system integrated with HA (via Solar Assistant’s MQTT).
Battery charging during the day is controlled based on a variety of inputs, including Solcast’s PV forecast HA integration to assess whether the off-grid array will have sufficient production to complete the job or it needs supplemental charging from the grid PV array. Since off-grid production is “use it or lose it” it’s preferable to soak up that production capacity before tapping the grid PV system.
The system manages when the house runs using the grid-tied PV (daytime mostly) or the off-grid battery and solar PV (night time mostly).
Automations controlling both loads and inverter’s mode of operation account for things like amount of excess solar PV (or if there are grid imports), solar PV production forecasts, battery state of charge, time of day, TOU tariff periods, offsets to sunrise and sunset etc.
I even have a “Storm Mode” in HA which has two levels of operation – but basically the idea is to preferentially charge up the battery in anticipation of an outage (we get regular outages here).
My HA pool pump automation adjusts pump duty cycle with the duration depending on available excess solar capacity, offsets to sunrise and sunset and availability of excess solar PV capacity (duty cycle gets longer for Summer, shorter for Winter) and if the day is overcast/rainy it doesn’t need to run for as long (with min and max durations).
Have other automations for aircon, one is used mostly for dehumidification and I use the Home Assistant Sensibo integration to control the split system based on humidity levels.
System also automatically sends alerts to my phone if there is a grid outage and when grid power has been restored.
And the excellent Energy tab combines all the data, including individual appliances.
A great article, will be of interest down the track as we have 10 kW of panels with SE optimisers and a 10 kW SE inverter and are looking to get an EV and battery when prices come down (and when SE batteries have a bit more of a track record).
Kim – the title of this article implies that Home Assistant is a SE product, is that the case?
Craig, Michael here – re: the title – no, it isn’t. Thanks for your feedback – we’ve made a small adjustment to the title to clarify.
As I have said on other posts, I am using Home Assistant. I have yet to automate much (Time restraints, even tho I am retired!)
I set the Home Assistant server up with the OCPP module to run & control my OCPP compliant, ZJBeny EV charger. This charger worked straight away with Home Assistant. Fyi, OCPP is a charger communication protocol standard that allows compliant chargers to be controlled by a central database, either a central server such as ChargeHQ, or in my case a local Home Assistant server. I also run the Adguard accessory that blocks malicious or annoying websites for my network. 1 computer, 2 jobs!)
Mathias,
Going electric is worthwhile. I have used an Ikea Cooktop (The one with the linked big pot elements.) For hot water, if you have an excess of PV, consider plain old storage HWS: You can ´distribute´ the tanks so the pipe runs are short: (eg a 150L for the bathroom, then another say 80L for Kitchen & laundry.) I changed the elements to 1800W or 2400W , then use a timeswitch with a Contactor to turn the HWS on at abt 10am, then off at 14:00. The odd overcast day might cost, but the simplicity saves money. I am not a fan of Heat pumps due to cost & complexity. Also an extra 1Kw or so of solar panels would balance most households hot water usage.
This is my current solution too – Fronius inverter programmed internally to turn the HWS element on via a relay when a pre-set level of solar generation has been achieved. It works very well but lacks the smarts that HA would add (ie integrating HWS and pool pump intelligently).
Home Assistant is NOT anything to do with SE. It is an open source project developed to enable a nice platform to integrate just about anything. So someone (may or may not be thing to do with SE) has developed some sort of integration to enable SE to be used in HE.
Anything that has any sort of interface to the outside world can and in a lot of cases probably has been integrated into HA as there is a massive support base. And the nature of the interface, is that is is easy enough for end users to make useful contibutions to get new things integrated, even if they are not programmers. If you put into google, “Home Assistant XYZ Device” there is a fair chance someone has developed and good integration, or instructions for doing so, or someone is working on it.
The power of this product, is it creates the glue/interfaces/common automation platform etc to join everything together. Hypothetically while SE (or anyone else) might develop their own home automation platform, and that might work well with say your SE solar inverter and battery and the limited number of appliciances they get around to making, it does not neccessarily enable you to easily link this in with turning your AC on when you have spare solar. That is where HA fits in. Because it has such wide support for all sorts of protocols for all sorts of vendors it allows you to easily integrate rules for a wide range of devices. To give you a rough idea, my HA includes devices from Tesla, Enphase, Actron, Ecowitt, Tuya, Inkbird, Logitech, LG, Samsung, Apple, Zigbee stuff, bluetooth stuff, Sonos, Google, Solar Cast, Epson, MPP Solar hybrid inverter via MQTT etc. Most of this stuff was brought before I was considering home automation, but it turns out it works. All of these things can be joined togethers as a source of information to drive other automations, or a device that can be automated. If you are in a vendor specific echo system, or are often constrained by that.
Wow. After reading this I installed a virtual machine under Hyper-V on my Windows PC, installed HomeAssistant on the VM, and bingo, it recognised my Fronius Primo inverter and began collecting information from it. Sadly I don’t have a solar battery so my control options are limited…
Really interested to try improving my existing clunky HWS element control (which is turned on by a relay controlled by the Fronius, when the power output is over a set level). I wonder whether the inverter is able to supply the output relay’s state to HomeAssistant?
I presume HomeAssistant could also activate a wifi-based 240v switch for the pool pump… Exciting!
Lots of options for this (clunky hws control). Hopefully there is a knob (Google Fronius xxxx home assistant). If not, move the hws to another device. I use Tuya devices for both plugged in and wired in control of devices usually brought from Aliexpress were this is a big range of options for cheap prices. My pool is automated with sub $15 standard 10a plug. I would get these switch with meters so you get a little more info which can be useful (ie when he’s turns off etc). I have brought a Tominz Hiking Tuya meter for my HWS. I use Iammeters for my grid connection meter as they are cheap enough, fast with modbus integration (1 sec read interval) and accurate. But your Fronius might or might not already provide you with this, so that will be the easiest place to start. But as said, the advantage of HA, is most smart devices probably has an integration, so will likely integrate, so plenty of options and lots of documentation and active community so you can buy with reasonable comfort you are buying something that will work.
Thanks Matthew, I see what you mean. Overnight I thought about it some more and realised that the Fronius inverter relay I’m using is a “dry” switch; that is, it is simply a set of contacts. There is a 12v supply in the switchboard that passes through the “dry” contact in the inverter and back to a relay to control the HWS element.
So in fact, all I need to do is take the LV twin cable from the inverter dry contact and connect to (for example) a zigbee controlled relay and I’ve in one step done taken the inverter out of the equation and enabled control by HA.
First thing I’ll do is establish some zigbee infrastructure with some test devices to experiment with, then finally take the big step of wresting control of the HWS relay from the Fronius inverter and replacing with a zigbee relay.
My only word of caution with HA automations is for key devices to have a fall back standard operating mode they default to for when HA fails, for whatever reason (e.g. network issues, hardware issues etc).
You do not, for instance, want your hot water to not be heated if HA is offline for some reason and the automation to start heating has failed to trigger.
My stuff works most of the time and it’s great. But when it doesn’t it can be incredibly frustrating to resolve.
I fully concur with Alex’s comments on having some form of “manual over-ride”. Other considerations include:
– maintaining supply to whatever device(s) that your HA software and networking gear is running on, or at least design the system to “fail safe” in the event of power or other failures;
– select devices that do not rely on the internet for operation. For example many Tuya devices rely via cloud servers unless “hacked” to operate directly on the local network
– test your systems regularly, including “black starts” (ie turn off your normal source of supply then restore some time later). You’d be surprised what “bugs” (oversights!) you’ll discover in the process!! Whilst this may inconvenience members of your household, it’s better to do this when you’re prepared than to discover issues when it really happens!
My advice is to use TP Link Kasa Slimline WiFi plugs. They’re the ones that I found the easiest to set up. They are $30 on Amazon. TP Link Tapo are cheaper but I haven’t been able to set them up with HA yet. Some people have had success but it’s a complicated set up process.
I have Home Assistant running on a PC in my shed, constantly monitoring all my home energy data from the Fronius Inverter and Smart Meter. Through winter it will kick on the heater if it’s exporting energy above 1000w and as soon as export drops to +50w or less, it turns off the heater.
This means when clouds roll over or when you turn on the kettle, the heater is constantly changing state from off to on and back. I would be less inclined to do that with an AC unit, but a resistive heater or a fan is a no brainer.
I was also able to use Home Assistant’s data logging to interrogate phantom loads and you can identify when the fridge runs through the night, and get a really good handle on your appliances. From there, I was able to tweak my HWS heat pump settings to turn on between certain times only. Once you know how much power it draws, you can determine what time of the day the solar is usually generating that. And each month tweak it a little earlier or later depending on the season.
Home assistant is great and I’ve only barely scratched the surface.
Re your note –
“In the app, if you click on inverter communication or inverter status, it will get you to scan the code on the side of the inverter, and that will let you into SetApp, which is what the installers use. So it’s not locked. You just have to know what you’re doing. ↩”
My installer did this numerous times and it was still limited to 72 hours.
The only way to indefinitely change is to contact SE Support.
Thanks for the update Richard.
Fantastic article! A very practical guide to making your energy usage smarter using Amber wholesale pricing model. I have a similar setup working at my house except that I do not have a battery (only solar).
My Home Assistant rules control my heated concrete floor and Mitsubishi split cycle A/C, and I have a heat pump for hot water. I have one Home Assistant helper which checks how much it will cost to turn on my heated floor based on Amber wholesale prices and my current inverter energy production and consumption data. If the cost is less than a certain cost rate (cents / hour) then the helper turns on and triggers the rest of my rules based on other conditions such as temperature.
All my rules are based on $$$, so if I can bring the house to temperature for less than a certain cost rate (cents / hour) then I switch them on. If I can SAVE more than that same threshold I turn them off.
For me, what this has meant for my energy usage for November so far is:
Total home energy usage (including solar): 968kWh
Total energy cost: $61.37
Average cost / kWh: 6.3c/kWh
Total solar exports: 351kWh
Total energy credits: $11.40
Average price / kWh: 3.2c/kWh
So, I use a LOT of energy, but it doesn’t cost very much and my house is always warm and my water is always hot. I also end up exporting only when it’s worth it.
There is so much cheap renewable energy on the grid at the moment that scheduling devices to use it is both cost effective as well as building demand for more renewables projects. It also is a great motivator to go completely electric. Bring on V2G!
It’s also worth noting that Amber SmartShift is actually a lot smarter than a set of business rules and indeed optimises charge/discharge cycles of the battery based on your energy usage patterns, solar forecasts and wholesale energy price forecasts. These two approaches can work hand in hand.
Great work, would you care to share your automations?
I have most household devices (Pool, EV, Air Conditioning, Hot Water) scheduling off Amber Prices and solar production.
My automation scripts are available here:
https://community.home-assistant.io/t/running-devices-when-energy-is-cheaper-and-greener/380011?u=markpurcell
Essentially when energy is cheap and green I turn everything on and supercharge my batteries from the grid, when energy is expensive and dirty (Red) I turn everything off and export to the grid for accelerated benefits.
Amazing to read through what you’ve done Mark, especially regarding the dynamic Tesla charge rate. I’ve added a comment over on the HA community page and outlined my approach for those that are interested.
Does your home assistant hack allow the charge/discharge profile to be programmed? How doing so has allowed my 13.25 kW panels and 10 kW inverter to produce up to 15.2 kW as shown in the linked webpage
Great to read about all this Home Energy Management activity using Home Assistant. We are an all-electric household and have implemented the same/similar to Mathias. Like Matthew, I don’t have a household battery, but do have an EV. My #1 aim is to be “renewables grid” friendly by consuming more when energy is cheap/negative (grid and/or off my roof) and consuming less when expensive (fossil fueled); and minimise my energy costs.
My managed loads and generation respond to Amber general/FIT price signals. My controls include:
> Bosch Compress HP hot-water – using the solar-PV open/close contact control input.
> Hydronic HP heating – open/close contact control wire
> Thermostatic heating control over two zones – 240v water pump circulation on/off using Shelly 2.5
> Tesla M3 charging control via Tesla Custom API
> Fronius Primo generation curtailment via the digital I/O port control
I’ve also done a HA integration to Solar Analytics (see github) for energy monitoring. For anyone with some coding experience I recommend Node Red which allows more complex automations. Using Graphana and ESP32 in HA are also really cool.
I did the same thing except, I use element heater to heat up hot water when the sun is out, and no battery.
we pay about $20 per month and battery just doesn’t make sense now, the pay back is more than 10 years.
we consumed about 20kwh and export upto 20kwh a day
the initial cost is just the hot water tank $1500, solar setup $3000 and a lot of time spent configuring Home assistant.
This article sounded great but is lacking the detail of how you were able to access the commissioning controls that only installers have.
You mention SetApp but you have to be an installer to use that app. The only way to setup as an installer is have unused invertor serial number and distributor details, neither of which I have.
Great article. Thanks.
I’m already using much of this including home assistant with the modbus TCP interface sans battery.
One of my SolarEdge inverters has the ev charger and I’ve not found a way to enable and disable that load except via the phone app. Any ideas about that?
I suspect you have 2 choices to control the charging speed. 1) is if you can control the charge rate via the EV Charger, or 2) if you can do it via the car.
If you have a Tesla, then it is easy enough to control the charging speed via the Tesla integration in home assistant. See https://github.com/alandtse/tesla for details.
If it is not a Tesla, suggest doing google on “home assistant XXXXX” replacing XXXXX with searchs for both your EV model and charger (seperately as you really only need to control one of these).
If you just want to do things like only charging from excess solar, see the link to my automations in a post above for some good examples. That thread has all sorts of other ideas, and no doubt in time updates and improvements. It is specifically for Tesla, but most of the ideas would be usable for any model once you figure out what you can control. My way, gives me very fine control to keep any charging from the grid to an absolute minimum with the whole feedback loop I recon well less than 8 seconds. I can do this because my grid consumption meter is comparitively fast (1 reading a second) and the Tesla interface reasonable quick to change the charging speed (probably s couple of seconds), I have comparitively fine control. Obviously if you are only using a grid meter that only reads every 5 minutes or 15 minutes our worse, or you only have slower control of the charging speeds, the granularity of the results achieveable will be less.
Those posting here with the SE Home battery and the Backup box – what time frame does your inverter take in a blackout to revert to the battery supply?
When my system was first installed it was about 30 secs.
Tonight (Nov 30) we had a blackout and it took 2-3 mins before backup initiated. Disappointing slow to the point I didn’t think it was going to happen.
Home Assistant rules!
One piece of advice: when selecting hardware contact the supplier and ask if the have an api or home assistant integration.
HA is essentially a sensor and data collection platform that you can automate against. It’s a steep learning curve but you can get some handsome rewards if you invest the time. If looking some of the integrations and addons to have a look at:
Influxdb / graphana – time series data collection and grapging dashboard
Esphome – write custom firmware for the esp8266/esp32 microcontroller that integrates into HA. Replace cloud based firmware on many devices running this microprocessor with local. Sorry China!
Node red: visual programming of automations
Frigate: non cloud based object detection on security camera feeds. Fires events into HA that you can automate against
Just a tiny tip of the iceberg…
Thanks for the article. I’m now part of a solaredge automation group and learning .
One member uses HA to set their solaredge battery to not charge from the grid ,set the maximum discharge rate to 400W (all they need overnight for self consumption) then charge their ev at off peak rates. The battery doesn’t get depleted and the vehicle charges, then flip it all back to maximise self usage in the morning.
I’m thinking HA is going to allow me more flexibility than any smart inverters, batteries or charges.
Can now confirm that on older models with screens MODBUS/IP is only available still on wired Ethernet, not wifi.
Handy hint for those losing self-consumption data, you only need to adjust the reversed capacity variable. If it’s at 15% and you increase to 100%, it will then start importing from the grid. This is really handy if you’re on a time of use tariff.
E.g. at 4am charge to 30-40% to cover off the peak rate from 6am to solar kicking in. At 6am set back to 15% to let the juice flow out.
Battery used up by midnight and it’s a stinker overnight and all day tomorrow? Charge the battery to 100% from 1am to 6am so you’ve got cheap rate electric from 6am.
Cloudy day and battery not charging, increase to 100% at midday and back to 15% at 3pm to fill the battery with shoulder rate ready for the peak rate in late afternoon and evening.
@Fin and @Kim.
You really should be adding the Home Assistant facet any review/data about inverters and batteries you do.
More and more people are becoming disgusted with purchasing a home automation product, being forced to install 16 apps.
The amount of education I have to do with solar installers makes me wonder if they even know the product they’re selling.
Please, when reviewing a product (or even listing it in your data tables), list things like:
– what local data access methods exist
– what methods of local control exist
– does the product even have this? or will the consumer be forced to use a company hosted server to controll or access data about their purchase?
I agree that would be valuable information.
I’d also like to see the same for Heat Pump hot water. It’s my understanding these devices are supposed to support load shedding and access to this functionality would be a boon for solar owners seeking to intelligently maximise self consumption.
I would like to be able to view the yaml files of this integration of Mathias. This is exactly what I want to do with my own house.
Does anyone have experience communicating with SMA inverters via Modbus? I’d like to limit PV generation on a Sunny Boy 5000TL-21 when needed but I’m finding the SMA documentation is poor (or at best incomplete and inconsistent).
It also seems like reducing output is locked behind SMA’s Grid Guard Code which only licensed installers can get. I can however change it through the SMA web portal. I understand why other parameters are locked but not this one.
Any tips or previous experience appreciated.
Hi Andrew,
Those SMAs are pretty bulletproof units. I’m glad you’re working to keep them going.
I’m not familiar with controls for them however I know there was an interface called Sunny Web box.
You may find one via the used solar systems & parts page on Facebook?
Thanks Anthony. The inverter already feeds data to the SMA web portal which was my understanding of most of what WebBox did. I know that the current SMA Home Manager 2 product can limit output but that’s over $1200 + install which doesn’t make economic sense against current negative FITs (like with Amber elec plans). And I’m not sure it can be scripted.
I was hoping that someone reading this may have experience with direct Modbus control and I wouldn’t have to start from scratch. I’ve seen python libraries and Home Asst plugins for other inverters that do this but nothing for Sunny Boys.